Home Appliances / Range Hoods
Belling 100cm Dual Fuel Range Cooker User Guide
Comprehensive user guide for the Belling 100cm Dual Fuel range cooker, covering safety, installation, operation of the hob and ovens, maintenance, and troubleshooting.
Table of contents
Manual images
Jump to the sectionProduct Overview
The Belling 100cm Dual Fuel range cooker is a high-performance kitchen appliance designed for versatile cooking. It features a gas hob with multiple burner sizes and a multi-cavity electric oven system. This appliance is intended for domestic cooking purposes only and must be installed in a well-ventilated space by a competent person in accordance with local regulations.
Safety Information
Safety is paramount when using gas and electric appliances. Always keep children under 8 years old away from the cooker unless supervised. Never use steam cleaners on the appliance. If you smell gas, do not attempt to light any appliance, do not touch electrical switches, and contact your gas supplier immediately. Ensure the appliance is properly earthed. Never store flammable liquids near the cooker, and do not modify the appliance. Always use oven gloves when handling hot items and ensure shelves are correctly positioned.
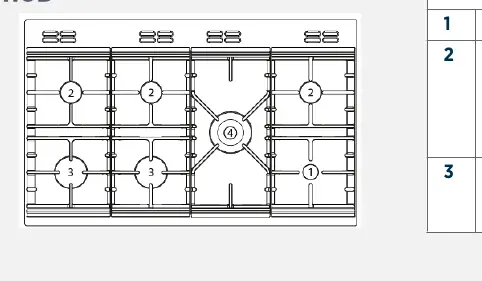
Using the Hob
The gas hob features various burner sizes. To ignite, push in and turn the control knob to the full flame symbol, keeping it depressed until the flame is established. Always use flat-bottomed pans that are appropriately sized for the burner to ensure stability and efficiency. Never allow pans to overlap the edges of the hob or cooking zones. Keep the hob clean to prevent grease build-up, which can be a fire hazard.
Using the Ovens and Grill
The main oven offers multiple functions, including fanned cooking, air frying, defrosting, and slow cooking. When using the oven or grill, the cooling fan will operate to keep the fascia and controls cool; this may continue for some time after cooking. Never place items directly on the base of the oven or cover it with foil, as this can cause overheating. The grill door must be kept fully open during grilling. For best results, preheat the grill before use.
Maintenance and Cleaning
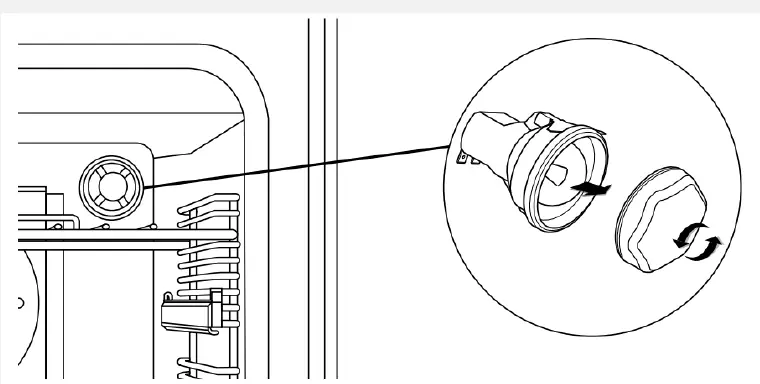
Regular cleaning is essential for performance and safety. Always allow the appliance to cool before cleaning. Use warm, soapy water and a damp cloth. Avoid abrasive cleaners, wire wool, or steam cleaners. Enamel parts like the grill pan can be cleaned in a dishwasher, but cast iron supports and burner caps should be hand-washed. If the oven light needs replacing, ensure the power is switched off first.
Troubleshooting
If the appliance does not work after a power failure, reset the clock/programmer. If the timer controls are unresponsive, the child-lock may be active; hold the plus key for 5-10 seconds to deactivate it. If the main oven fails to operate, ensure the timer is set to manual mode and that both a function and temperature are selected.
Manufacturer information
Belling
Practical help
Common problems
Timer controls not responding
The child-lock is likely active. Press and hold the plus key for 5-10 seconds until the padlock symbol disappears.
Main oven not working
Ensure the timer is set to manual mode ('Man' displayed) and that both a function and temperature have been selected.
Cooling fan runs for a long time after use
This is normal. The fan runs to cool the appliance down to approximately 35°C to ensure safety.
Smell of gas
Do not light any appliance, do not touch electrical switches, and contact your gas supplier immediately.
Before use
- Remove all packaging and wrapping from inside the appliance.
- Wash oven shelves, baking tray, grill pan, and trivet in hot soapy water.
- Turn ovens/grill on for a short while to burn off manufacturing residues.
- Ensure the appliance is installed in a well-ventilated space.
- Verify that the gas type and pressure are compatible with your supply.
- Ensure the clock/programmer is unlocked and set to the correct time.
- Check that burner caps and heads are correctly and securely fitted.
Specs in practice
- Electrical Supply
- 230-400V ~3N ~ 50 Hz
- Natural Gas Pressure
- 20 mbar
- LPG Pressure
- 30 mbar
- Max Heat Input
- 17.00 kW
Images and diagrams
- Control panel layout showing cook zones, grill, ovens, and programmer.
- Hob burner layout identifying small, medium, and large zones.
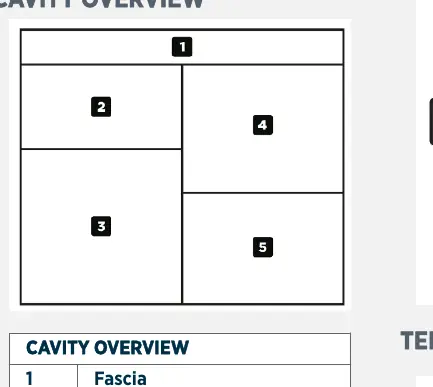
- Cavity overview showing the positions of the grill, conventional oven, fanned oven, and storage.
- Grill pan and trivet orientation with the sloping lip at the front.
- Lightbulb replacement procedure showing the lens cover removal.
Model compatibility
- Only use pans between 100mm and 250mm in diameter.
- Use only hob guards designed or indicated by the manufacturer.
- Conversion to LPG requires a specific kit available from the Customer Care Centre.
- The appliance must be connected by a competent person.

Manual page author
Michael Turner
Technical manual editor
Reviews PDF manuals for structure, safety notes, and practical product details so readers can find the right information quickly.