Garden / Outdoor Furniture
Instruction Manual for Best Choice Products 24.5in Woven Water Hyacinth Tree Collar
Quick guide for assembling your 24.5in Woven Water Hyacinth Tree Collar. Includes parts list, step-by-step assembly instructions, and safety warnings.
Quick answers from the manual
Quick answer
- This manual provides instructions for assembling the 24.5in Woven Water Hyacinth Tree Collar. It involves connecting three panels (two standard, one with a cutout) around the base of a Christmas tree using a hook-and-receiver system. p. 3, 4, 5
Key actions
- Connect the panels using the hook-and-receiver system. p. 4
- Adjust the collar to accommodate the lighting cord. p. 5
First start
- Assemble the collar only after the Christmas tree is fully set up. p. 3
Show 2 more answers Show less
Technical specifications
| Parameter | Value | Meaning | Pages |
|---|---|---|---|
| Assembly Time | Up to 10 minutes | Estimated time for one person to assemble. | p. 3 |
| Assembly Personnel | 1 Person | The product is designed for one-person assembly. | p. 3 |
Where to find it in the PDF
- Parts List p. 3
- Assembly Instructions p. 4, 5
Table of contents
Manual images
Click an image to enlargeImportant Information
This manual provides instructions for the assembly of the 24.5in Woven Water Hyacinth Tree Collar (Models: SKY6788, SKY6789, SKY6790). The product is intended for residential use only. Assembly is designed for one person and takes approximately 10 minutes.
Parts List
Before beginning assembly, ensure you have the following components:
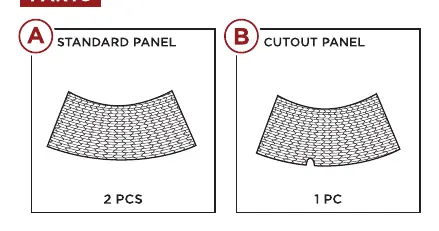
- Standard Panel (Part A): 2 pieces
- Cutout Panel (Part B): 1 piece
Assembly Instructions
Follow these steps to assemble your tree collar:
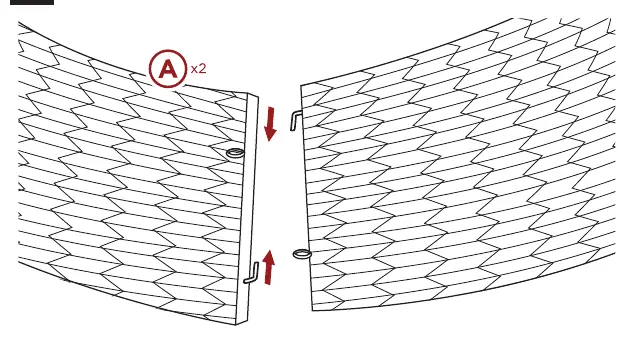
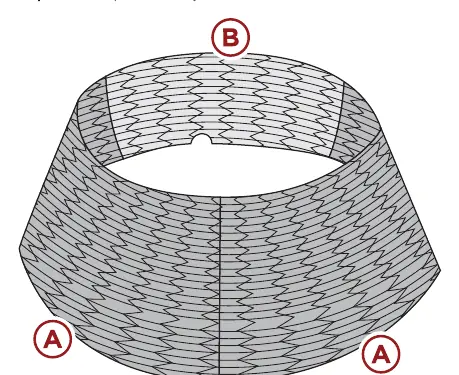
- Connect Panels: Locate the hooks on one Part A standard panel and insert them into the receivers on a second Part A standard panel.
- Positioning: Wrap the assembled Part A panels around the base of your Christmas tree.
- Complete Assembly: Insert the Part B cutout panel to close the circle.
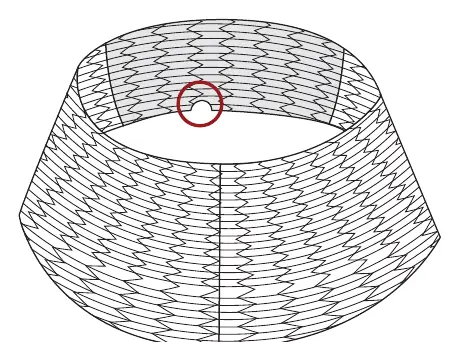
- Final Adjustment: Adjust the tree collar so that your tree's lighting cord runs through the cutout section.
Safety Warnings
- Do not stand on or jump on any part of this item.
- Do not use or store this item in the proximity of open flames or flammable/combustible chemicals.
- If any parts are missing, broken, damaged, or worn, stop using this product until repairs are made and/or factory replacement parts are installed.
- Assemble this product only after setting up your Christmas tree.
Manufacturer information
Best Choice Products
Practical help
Common problems
Missing or damaged parts
Stop using the product and contact customer support via help.bestchoiceproducts.com.
Difficulty connecting panels
Ensure the hooks on the standard panels are fully aligned and inserted into the receivers on the adjacent panel.
Before use
- Verify all parts are present (2 Standard Panels, 1 Cutout Panel).
- Ensure the Christmas tree is fully set up before installing the collar.
- Check that the area is free from open flames or flammable materials.
- Ensure the assembly area is clear for one person to work.
Show more Show less
Specs in practice
- Assembly Time
- Estimated time for one person to assemble is up to 10 minutes.
- Intended Use
- Residential use only.
Images and diagrams
- The assembly relies on a hook-and-receiver system to join the three panels together.
- The cutout panel is designed to accommodate the electrical cord of the Christmas tree lights.
Model compatibility
- Designed for use with Christmas trees.
- The cutout panel must be positioned to allow the lighting cord to pass through.

Manual page author
Michael Turner
Technical manual editor