Garden / Outdoor Furniture
User Manual for Best Choice Products Land Rover 2-Seater Ride-On
Quick guide for the Best Choice Products Land Rover 2-Seater Ride-On. Includes assembly instructions, charging guidelines, remote control pairing, and troubleshooting steps.
Quick answers from the manual
Quick answer
- The vehicle requires an initial charge of 12 hours before the first use. Subsequent charges take 8-12 hours. Do not exceed 20 hours of charging. p. 2, 12
Key actions
- Pairing the remote control p. 14
- Connecting the battery p. 10
First start
- Charge the battery for 12 hours before initial use. p. 2, 12
Problems and fixes
Vehicle does not move
Fully charge the battery, check electrical protection, ensure switches are in the correct position, and check battery connectors.
p. 15Maintenance and reset
- Charge the battery at least once a month to prolong its life. p. 12
Technical specifications
| Parameter | Value | Meaning | Pages |
|---|---|---|---|
| Battery | 12V 7AH | Rechargeable SLA battery | p. 4 |
| Weight Capacity | 125 lbs | Combined weight limit | p. 4 |
Where to find it in the PDF
- Safety Warnings p. 3
- Specifications p. 4
- Assembly Instructions p. 6, 7, 8, 9
- Troubleshooting p. 15
Table of contents
Manual images
Click an image to enlargeQuick guide from the manual
This vehicle is designed for children aged 3 to 8 years with a combined weight capacity of 125 lbs. Adult assembly is required. The vehicle must be charged for 12 hours before its initial use. Always operate on flat, hard surfaces and avoid unsafe conditions like slopes, water, or loose dirt.
Safety Information
- Age Range: 3 to 8 years old.
- Weight Capacity: 125 lbs (combined).
- Supervision: Adult supervision is required at all times.
- Hazards: Contains small parts; keep away from children during assembly. Never open the battery as it contains lead-acid.
- Operation: Do not use on roadways, near motor vehicles, or steep inclines.
Charging Instructions
The charging port is located below the seat. Always use the supplied charger.
- Initial Charge: 12 hours before first use.
- Normal Charge: 8 to 12 hours.
- Limits: Do not charge for more than 20 hours to avoid damage. Do not allow the battery to drain completely.
- Maintenance: Charge at least once a month to prolong battery life.
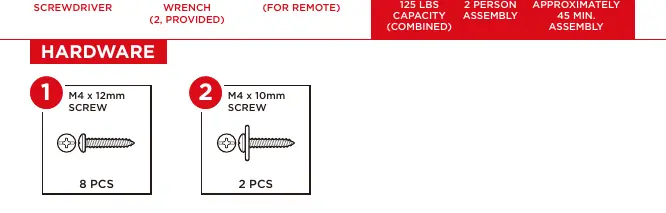
Assembly Overview
The assembly requires a Phillips screwdriver and approximately 45 minutes. Key steps include:
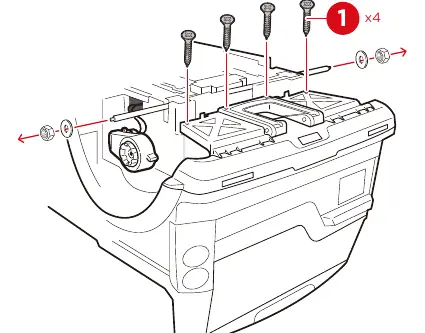
- Rear Assembly: Secure the rear bracket and gear boxes to the rear axle.
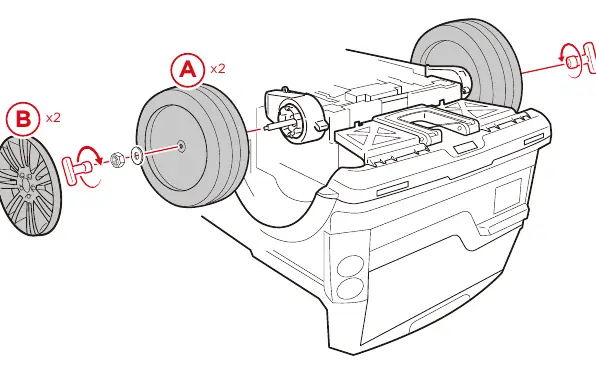
- Wheels: Attach wheels to front and rear axles, securing with nuts and washers, then snap on hubcaps.
- Steering: Connect the steering wheel connector and press into the mount.
- Body: Snap in the rear frame, side frames, seat, and windshield.
- Electrical: Connect the red wire to the red terminal on the battery.
Remote Control Pairing
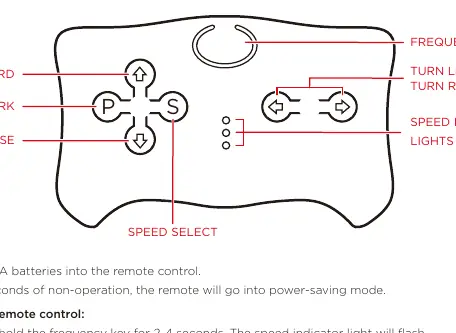
- Install 2 AAA batteries into the remote.
- Press and hold the frequency key for 2-4 seconds until the speed indicator light flashes.
- Turn the vehicle on. The light will turn solid to indicate a successful link.
- If the light continues to flash, remove and reinsert batteries and repeat the process.
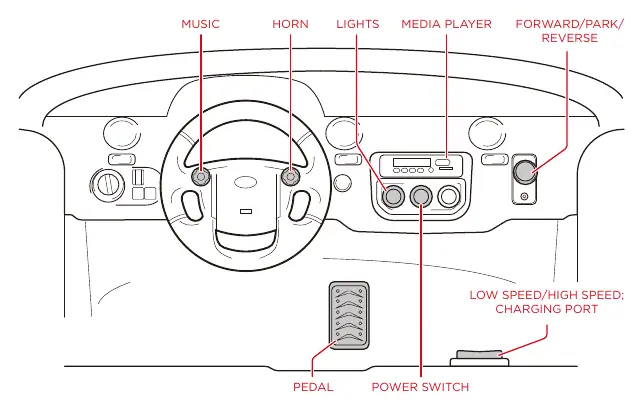
Dashboard and Media Player
The dashboard features a pedal for driving (forward/reverse), light controls, and a music player. The media player supports USB drives, MicroSD cards, and AUX input. Use the mode button to toggle between music and FM radio.
Troubleshooting
If the vehicle does not move, check if the battery is charged, ensure switches are in the correct position, and verify that battery connectors are plugged in. If the vehicle is silent, check the steering wheel connection.
Manufacturer information
Best Choice Products
Practical help
Common problems
Vehicle does not move
Fully charge the battery, ensure switches are pressed correctly, and check that battery connectors are plugged in.
Slow speed
Fully charge the battery, reduce the weight on the vehicle, or drive on flat pavement.
Vehicle is silent
Ensure the steering wheel connector is properly connected.
Battery does not recharge
Ensure the charger is completely plugged into the outlet and the battery connectors are connected.
Before use
- Charge the battery for 12 hours before initial use.
- Verify the child is between 3 and 8 years old.
- Ensure the combined weight of riders does not exceed 125 lbs.
- Assemble the vehicle on a level surface.
- Install 2 AAA batteries in the remote control.
- Check that all parts are securely fastened.
Specs in practice
- Battery Type
- 12V 7AH Rechargeable SLA battery.
- Charging Time
- 8 to 12 hours for a full charge.
Images and diagrams
- The dashboard diagram shows the location of the pedal, power switch, and media player controls.
- The remote control diagram identifies the frequency key, speed select, and directional buttons.
- Assembly diagrams illustrate the correct placement of screws, nuts, and washers on the axles.
Model compatibility
- Only use the supplied rechargeable battery and charger.
- Remote control requires 2 AAA batteries (not included).

Manual page author
Michael Turner
Technical manual editor
Reviews PDF manuals for structure, safety notes, and practical product details so readers can find the right information quickly.