Lighting / Holiday Lighting
Holiday Living 24-in Fluffy Terrier Assembly and User Guide
Quick guide for the Holiday Living 24-in Fluffy Terrier (ES79-007LC). Includes assembly steps, safety instructions, lamp replacement, and troubleshooting tips.
Quick answers from the manual
Quick answer
- The Holiday Living 24-in Fluffy Terrier (ES79-007LC) is a seasonal decoration. Assembly involves connecting the main body parts (A, B, C, D, F) using the provided hardware (AA, BB). Maintenance includes replacing 3V 0.06W LED lamps and 3A 125V fuses. p. 1, 2, 3
Key actions
- Assemble the figure by connecting parts A, B, C, D, and F using hardware AA and securing to the ground with BB. p. 3
- Replace the fuse by opening the cover on the attachment plug and inserting a 3 Amp, 125 Volt fuse. p. 2, 3
Problems and fixes
One section does not light
Check for broken or loose bulbs and replace them.
p. 1
No lights light up
Check power, extension cord, and fuse.
p. 1Show 3 more answers Show less
Maintenance and reset
- Replace lamps with 3V 0.06W LED lamps. Replace fuses with 3 Amp, 125 Volt fuses. p. 2, 3
Technical specifications
| Parameter | Value | Meaning | Pages |
|---|---|---|---|
| Fuse | 3 Amp, 125 Volt | Overload protection. | p. 2, 3 |
| Lamp | 3V 0.06W LED | Replacement bulb specification. | p. 2 |
Where to find it in the PDF
- Safety and Troubleshooting p. 1
- Maintenance and Care p. 2
- Assembly Instructions p. 3
Table of contents
Manual images
Click an image to enlargeQuick Guide
This guide provides instructions for the Holiday Living 24-in Fluffy Terrier (Model ES79-007LC). The estimated assembly time is 5 minutes. Please ensure all parts are present before beginning assembly. This product is for seasonal use only and is not intended for permanent installation.
Assembly Instructions
Follow these steps to assemble your Fluffy Terrier:
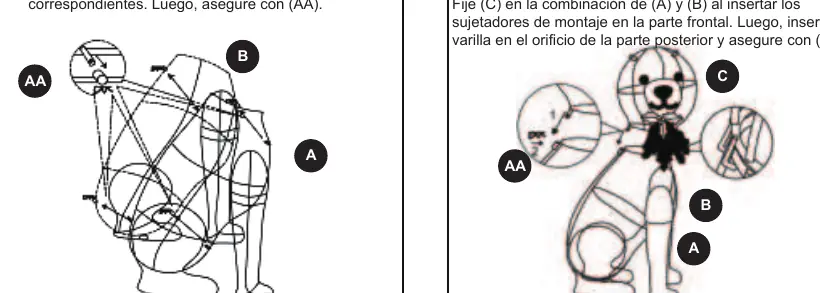
- Combine (A) and (B): Insert the rods into the corresponding holes and secure with (AA).
- Attach (C): Insert the mounting clips on the front of (C) into the combined (A) and (B), then insert the rod into the hole on the back and secure with (AA).
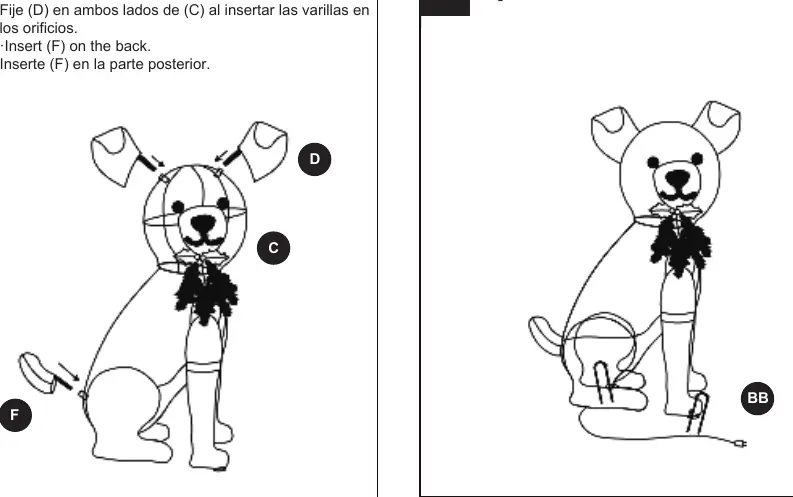
- Attach (D) and (F): Attach (D) on both sides of (C) by inserting the rods into the holes. Insert (F) on the back.
- Secure: Secure the item firmly into the ground using (BB).
Use and Care
- If placing on a live tree, ensure the tree is well-maintained, fresh, and the holder is filled with water. Do not use on trees with brown or brittle needles.
- Inspect the product carefully before each use. Discard if you find damaged wires, cracked lamp holders, or loose connections.
- When not in use, store the product in a cool, dry location protected from sunlight.
Maintenance
Replacing the Lamp
- Unplug the product from the power source. Do not pull on the cord.
- Pull the lamp and plastic base straight out of the lamp holder.
- Replace with a 3V 0.06W LED lamp (provided with the product).
- If the new base does not fit, straighten the lamp leads, thread them through the holes of the old base, and bend the leads up to touch the contacts inside the holder.
Replacing the Fuse
- Unplug the product.
- Open the fuse access cover on the top of the attachment plug.
- Remove the old fuse and replace it with a 3 Amp, 125 Volt fuse.
- Close the fuse cover.
Troubleshooting
- One section does not light: Check for broken or loose bulbs. Replace any damaged bulbs.
- No lights light up: Ensure the power is on, check the extension cord, and inspect the fuse in the plug.
Safety Information
- This is an electric product, not a toy. Keep out of reach of small children.
- Do not mount near gas or electric heaters, fireplaces, candles, or other heat sources.
- Do not secure wiring with staples or nails, or place on sharp hooks.
- Unplug when leaving the house, retiring for the night, or if left unattended.
- Do not cover the product with cloth, paper, or any material when in use.
- This product employs overload protection (fuse). If the fuse blows, unplug the product and any attached strings.
Practical help
Common problems
One section does not light
Check for broken or loose bulbs. Replace any damaged or loose bulbs with working ones.
No lights light up
Check if the power is on, inspect the extension cord, and check the fuse in the male plug.
Before use
- Ensure all parts are present by comparing with the package contents list.
- Inspect for damaged or frayed wire insulation, cracks in lamp holders, or loose connections.
- If using on a live tree, ensure the tree is fresh and the holder is filled with water.
- Ensure the product is stable and well-secured.
Show more Show less
Model compatibility
- Not intended for permanent installation.
- Seasonal use product only.
- Do not use on live trees with brown or brittle needles.

Manual page author
Michael Turner
Technical manual editor