Tools / Power Tools
User Manual for Bosch GWS 12V-76 Professional Compact Angle Grinder
Quick guide for the Bosch GWS 12V-76 Professional compact angle grinder. Includes safety instructions, assembly, operation, battery management, and maintenance.
Table of contents
Manual images
Click an image to enlargeQuick guide from the manual
This manual provides essential information for the safe and efficient operation of the Bosch GWS 12V-76 Professional compact angle grinder. Always read the full safety instructions before use.
Safety Instructions
General Power Tool Safety: Keep your work area clean and well-lit. Do not operate power tools in explosive atmospheres. Keep children and bystanders away.
Angle Grinder Safety: This tool is intended for grinding and cutting. Do not use it for sanding, wire brushing, or polishing. Always use the correct protective guard for the application. Ensure the grinding surface of depressed center wheels is mounted below the plane of the guard lip.
Product Description
The tool is designed for cutting metal, stone, plastics, composite materials, and wood, as well as for roughing metal without the use of water.
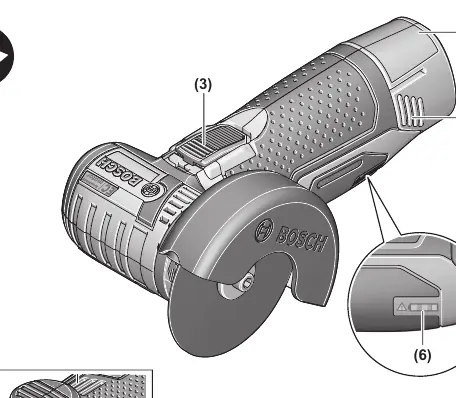
Key Components
- Direction of rotation arrow on housing
- Spindle lock button
- On/off switch
- Protective guard for grinding
- Protective guard for cutting
Battery Management
Use only the chargers listed in the technical data. Lithium-ion batteries are supplied partially charged. To ensure full capacity, charge the battery fully before the first use.
Battery Charge Indicator
The three green LEDs indicate the state of charge. They only light up for 3 seconds after start-up.
Overload Protection
The tool features temperature-dependent overload protection. If the tool is overloaded or the battery temperature is outside the permitted range, the speed is reduced or the tool switches off.
Assembly
Always remove the battery before performing any work on the tool (maintenance, tool change, etc.) or during transport and storage.

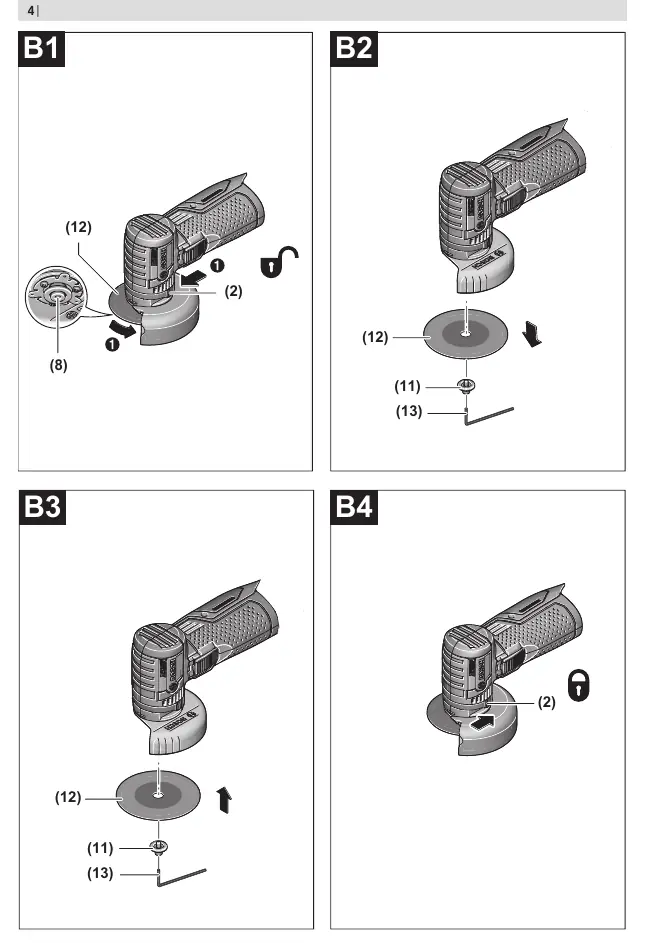


Mounting Protective Equipment
Always use the protective guard for grinding when grinding. Always use the protective guard for cutting when cutting. Insert the cutting guard onto the grinding guard until it engages firmly.
Fitting Abrasive Tools
Clean the grinding spindle and all parts to be mounted. Push the spindle lock button forward and turn the abrasive tool to fix the spindle. Use the hex key to tighten or loosen the clamping bolt with washer.
Operation
Switching On/Off
To start, push the on/off switch forward. To lock, push the switch forward and down until it clicks. To switch off, release the switch or push it backward and down.
Rough Grinding
Always use the protective guard for grinding. Best results are achieved with a set angle of 30° to 40°. Move the tool back and forth with moderate pressure.
Cutting Metal and Stone
Always use the protective guard for cutting. When cutting stone, ensure sufficient dust extraction and wear a dust mask. The tool is for dry cutting/grinding only.
Maintenance and Service
Always keep the tool and ventilation slots clean. If the tool fails despite careful manufacturing and testing, repairs should be carried out by an authorized after-sales service center for Bosch power tools.
Manufacturer information
Bosch
Practical help
Common problems
Tool stops automatically during use.
The tool is overloaded or the battery temperature is outside the permitted range. Switch off, let the battery cool down, and switch on again.
Red LED indicator flashes.
The tool is blocked. Remove the tool from the workpiece to clear the blockage.
Before use
- Ensure the battery is fully charged.
- Install the correct protective guard for the intended task.
- Check that the abrasive tool is correctly mounted and rotates freely.
- Perform a test run for at least 1 minute without load.
Specs in practice
- Rated voltage
- 12V
- Rated no-load speed
- 19,500 min-1
- Max. grinding disc diameter
- 76 mm
Images and diagrams
- Direction of rotation arrow on housing (1)
- Spindle lock button (2)
- On/off switch (3)
- Protective guard for grinding (7)
- Protective guard for cutting (10)
Model compatibility
- Only use accessories specified for this tool.
- Do not use adapters or reducers for mounting discs.

Manual page author
David Miller
Documentation analyst
Organizes user manual content into clear summaries, with attention to model details, product context, and everyday usability.