Tools / Power Tools
User Manual for Bosch GTB 185-LI Professional Cordless Drywall Screwdriver
Comprehensive user guide for the Bosch GTB 185-LI Professional cordless drywall screwdriver. Includes setup, operation, PowerSAVE mode, depth adjustment, and maintenance instructions.
Quick answers from the manual
Quick answer
- The Bosch GTB 185-LI is a cordless drywall screwdriver. To operate, insert a charged 18V battery, set the rotation direction, and press the tip of the screw against the workpiece to drive it in. p. 3, 8, 9
Key actions
- Activating PowerSAVE mode p. 9
- Adjusting screw-in depth p. 9
First start
- Insert the charged battery into the handle until it clicks into place. p. 7, 8
Problems and fixes
Battery charge indicator shows no lights
The battery is defective and must be replaced.
p. 8Maintenance and reset
- Keep the tool and ventilation slots clean. p. 9
Technical specifications
| Parameter | Value | Meaning | Pages |
|---|---|---|---|
| Rated voltage | 18 V | Operating voltage | p. 7 |
| No-load speed | 0–4500 min-1 | Rotational speed | p. 7 |
Where to find it in the PDF
- Overview p. 3
- Operation Diagrams p. 4
Table of contents
Manual images
Click an image to enlargeQuick guide from the manual
The Bosch GTB 185-LI is a cordless drywall screwdriver designed for driving and loosening screws. Key features include a PowerSAVE mode for energy efficiency, an adjustable depth stop for precise screw-in depth, and a reversible depth stop for easy screw removal.
Product Description
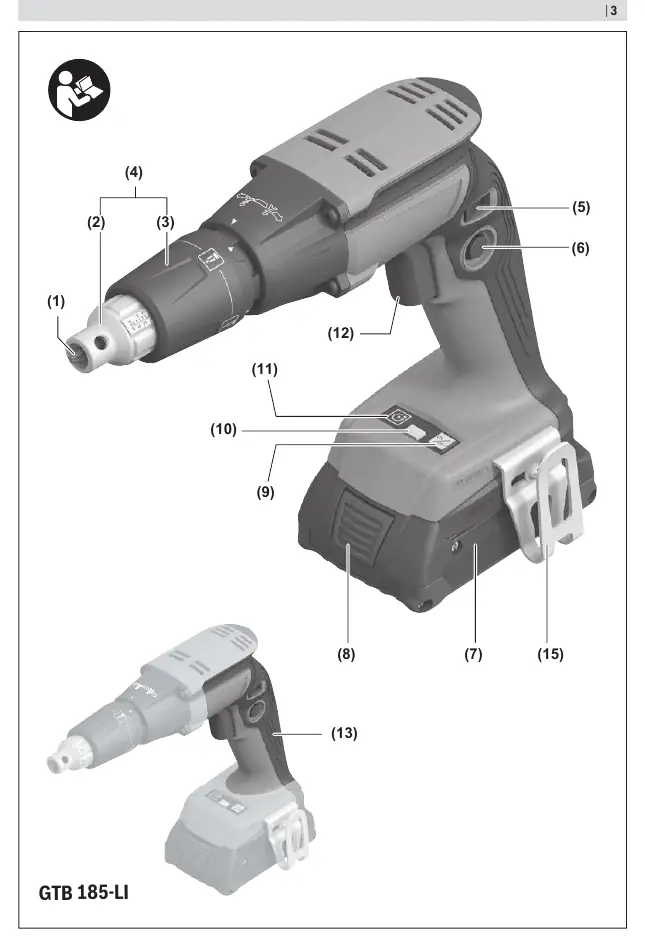
The tool features a 1/4" internal hexagon tool holder, a reversible depth stop, and an adjusting sleeve for depth control. It is powered by an 18V battery system. The tool includes an LED light for illuminating the work area and a belt clip for convenience.
Operation
Inserting and Removing the Battery
Push the charged battery into the handle until it clicks into place. To remove, press the battery release button and pull the battery out. Do not use force.
Switching On/Off and Speed Control
Press and hold the on/off switch to start the tool. The speed is controlled by the pressure applied to the switch. Use the lock-on button to lock the switch in the on position.
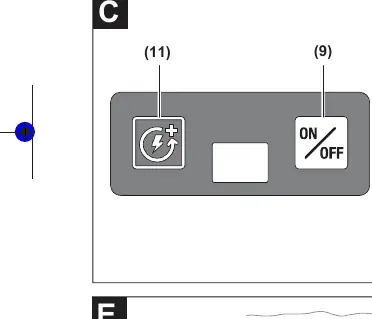
PowerSAVE Mode
To activate PowerSAVE mode, press the PowerSAVE on/off button. The PowerSAVE LED will light up. Then, press the on/off switch and lock it. The motor remains deactivated until the tool is pressed against the workpiece.
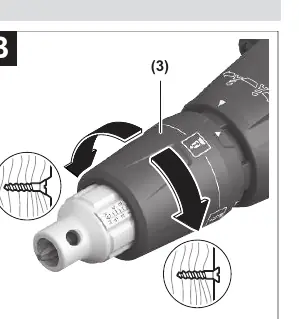
Adjusting Screw-in Depth
Turn the adjusting sleeve to the desired depth. The scale on the sleeve serves as a guide. Turning clockwise increases depth; turning counter-clockwise decreases it.
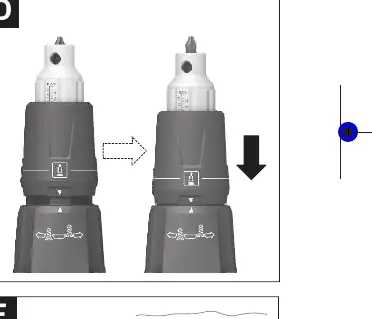
Reversible Depth Stop
To loosen screws, align the arrows on the adjusting sleeve and the gearbox. Pull the adjusting sleeve backwards until it clicks into place. The screwdriver bit will be exposed, allowing for screw removal.
Maintenance and Cleaning
Always remove the battery before performing maintenance or changing tools. Keep the tool and ventilation slots clean to ensure safe and efficient operation.
Manufacturer information
Bosch
Practical help
Common problems
Tool does not start
Check if the battery is charged and properly inserted. Ensure the rotational direction switch is not in the middle position.
Screw depth is incorrect
Adjust the depth stop using the adjusting sleeve. Perform a test drive on a scrap piece of material.
Battery charge indicator not working
If no LEDs light up after pressing the battery indicator button, the battery is defective and must be replaced.
Before use
- Ensure the battery is fully charged.
- Check that the correct screwdriver bit is installed.
- Set the rotational direction switch to the desired direction.
- Adjust the depth stop for the specific screw length being used.
Specs in practice
- Rated voltage
- 18V, indicates the battery system required.
- No-load speed
- 0–4500 min-1, the maximum rotational speed of the tool.
Images and diagrams
- Page 3: Overview of all tool components (1-15).
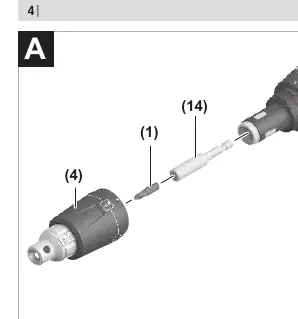
- Page 4: A - Tool change procedure.
- Page 4: B - Adjusting screw-in depth.
- Page 4: C - PowerSAVE mode operation.
- Page 4: D - Reversible depth stop usage.
Model compatibility
- Compatible with GBA 18V and ProCORE18V battery series.
- Use only chargers listed in the technical data (GAL 18..., GAX 18..., GAL 36...).

Manual page author
Emily Carter
User documentation editor
Prepares concise manual descriptions and highlights the most useful setup, operation, and maintenance information for readers.