Tools / Power Tools
User Manual for Bosch GRO 12V-35 Professional Cordless Multi Rotary Tool
Quick guide for the Bosch GRO 12V-35 Professional cordless multi rotary tool. Includes setup, tool change, operation, maintenance, and safety instructions.
Table of contents
Manual images
Click an image to enlargeQuick Guide
The Bosch GRO 12V-35 Professional is a cordless multi-rotary tool designed for cutting, grinding, sanding, polishing, and drilling. Before first use, ensure the battery is fully charged. To change tools, use the spindle lock to loosen the clamping nut, insert the accessory, and tighten securely. Adjust the speed using the regulator dial based on the material and application.
Safety Instructions
Read all safety warnings and instructions. Failure to follow these may result in electric shock, fire, or serious injury. Always wear eye protection and appropriate personal protective equipment. Keep the work area clean and well-lit. Do not operate in explosive atmospheres. Ensure the tool is switched off before inserting the battery or changing accessories.
Product Description
Key components include:
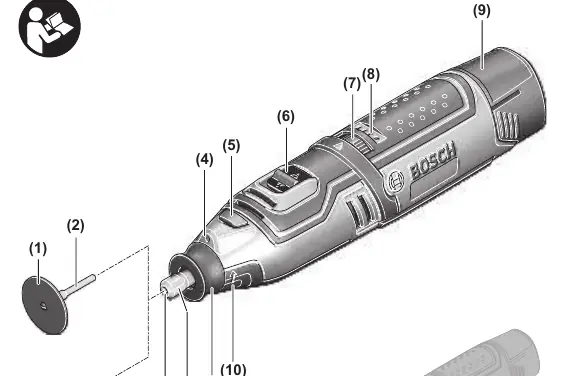
- Cutting disc
- Holding rod
- Grinding accessory
- Spindle lock
- On/off switch
- Speed regulator
- Battery charge indicator
- Clamping nut
- Collet
Assembly
Battery: Insert the charged battery into the battery holder until it clicks into place. To remove, press the release button and pull the battery out.
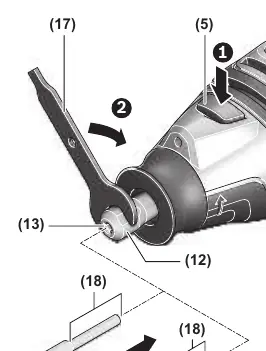
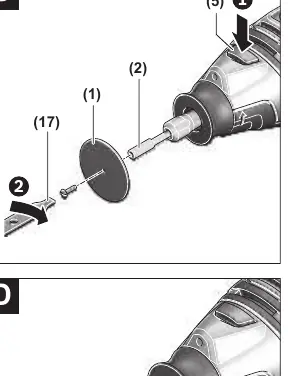
Tool Change: Press the spindle lock and turn the clamping nut by hand until it locks. Use the provided open-ended spanner to loosen the nut. Insert the accessory into the collet, ensuring the shank is inserted at least 10 mm deep. Tighten the nut while holding the spindle lock.
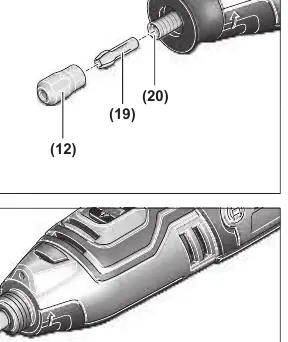
Collet Change: Press the spindle lock, loosen the clamping nut, and remove it along with the collet. Insert the required collet into the drive spindle and tighten the nut slightly.
Dust Protection Cap: Two caps are included. Use the cap for detailed work (11) for a better grip, or the cap for surface work (21) when working close to the workpiece.
Operation
Starting: Slide the on/off switch forward to start and backward to stop. Speed Adjustment: Use the speed regulator to adjust the speed continuously from 5000 to 35000 min-1. Use lower speeds for plastics and materials with low melting points, and higher speeds for cutting wood, iron, or steel.
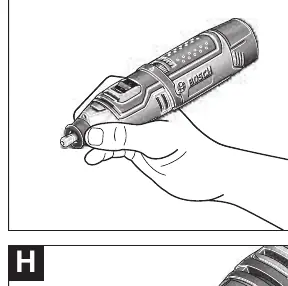
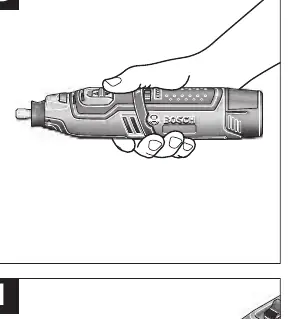
Practical Advice: For detailed work, hold the tool like a pen. For heavy work, use the "golf grip" method. Move the tool with light pressure for optimal results.
Maintenance and Service
Remove the battery before any maintenance or transport. Keep the tool and ventilation slots clean. Store accessories carefully. If the tool stops due to blockage, determine the cause and eliminate it.
Manufacturer information
Bosch
Practical help
Common problems
Tool stops during operation
The blockage protection has triggered. Check for a jammed accessory or excessive pressure and remove the cause.
Battery life is significantly reduced
The battery is likely worn out and needs to be replaced.
Tool overheats
Switch off the tool and allow it to cool down completely.
Before use
- Ensure the battery is fully charged.
- Check that the accessory shank is clean and undamaged.
- Verify the correct collet size is installed for the accessory.
- Ensure the accessory is inserted at least 10 mm into the collet.
- Check that the clamping nut is securely tightened.
Specs in practice
- Collet diameter
- 3.2 mm, standard size for most rotary tool accessories.
Images and diagrams
- (1) Cutting disc
- (2) Holding rod
- (3) Grinding accessory
- (5) Spindle lock
- (6) On/off switch
Model compatibility
- Use only brand accessories approved for 35,000 min-1 and a 3.2 mm shank diameter.

Manual page author
Emily Carter
User documentation editor
Prepares concise manual descriptions and highlights the most useful setup, operation, and maintenance information for readers.