Garden / Watering Equipment
Bosch GardenPump 18 Cordless Rainwater Pump User Manual
Quick guide for the Bosch GardenPump 18 cordless rainwater pump. Includes assembly, operation, battery maintenance, cleaning, and troubleshooting.
Table of contents
Manual images
Click an image to enlargeQuick guide from the manual
The Bosch GardenPump 18 is designed for pumping rainwater from a water tank to irrigate flower beds, lawns, and vegetable beds. It is a cordless system consisting of a pump and a battery control unit.
Assembly
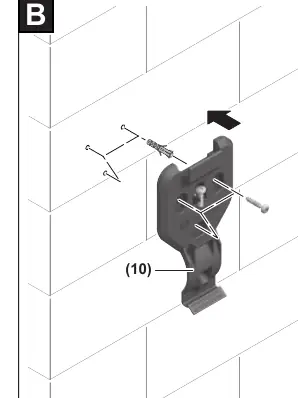
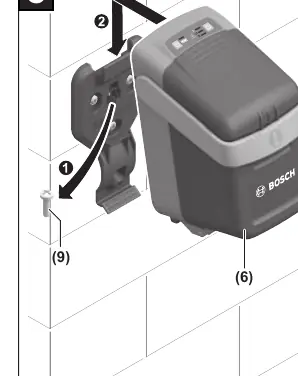
Wall/Tank Attachment: Fasten the wall attachment (10) next to the water tank. If wall mounting is not possible, use the provided water tank attachment (8) to clip the unit directly to the rim of the tank. Ensure the control unit is mounted in a shady spot to prevent overheating.
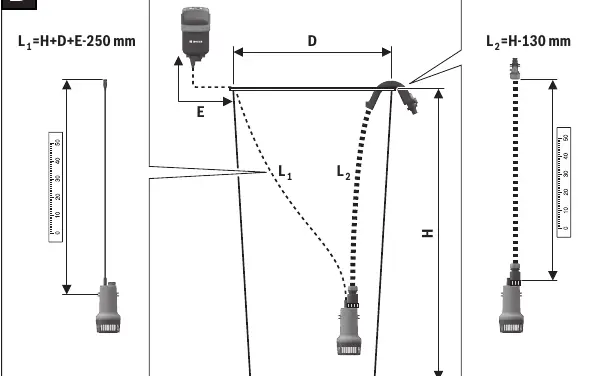
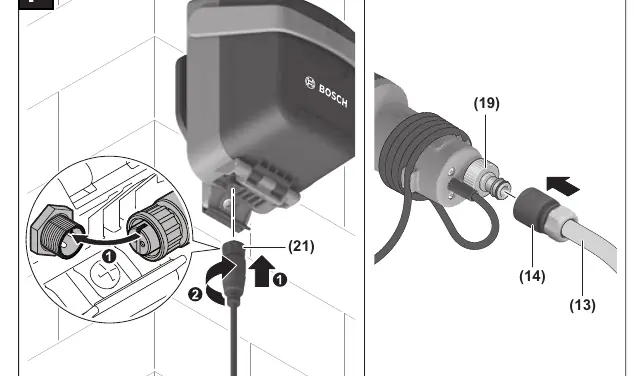
Cable and Hose Length: Measure the height (H) and diameter (D) of the tank, and the distance (E) from the tank rim to the control unit. Calculate cable length (L1 = H + D + E - 250 mm) and hose length (L2 = H - 130 mm). Wrap excess cable around the pump (18) and secure with the cable clamp (16). Cut the connecting hose to length L2 and re-attach the anti-siphon connector (12).
Operation
Inserting the Battery: Pivot the locking handle (7) upward, fold the control unit cover down, and insert the battery (22) until it engages. Close the cover and lock the handle.
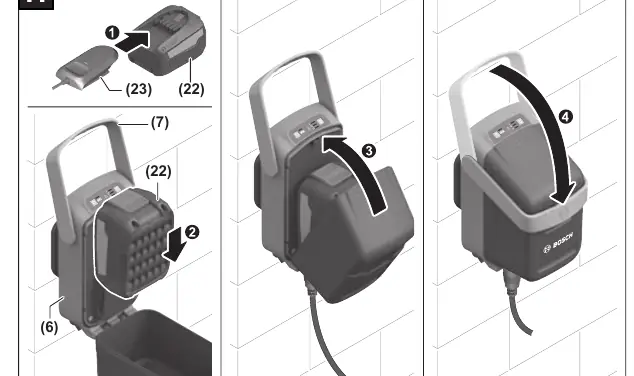
Switching On/Off: Press the On/Off switch (1). The battery charge indicator (2) will light up to show the charge level.
Timer Function: Press the time function button (5) when the pump is on. Each press increases the running time by 5 minutes, up to a maximum of 15 minutes. The selected time is indicated by the corresponding LED (4).
Maintenance and Cleaning
Filter Cleaning: The pump (18) has a filter (17) to prevent damage from debris. Pull the filter downward, clean it under running water, and re-attach it.
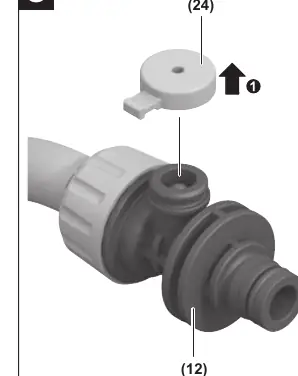
Anti-Siphon Connector: If blocked, remove the cap (24) and ball (25), clean the connector (12) under running water, and reassemble.
Storage
In autumn and winter, remove the pump from the water tank if there is a risk of frost. Drain all water from the pump, clean the exterior, and store in a frost-free environment. Always remove the battery when storing the device indoors.
Manufacturer information
Bosch
Practical help
Common problems
Warning triangle flashing red
Battery is too hot or too cold. Allow it to cool down or warm up.
Warning triangle flashing yellow
Dry-running protection is activated. Switch off the machine and reposition the pump so it is fully submerged.
Pump does not start
Ensure the battery control unit is fully closed, the battery is correctly inserted, the cable is connected, or the pump/water is not frozen.
Pump running but limited pressure
Check for a clogged filter, insufficient water level, air in the pump/hose, or an auto-stop hose coupling.
Before use
- Ensure the battery is fully charged.
- Check that the pump is fully submerged in the water tank.
- Verify the filter is clean and free of debris.
- Ensure the control unit is mounted in a shaded area.
- Check that the anti-siphon connector is correctly positioned above the water level.
Specs in practice
- Head pressure (H)
- 17.5 m
- Max. submersion depth
- 1.8 m
- Max. water temperature
- 35 °C
Images and diagrams
- Figure A: Overview of all components including pump, control unit, and battery.
- Figure B: Mounting the wall or tank attachment.
- Figure C: Inserting the battery control unit into the mount.
- Figure D: Calculating the required cable and hose lengths.
- Figure E: Wrapping excess cable and cutting the connecting hose.
Model compatibility
- Use only with the GardenPump 18 battery control unit.
- Do not use hose couplings with auto-stop as they may reduce flow.

Manual page author
Michael Turner
Technical manual editor
Reviews PDF manuals for structure, safety notes, and practical product details so readers can find the right information quickly.