Garden / Watering Equipment
User Manual for SOLO Backpack Sprayer 425/475 Series
Comprehensive user guide for SOLO backpack sprayers (425/475 series). Includes assembly instructions, pressure regulation, cleaning procedures, maintenance tips, and a detailed spare parts list.
Table of contents
Manual images
Click an image to enlargeQuick Guide from the Manual
This manual covers the operation and maintenance of SOLO backpack sprayers, including models 425, 475-B, 435, 485, and others. Before using the sprayer with chemicals, always fill it with fresh water to check for leaks and ensure proper assembly. Always wear appropriate protective clothing, including rubber gloves and safety goggles. Do not use flammable materials, diesel fuel, or liquids above 110°F (43°C).
Assembly Instructions
Nozzle and Wand: Insert the wand into the shut-off valve and tighten the screw cap clockwise. To remove the nozzle, unscrew the cap while the retaining nut is fastened to the elbow, then unscrew the nut.

Pump Lever: Place the lever handle onto the pump shaft, align bolt holes, and secure with bolts and washers. For diaphragm pump sprayers, ensure the stop plate is mounted correctly with the closed end pointing downward.
Shoulder Straps: The top of the straps are pre-attached. Fasten the lower strap hooks to the metal frame between the tank and the frame bend.
Regulating the Pressure (Deluxe Models)
Deluxe models feature an adjustable pressure regulator located inside the tank. To adjust, remove the tank cap and filter basket. Push down on the regulator knob and rotate to align the desired number with the alignment pin:
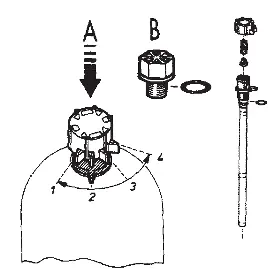
- Setting #1: 15 psi
- Setting #2: 30 psi
- Setting #3: 45 psi
- Setting #4: 60 psi
Operation and Filling
Mix spray formula and water in a separate container before pouring through the filter basket. Prime the pump with quick strokes until firm resistance is felt. To bleed air from the hose and wand, point the wand upward and spray for 10 seconds or until only liquid is discharged.
Cleaning and Maintenance
After each use, clean the tank thoroughly. Pump until all liquid is discharged, then refill with clean, soapy water and pump again. If using wettable powders, ensure they are thoroughly mixed and clean the piston/Viton collar immediately after use. Store the sprayer away from direct sunlight and leave the shut-off valve in the open position during winter storage to prevent freezing.
Troubleshooting
If pressure drops quickly, drain the tank completely and pump without liquid to refill the air chamber. If spray distribution is poor, check for a clogged nozzle. Regularly inspect the hose, wand, pump, and tank for wear or leaks.
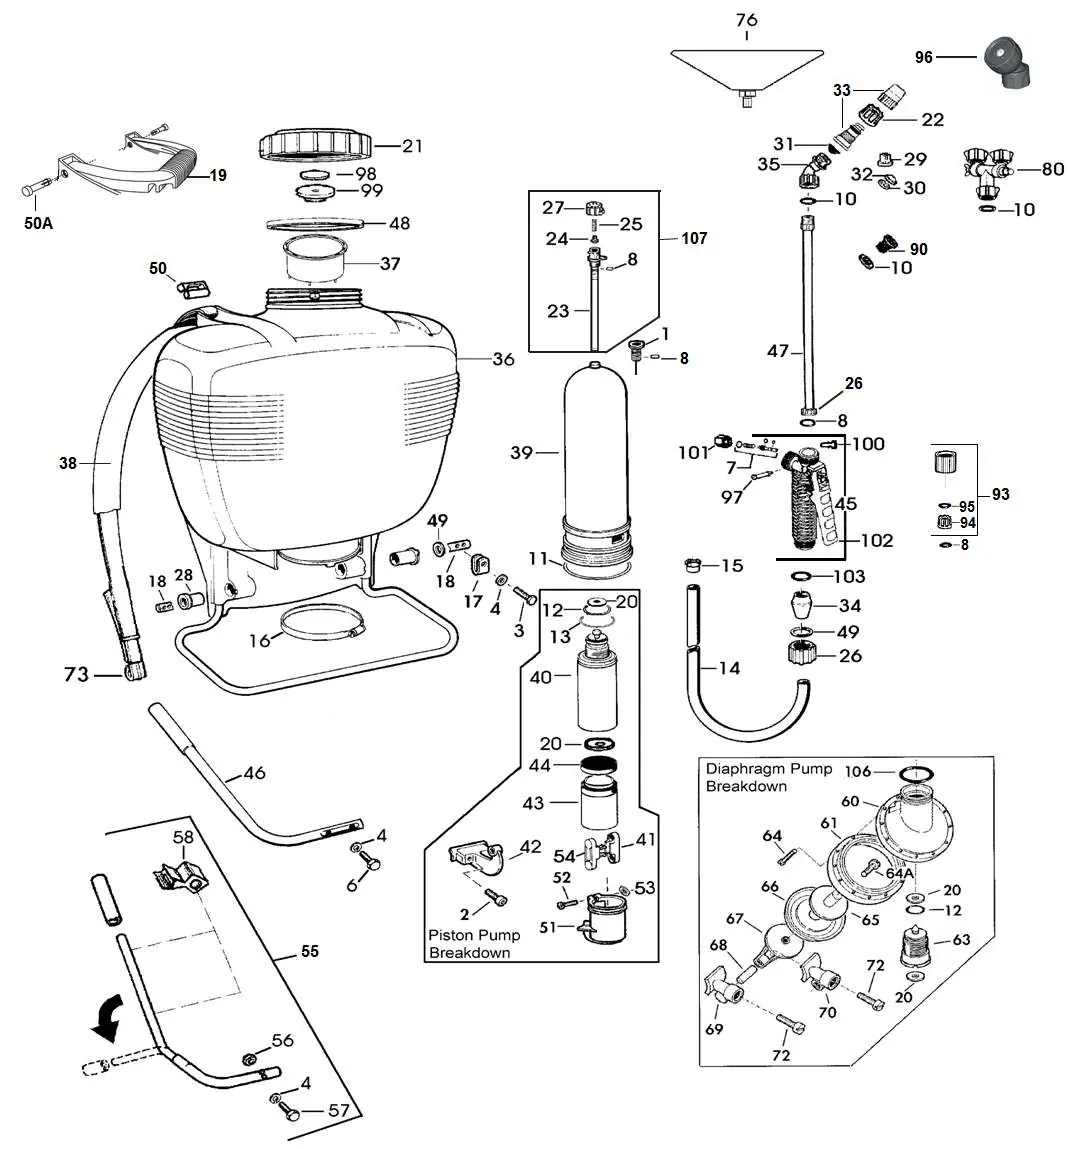
Spare Parts List
The manual includes a detailed breakdown of parts for both piston and diaphragm pump models. For missing parts or service, contact SOLO at 1-800-765-6462 or visit us.solo.global.
Official resources from the manual
Manufacturer information
SOLO Kleinmotoren GmbH
Practical help
Common problems
Pressure drops quickly
Drain the tank completely and pump without liquid to refill the air chamber with the required volume of air.
Improper spray distribution
The nozzle is likely clogged. Remove and clean the nozzle assembly.
Leaking around piston
Inspect the Viton collar for wear, lubricate with Solo Superior Grease or petroleum jelly, or replace if damaged.
Before use
- Fill with fresh water first to check for leaks and ensure proper assembly.
- Ensure all pressure is relieved before performing maintenance.
- Wear rubber gloves, safety goggles, and appropriate protective clothing.
- Ensure the shut-off valve is in the open position for storage.
- Mix chemicals in a separate container before pouring into the tank.
Specs in practice
- Pressure Regulator (Deluxe Models)
- Adjustable settings 1-4 correspond to 15, 30, 45, and 60 psi respectively.
- Wettable Powders
- Use diaphragm pump models (e.g., 475-B, 475-Prof) for better resistance to abrasive materials.
Images and diagrams
- Exploded view of pump and tank components for parts identification.
- Pressure regulator settings 1-4.
- Shoulder strap harness assembly.
Model compatibility
- Do not use flammable materials or diesel fuel.
- Do not use liquids with a temperature above 110°F (43°C).
- Do not use acid or caustic chemicals.

Manual page author
David Miller
Documentation analyst
Organizes user manual content into clear summaries, with attention to model details, product context, and everyday usability.