Garden / Watering Equipment
User Manual for Chapin 1-Gallon Lawn Sprayer 20541
Quick guide for the Chapin 1-Gallon Lawn Sprayer 20541. Includes assembly instructions, pressurizing steps, maintenance tips, and troubleshooting for common issues.
Table of contents
Manual images
Click an image to enlargeQuick guide from the manual
This manual provides essential instructions for the safe and effective use of the Chapin 1-Gallon Lawn Sprayer. Warning: Improper use can result in explosive failure. Never leave the sprayer in the hot sun, do not modify the sprayer, and never use flammable, caustic, acidic, or gas-producing chemicals. Always wear protective gear including goggles, gloves, and full-foot protection.
Assembly
Follow these steps to assemble the hose to the tank:
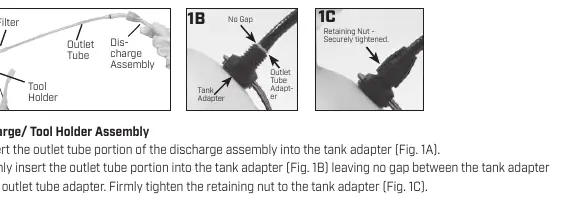
- Insert the outlet tube portion of the discharge assembly into the tank adapter.
- Ensure the hose covers both barbs on the outlet tube adapter and touches the flange.
- Firmly tighten the retaining nut to the tank adapter to ensure there is no gap.
- Attach the nozzle to the extension wand.
Pre-Use Check
Before using the sprayer, perform the following checks:
- Verify the hose nut is tight and the hose is securely attached.
- Inspect the hose for cracks, softness, or deterioration. Replace if necessary.
- Remove the pump and inspect the tank interior and exterior for signs of deterioration.
- Perform a test with water only (10-20 pump strokes) to check for leaks.
- Inspect all metal parts (wand, nozzle, fittings) for rust or corrosion.
Filling
- Turn the pump handle counterclockwise to remove the pump.
- Prepare the spray solution according to the chemical manufacturer's instructions.
- Fill the tank to the appropriate gallon marker. Do not overfill.
- Ensure the pump barrel is free of grass or dirt, then replace and tighten securely.
Pressurizing and Spraying

- To Pressurize: Turn the handle clockwise to tighten. Pump until you feel resistance.
- To Spray: Push the handle down and turn 1/4 turn clockwise to lock. Begin spraying. Re-pump as needed to maintain force.
- To Release Pressure: Turn the locked handle counterclockwise until air begins to escape. Point the pump away from you until all air has escaped.
Care, Storage, and Maintenance
- Clean the sprayer thoroughly after each use according to the chemical manufacturer's instructions.
- Rinse the wand and nozzle with water after every use.
- Store the tank upside down in a warm, dry location with the pump removed.
- Periodically lubricate the pump by adding 10-12 drops of light oil down the pump rod.
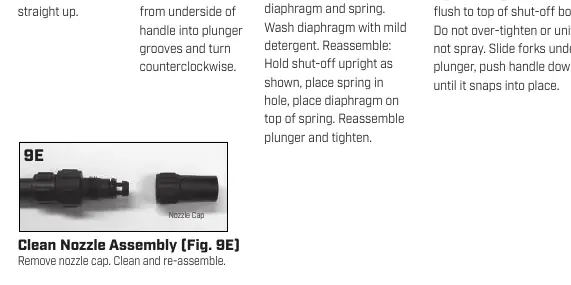
Troubleshooting
If the tank pressurizes but does not spray, release the pressure first, then:
- Clean Shut-off: Pull the handle up, remove the plunger, diaphragm, and spring. Wash the diaphragm with mild detergent and reassemble.
- Clean Nozzle: Remove the nozzle cap, clean out any debris, and reassemble.
Practical help
Common problems
Tank pressurizes but does not spray
Release pressure, then clean the shut-off assembly and nozzle assembly.
Hose blowing off
Ensure the hose covers both barbs on the outlet tube adapter and touches the flange before tightening the nut.
Sprayer not maintaining pressure
Check for leaks, ensure the pump is tightened, and lubricate the pump rod with light oil.
Before use
- Check hose tightness at the tank outlet.
- Inspect hose for cracks, softness, or deterioration.
- Inspect tank for signs of deterioration.
- Test with water only (10-20 strokes) to check for leaks.
- Ensure pump barrel is free of grass or dirt.
- Inspect metal parts for rust or corrosion.
Images and diagrams
- 1A-1C: Correct hose-to-tank assembly showing the barbs and flange.
- 6A-6D: Sequence for pressurizing, locking, spraying, and releasing pressure.
- 9A-9E: Steps for disassembling and cleaning the shut-off and nozzle components.
Model compatibility
- Do not use flammable, caustic, acidic, chlorine, bleach, or heat/gas-producing chemicals.
- Use only original manufacturer parts for replacements.

Manual page author
Emily Carter
User documentation editor
Prepares concise manual descriptions and highlights the most useful setup, operation, and maintenance information for readers.