Tools / Saws
User Manual for Bosch AdvancedSaw 18V-140 Jigsaw
Quick guide for the Bosch AdvancedSaw 18V-140 Jigsaw. Includes setup, operation, maintenance, and safety instructions.
Quick answers from the manual
Quick answer
- This manual provides instructions for operating the Bosch AdvancedSaw 18V-140 jigsaw, including assembly, operation, maintenance, and safety guidelines. p. 8, 16
Key actions
- Inserting/changing the saw blade p. 10, 18
- Adjusting the mitre/bevel angle p. 11, 19
First start
- Charge the battery p. 9, 17
- Insert the battery p. 9, 17
Problems and fixes
Tool overheats during prolonged use at low stroke rate
Remove the saw blade and let the power tool run at the maximum stroke rate for around three minutes to cool down.
p. 12, 20
Battery temperature outside operating range or overload protection triggered
Switch off the power tool, allow the battery to cool down, then switch the power tool back on.
p. 12, 20Technical specifications
| Parameter | Value | Meaning | Pages |
|---|---|---|---|
| Rated voltage | 18 V | Operating voltage of the tool | p. 9, 17 |
| No-load stroke rate | 0-3000 min⁻¹ | Speed of the saw blade without load | p. 9, 17 |
| Max. cutting depth (wood) | 140 mm | Maximum thickness of wood that can be cut | p. 9, 17 |
Where to find it in the PDF
- Safety Instructions p. 6, 7, 14, 15
- Product Description p. 8, 16
- Technical Data p. 9, 17
- Assembly and Operation p. 10, 11, 12, 18
- Maintenance and Service p. 13, 21
Table of contents
Manual images
Click an image to enlargeQuick guide from the manual
This manual provides essential information for the safe and efficient operation of the Bosch AdvancedSaw 18V-140 Jigsaw. Always ensure the battery is removed before performing any maintenance or changing accessories.
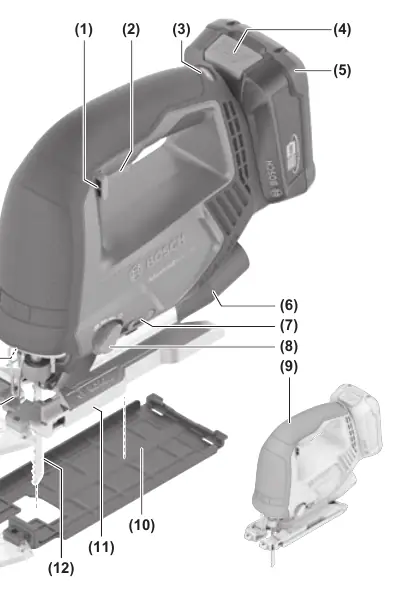
Device Description
The jigsaw is designed for cutting and making cut-outs in wood, plastic, metal, ceramic plates, rubber, and laminate. It is suitable for straight and curved cuts with mitre angles up to 45°.
Assembly
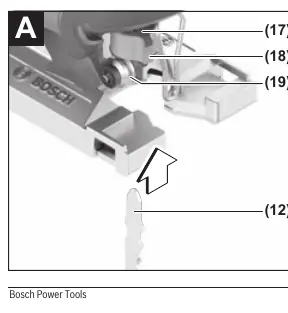

Inserting/changing the saw blade
Wear protective gloves when changing the saw blade. Use only T-shank saw blades. Push the saw blade (12) into the receptacle (17) until it clicks. The SDS lever (18) will automatically lock the blade. Ensure the back of the blade is in the guide roller (19) groove.
Cut Control
Cut Control allows for precise guidance along a marked line. The viewing window (13) can be attached to the base plate (11) using the base (15) or directly to the glide shoe (10).
Operation
Pendulum action
Adjust the pendulum action using the lever (8) to optimize cutting speed and quality. Use lower settings for finer cuts and higher settings for faster, rougher cuts.
Mitre angle
The base plate (11) can be tilted up to 45° for mitre cuts. Loosen the screw (25), slide the base plate slightly towards the battery, tilt to the desired angle, and retighten the screw.
Plunge cutting
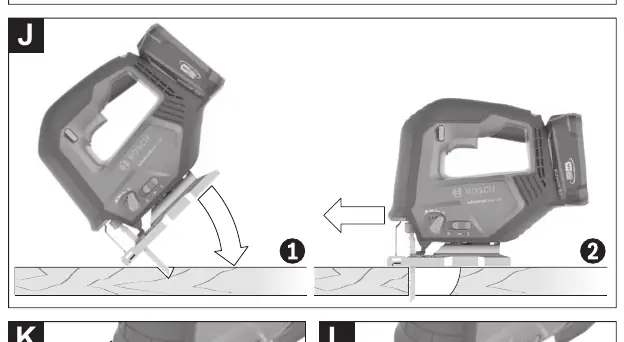
Only perform plunge cuts in soft materials like wood or gypsum board. Use short saw blades and only with a 0° mitre angle.
Maintenance and Cleaning
Keep the tool and ventilation slots clean. Regularly clean the saw blade receptacle. Lubricate the guide roller (19) occasionally with a drop of oil. If the tool becomes very dirty, it may lead to malfunctions.
Safety
Always remove the battery before transport or storage. Do not use the tool if the switch is defective. Keep hands away from the sawing area and never reach under the workpiece.
Manufacturer information
Bosch
Practical help
Common problems
Tool overheats during prolonged use at low stroke rate
Remove the saw blade and run the tool at maximum stroke rate for approximately 3 minutes to cool down.
Saw blade blocks
Switch off the power tool immediately.
Before use
- Check battery charge level
- Ensure the correct saw blade is selected for the material
- Verify the saw blade is securely seated in the receptacle
- Ensure the base plate is securely attached
- Check for any damage to the tool or battery
Specs in practice
- Max cutting depth (wood)
- 140 mm
- Max cutting depth (aluminium)
- 20 mm
- Max cutting depth (steel)
- 10 mm
Images and diagrams
- A: Inserting the saw blade
- B: Ejecting the saw blade
- C: Installing the anti-splinter guard
- D-E: Attaching Cut Control
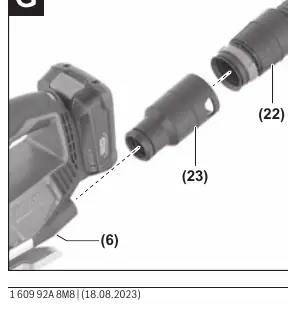
- F-G: Connecting dust extraction
Model compatibility
- Compatible with Bosch PBA 18V batteries.
- Not compatible with AL 1814 CV, AL 1820 CV, and AL 1860 CV chargers.

Manual page author
Emily Carter
User documentation editor
Prepares concise manual descriptions and highlights the most useful setup, operation, and maintenance information for readers.