Tools / Saws
User Manual for Bauer 4-1/2" Compact Circular Saw 19710E-B
Comprehensive user guide for the Bauer 4-1/2" Compact Circular Saw (19710E-B). Includes safety instructions, setup procedures, blade installation, operation tips, maintenance, and troubleshooting.
Quick answers from the manual
Quick answer
- The Bauer 19710E-B is a 4-1/2" compact circular saw. Always unplug before adjustments or blade changes. Use two hands for operation, ensure the workpiece is supported, and never force the tool. p. 1, 8, 9, 10
Key actions
- Mounting/Removing Blade p. 9
- Adjusting Depth p. 9
- Adjusting Bevel p. 9
First start
- Ensure trigger is off, plug into 120V grounded outlet, adjust depth/bevel, and hold with two hands. p. 10
Problems and fixes
Tool will not start
Check power, circuit breaker, or thermal reset.
p. 13
Overheating
Check blade, vents, and extension cord.
p. 13Maintenance and reset
- Wipe external surfaces with clean cloth after use. Inspect for loose hardware or damaged parts before each use. p. 12
Technical specifications
| Parameter | Value | Meaning | Pages |
|---|---|---|---|
| Blade Speed | 3500 RPM | No load speed | p. 8 |
| Max Depth of Cut | 1-11/16" at 90° | Maximum cutting depth | p. 8 |
Where to find it in the PDF
- Safety Information p. 2, 3, 4, 5
- Specifications p. 8
- Setup and Operation p. 8, 9, 10, 11
- Maintenance and Troubleshooting p. 12, 13
Table of contents
Manual images
Click an image to enlargeQuick Guide from the Manual
The Bauer 4-1/2" Compact Circular Saw is designed for cutting wood. Before use, ensure the tool is unplugged, the blade is sharp and correctly installed, and the workpiece is securely clamped. Always operate the saw with two hands, keeping fingers away from the cutting area. Never force the tool; let it cut at its own rate to prevent kickback and overheating.
Safety Information
General Safety: Always wear eye protection and appropriate PPE. Keep the work area clean and well-lit. Do not operate in explosive atmospheres.
Electrical Safety: Ensure the tool is plugged into a properly grounded 120V outlet. Use appropriate extension cords based on the gauge table provided in the manual.
Kickback Prevention: Kickback is a sudden reaction to a pinched or misaligned blade. To avoid it: maintain a firm grip, support large panels on both sides of the cut, do not use dull blades, and ensure depth/bevel levers are tight.
Setup and Adjustments
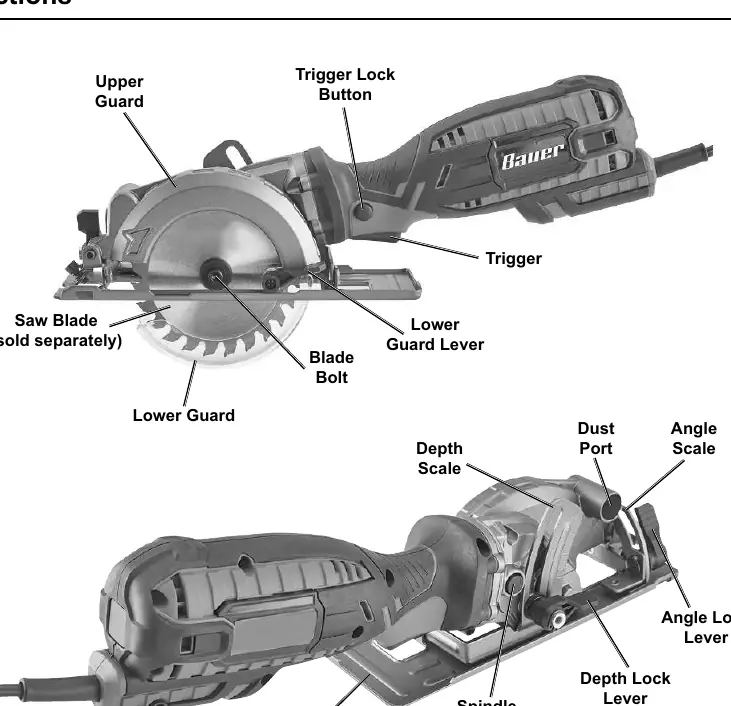
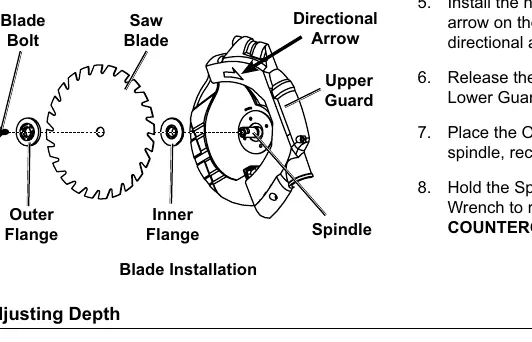
Blade Installation: Unplug the tool. Use the spindle lock button and hex wrench to remove the blade bolt. Install the new blade, ensuring the directional arrow matches the arrow on the upper guard. Secure the bolt counter-clockwise.
Depth Adjustment: Loosen the depth lock lever, adjust the base plate to the desired depth using the scale, and retighten the lever.
Bevel Adjustment: Loosen the angle lock lever, tilt the base plate to the desired angle (0° to 45°), and retighten the lever.
Operation
General Use: Mark your cutting line. Align the saw using the notches on the front of the base plate (0° for straight cuts, 45° for bevels). Start the tool, allow it to reach full speed, and gently push forward along the line. Do not pull the saw backward while the blade is in the cut.
Pocket Cuts: Set the depth, angle the front of the base plate on the workpiece, retract the lower guard, and slowly lower the blade into the material once the saw is at full speed.
Maintenance
Inspection: Before each use, check for loose hardware, damaged cords, or misaligned parts. Wipe external surfaces with a clean cloth after use. If the power cord is damaged, it must be replaced by a qualified technician.
Practical help
Common problems
Tool will not start
Check that the cord is plugged in, the outlet has power, the circuit breaker is not tripped, or the thermal reset button on the tool needs pressing.
Tool operates slowly
Do not force the tool to work too fast. Ensure the extension cord is not too long or of too small a diameter.
Overheating
Allow the tool to work at its own rate, check blade alignment, clean motor housing vents, and ensure the extension cord is appropriate for the load.
Before use
- Inspect tool for loose hardware or damaged parts
- Ensure blade is sharp and correct for the material
- Check that guards move freely and close instantly
- Ensure all adjustment levers are tight
- Wear appropriate PPE (eye/dust protection)
Specs in practice
- Electrical Rating
- 120VAC / 60Hz / 5.8A
- Max Blade Diameter
- 4-1/2" (115mm)
- Max Depth of Cut
- 1-11/16" at 90°, 1-3/16" at 45°
Images and diagrams
- Functions diagram identifies trigger, guards, and adjustment levers
- Blade installation diagram shows bolt, flanges, and directional arrow
- Base plate notches for 0° and 45° alignment
Model compatibility
- Use only 4-1/2" blades
- Do not use high-speed steel, abrasive, metal, or masonry blades

Manual page author
David Miller
Documentation analyst
Organizes user manual content into clear summaries, with attention to model details, product context, and everyday usability.