Tools / Drills
User Manual for Bosch 11253VSR and 11255VSR Rotary Hammer
Comprehensive user guide for the Bosch 11253VSR and 11255VSR rotary hammers. Includes safety instructions, operating procedures, maintenance tips, and accessory installation.
Table of contents
Manual images
Click an image to enlargeQuick guide from the manual
The Bosch 11253VSR and 11255VSR are rotary hammers designed for drilling and chipping applications. Before use, ensure the tool is disconnected from the power source when changing accessories or performing maintenance. Always wear appropriate safety gear, including eye protection and a dust mask, especially when drilling materials that generate dust.
Safety rules
- Work area: Keep the area clean and well-lit. Do not operate in explosive atmospheres.
- Electrical: Ensure the plug matches the outlet. Do not modify the plug. Use a GFCI in damp locations.
- Personal: Stay alert, wear eye protection, and avoid loose clothing.
- Tool specific: Hold the tool by insulated gripping surfaces. Always use the side handle for control. Use a metal detector to check for hidden pipes or wires before drilling.
Operating instructions
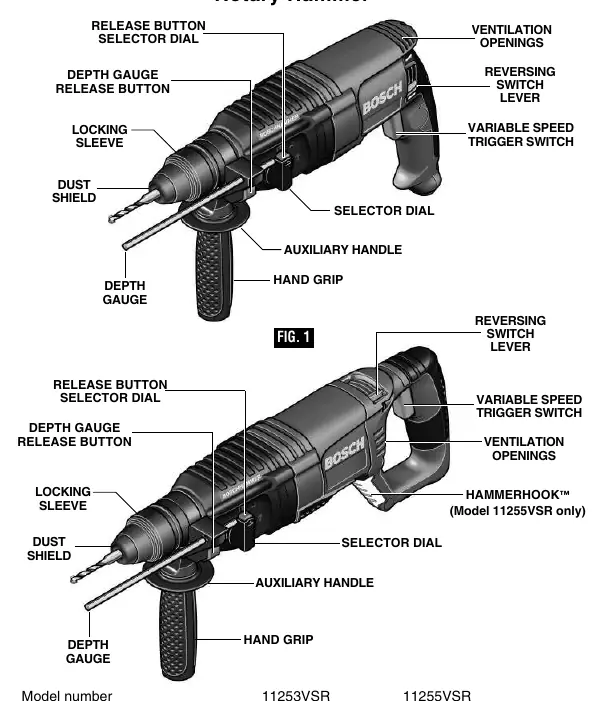
Variable speed trigger: Control speed by applying pressure to the trigger. More pressure increases speed.
Reversing switch: Slide the switch to the arrow marked forward or reverse. The tool will not operate in the middle position.
Slip clutch: The tool features an internal clutch that slips if the bit binds or the tool is overloaded. If this happens, turn the tool off immediately and clear the obstruction.
Auxiliary handle: Can be swiveled 360 degrees. Loosen the hand grip to reposition, then retighten securely.
Depth gauge: Used to pre-set drilling depth. Push the release button, slide the gauge to the desired depth, and release the button to lock.
Selector dial and modes
The selector dial allows you to choose between different operating modes:
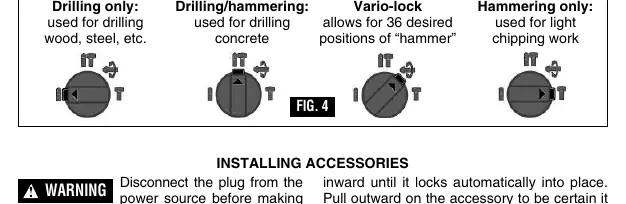
- Drilling only: For wood, steel, etc.
- Drilling/hammering: For concrete.
- Vario-lock: Allows for 36 positions of the hammer to set the angle of chisels.
- Hammering only: For light chipping work.
Caution: Do not operate the selector dial until the tool has come to a complete stop.
Installing and removing accessories
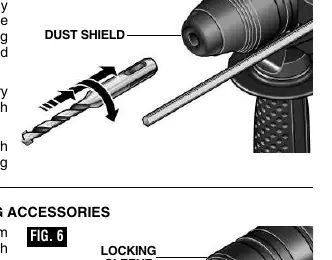
These models use SDS-plus bits. Clean the shank end of the accessory and lightly grease it before insertion. Insert the accessory into the tool holder through the dust shield, twisting and pushing until it locks. To remove, pull the locking sleeve backwards and pull the accessory out.
Maintenance and cleaning
Disconnect the tool from the power supply before cleaning. Use compressed dry air for cleaning. Keep ventilation openings clear. Check carbon brushes every two to six months. Bearings should be replaced after 300-400 hours of operation or at every second brush change by an authorized service center.
Manufacturer information
Bosch
Practical help
Common problems
Bit binds in the hole
The slip clutch will engage. Turn the tool off immediately and correct the condition causing the binding.
Tool stalls during operation
Too much pressure at low speed can stall the hammer. Reduce pressure.
Bit not cutting effectively
Too little pressure causes excess friction and sliding. Apply moderate, steady pressure.
Before use
- Check that the power source matches the tool's rating.
- Ensure the auxiliary handle is securely tightened.
- Verify the bit is sharp and undamaged.
- Wear safety goggles and a dust mask.
- Check for hidden wires or pipes in the work area.
Specs in practice
- Carbide tipped bits
- Maximum capacity is 1 inch.
- Thin wall core bits
- Maximum capacity is 2-5/8 inches.
Images and diagrams
- The selector dial (Fig. 4) allows switching between drilling, hammering, and Vario-lock modes.
- The locking sleeve (Fig. 5, 6) is used to install and remove SDS-plus accessories.
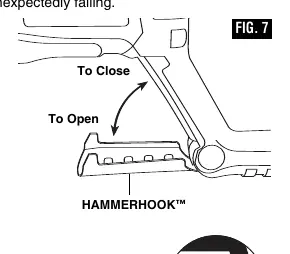
- The Hammerhook (Fig. 7, 11255VSR only) allows the tool to be hung when not in use.
Model compatibility
- Designed for SDS-plus bits.
- 3-Jaw Chuck with SDS Shank Adaptor can be used for straight shank bits.

Manual page author
David Miller
Documentation analyst
Organizes user manual content into clear summaries, with attention to model details, product context, and everyday usability.