Automotive / Backup Cameras
Installation Instructions for Brandmotion FLTW-1002 Backup Camera
Quick installation guide for the Brandmotion FLTW-1002 Heavy Duty Wide Angle AHD Exterior Camera. Includes mounting steps, wiring instructions, and configuration for parking lines and image mirroring.
Table of contents
Manual images
Click an image to enlargeQuick Guide
The Brandmotion FLTW-1002 is a heavy-duty wide-angle AHD exterior camera. Installation requires approximately 1 hour 30 minutes to 2 hours. Recommended tools include a screwdriver, drill, 5/32" drill bit, and electrical tape.
Kit Contents
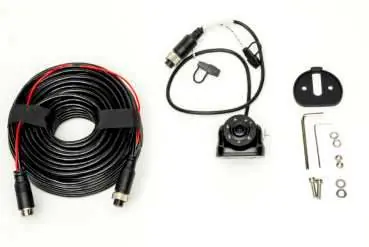
- 1x Camera
- 1x 20m 4-Pin Extension Cable
- 1x Rubber Gasket
- 1x Hardware Bag
Camera Mounting
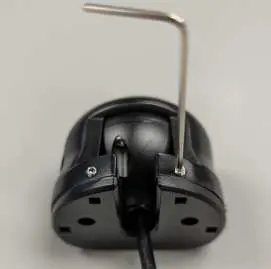
- Loosen the 4 Allen screws on the sides of the camera and remove the mounting bracket foot.
- Position the bracket on the vehicle, ensure there is space, and mark the holes with a pencil.
- Predrill holes using a 5/32" (4mm) drill bit.
- Attach the mounting foot to the vehicle using the provided bolts, washers, and nuts. Place the rubber gasket between the foot and the vehicle.
- Use a hole saw to drill a hole for the camera harness.
- Feed the harness through the hole and fit the grommet. Use silicone or sealing agents if necessary to ensure it is water-tight.
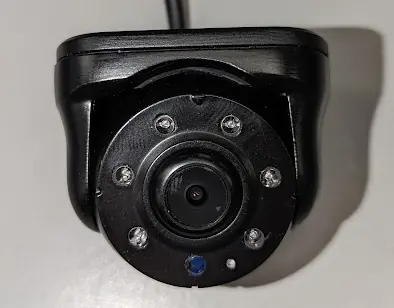
- Reattach the camera to the mounting foot, ensuring the light sensor is facing down.
- Tighten the four screws to lock the camera in position.
Camera Orientation
Rotate the camera barrel so that the light sensor is facing down, regardless of whether you are performing a top or under-mounting configuration.
Power Connection
The camera is powered via a 4-pin Aviator harness. Connect the camera to the harness to draw the necessary power and video signal.
Configuration
The camera connector features a WHITE and a GREEN loop wire for configuration:
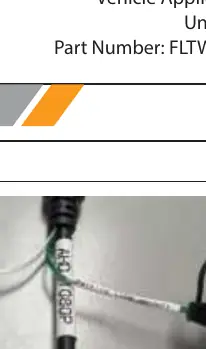
- GREEN loop: Controls parking lines. Unplug the loop cap to enable parking lines.
- WHITE loop: Controls mirrored image. Unplug the loop cap to unmirror the image. If using as a rear-facing camera, plug in the loop cap. If using as a front-facing camera, unplug the loop cap.
Practical help
Common problems
No parking lines visible
Unplug the loop cap on the GREEN loop wire.
Image is mirrored incorrectly
Adjust the WHITE loop wire. Unplug the cap to unmirror (front-facing); plug in the cap for rear-facing.
Grommet is not water-tight
Use silicone or other sealing agents around the grommet installation.
Before use
- 5/32" Drill Bit
- Electrical Tape
- Hole saw (for harness hole)
Images and diagrams
- The 4-pin Aviator harness connects the camera to the power and video source.
- Loop wires on the connector allow for customization of parking lines and image orientation.
Model compatibility
- Universal vehicle application.

Manual page author
Michael Turner
Technical manual editor
Reviews PDF manuals for structure, safety notes, and practical product details so readers can find the right information quickly.