Automotive / Backup Cameras
User Manual for Brandmotion 7" AHD 4 Input Monitor FLTW-2100
Quick guide for the Brandmotion FLTW-2100 7-inch AHD 4-input monitor. Includes installation steps, wiring diagrams, monitor navigation, and SD card formatting instructions.
Table of contents
Manual images
Click an image to enlargeQuick guide from the manual
This document provides installation and operation instructions for the Brandmotion FLTW-2100 7-inch AHD 4-input monitor. The system is designed for universal vehicle application and supports recording via an SD card. Key procedures include mounting the monitor, wiring power and trigger inputs, and formatting the SD card for DVR functionality.
Kit Contents
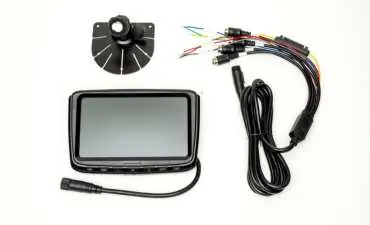
- Wired Monitor
- Fan Mount
- 20m Camera Extension Wire
- Monitor Harness
Mounting the Monitor
- Choose a desired mounting location on the dashboard.
- Peel off the red 3M tape cover and adhere the fan mount to the dash.
- Use the provided screws to secure the mount permanently.
- Slide the monitor into the bracket on the mount.
- Tighten the retaining nut against the bracket to secure the monitor in place.
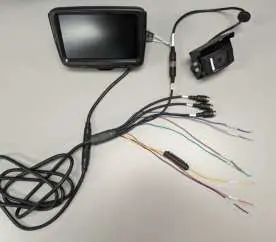
Wiring and Connections
Proper wiring is essential for power and automatic camera switching. Connect the monitor harness to the monitor and route the leads to the vehicle's power sources.
- Red: Accessory Power
- Yellow: Constant Power
- Black: Ground
- Brown: Channel 1 Trigger
- Green: Channel 2 Trigger
- Blue: Channel 3 Trigger
- Grey: Channel 4 Trigger
Trigger wires allow the monitor to automatically select inputs. For example, wiring the Green trigger to a turn signal will switch the monitor to the corresponding camera when the signal is activated.
DVR and SD Card Usage
The system supports video recording. Insert an SD card into the slot on the left side of the monitor. Note that the system only supports SD cards up to 128GB.
Monitor Navigation
The monitor features physical buttons for operation. Use the Primary Function during normal operation and the Menu Function when navigating settings.
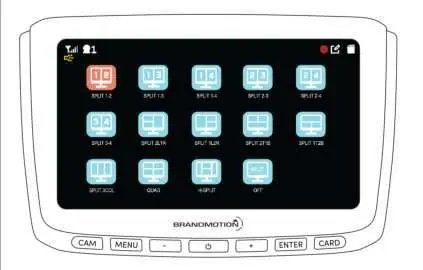
- CAM: Cycle Camera Layout
- MENU: Open Menu / Back
- POWER: Display On/Off
- +: Volume Up / Navigate Left
- ENTER: Start/Stop Recording / Scroll Up
- CARD: View Recordings / Scroll Down
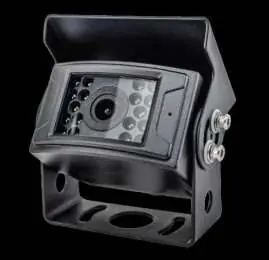
Camera Compatibility
The monitor is compatible with any 1080p AHD 4-pin camera. Supported Brandmotion parts include FLTW-1000, FLTW-1001, FLTW-1002, FLTW-1003, FLTW-1004, FLTW-1100, FLTW-1101, and FLTW-1102.
SD Card Formatting Procedure
- Insert the SD card.
- Press Menu.
- Press ENTER 3 times.
- Press +.
- Press ENTER.
- Press +.
- Press Card.
- Press Menu 2 times.
Practical help
Common problems
Monitor does not switch to camera automatically
Ensure the corresponding trigger wire (Brown, Green, Blue, or Grey) is correctly connected to the signal source, such as a turn signal.
Recording not working
Ensure the SD card is formatted correctly using the procedure in the manual and that the card capacity does not exceed 128GB.
Before use
- Verify all kit contents are present: Monitor, Fan Mount, Extension Wire, and Harness.
- Identify Accessory power, Constant power, and Ground sources in the vehicle.
- Ensure the SD card is 128GB or smaller.
- Confirm camera compatibility (1080p AHD 4-pin).
Specs in practice
- Trigger Wires
- Used for automatic input switching (e.g., turn signals).
Images and diagrams
- The wiring diagram illustrates the color-coded connections for power and camera triggers.
- The monitor navigation table explains the dual-function buttons for normal operation and menu settings.
Model compatibility
- Compatible with any 1080p AHD 4-pin camera.
- Supports SD cards up to 128GB.

Manual page author
Michael Turner
Technical manual editor
Reviews PDF manuals for structure, safety notes, and practical product details so readers can find the right information quickly.