Baby / Baby Walkers
User Manual for Bright Starts Zig Zag Zebra Walker
Quick guide for the Bright Starts Zig Zag Zebra Walker. Includes assembly instructions, safety warnings, battery installation, seat height adjustment, and cleaning tips.
Table of contents
Manual images
Click an image to enlargeQuick guide from the manual
This manual provides essential safety, assembly, and maintenance instructions for the Bright Starts Zig Zag Zebra Walker. Always read the full manual before use. The walker is intended for children who can sit up by themselves (approximately 6 months) and until they can walk by themselves or weigh more than 12 kg (26 lbs).
Safety Warnings
- Never leave the child unattended. Always keep the child in view while in the walker.
- Stair Hazard: Block stairs and steps securely before using the walker.
- Surface: Use only on flat surfaces free of objects that could cause the walker to tip over.
- Hazards: Keep the child away from hot liquids, oven ranges, radiators, space heaters, fireplaces, and electrical cables.
- Usage: Use only for short periods of time (e.g., 20 minutes).
- Indoor use only.
Parts List
Ensure all parts are present before assembly:
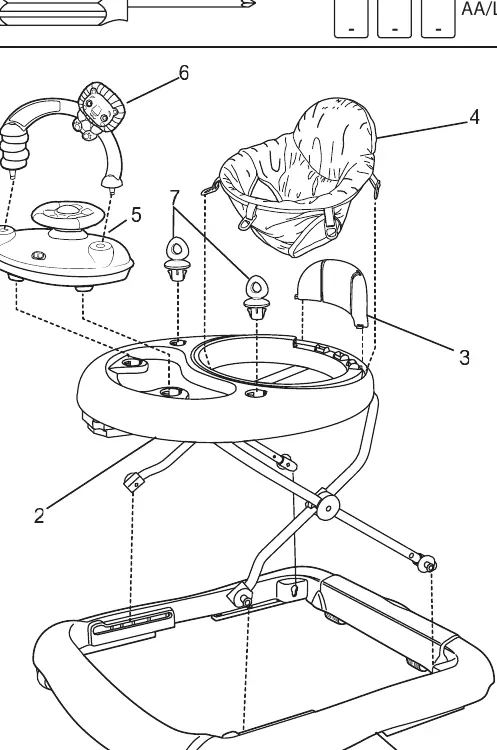
- Base
- Frame with table surface
- Backrest
- Seat Pad
- Toy Station
- Elmo Toy Bar
- Link Loops (2)
Assembly Instructions
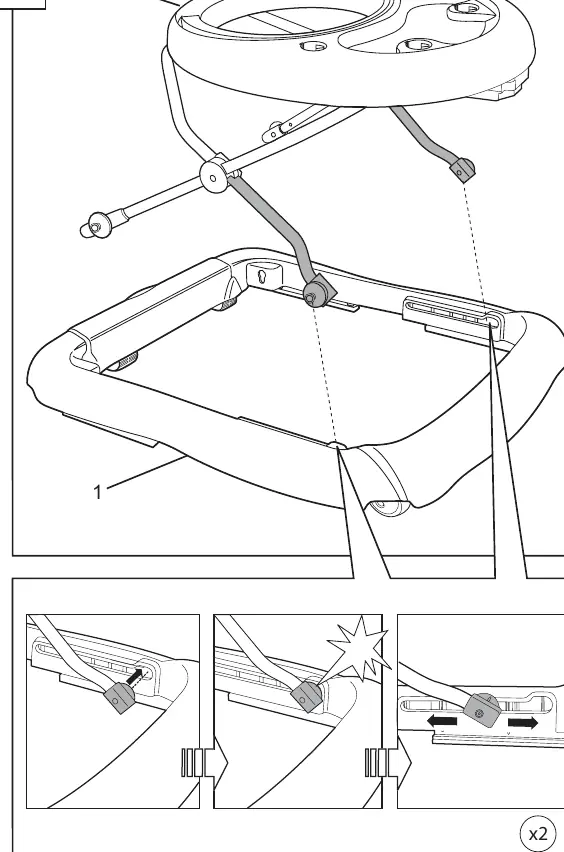
- Attach the frame to the base by aligning the components and snapping them into place.
- Secure the backrest into the designated slots on the frame.
- Attach the seat pad to the frame, ensuring all 8 clips are securely fastened.
- Insert the toy station into the table surface.
- Attach the Elmo toy bar to the toy station.
- Snap the link loops into the designated slots on the table surface.
Battery Installation
The music unit requires (3) size AA/LR6 (1.5V) alkaline batteries (not included).
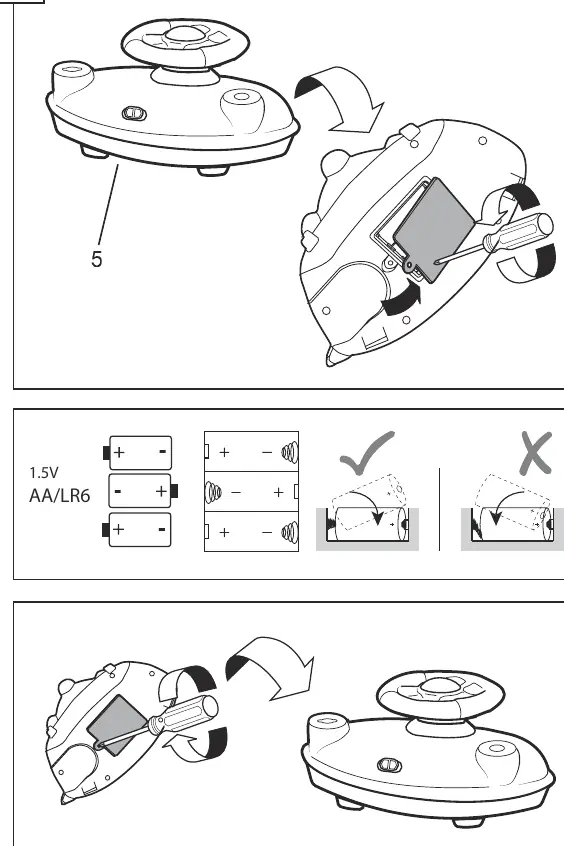
- Use a screwdriver to open the battery compartment on the toy station.
- Install batteries matching the polarity markings inside the compartment.
- Replace the cover and secure it with the screw.
- Do not mix old and new batteries or different types of batteries.
Adjusting the Seat Height
The walker features adjustable seat height to accommodate your growing child. Use the clips located on the frame to adjust the height. Ensure the child's feet are positioned correctly on the floor as shown in the diagram.
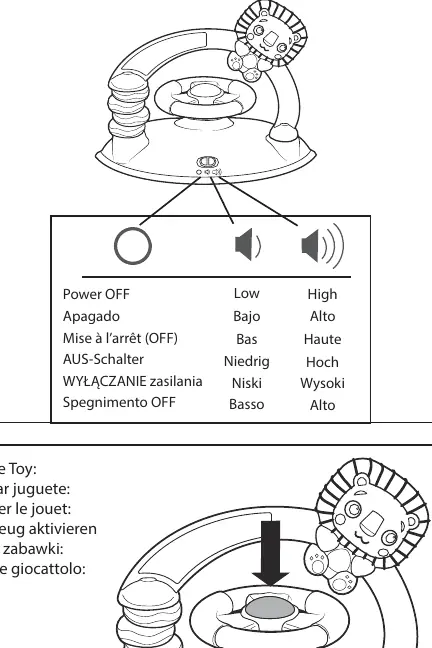
Toy Operation
The toy station features power and volume controls. Use the switch to turn the unit off or select the desired volume level (Low/High).
Care and Cleaning
- Seat pad: Machine wash with cold water, gentle cycle. No bleach. Tumble dry on low heat.
- Plastic Parts: Wipe clean with a damp cloth and mild soap. Air dry. Do not immerse in water.
- Frame: Wipe the metal frame with a soft, clean cloth and mild soap.
Manufacturer information
Bright Starts
Practical help
Common problems
Distorted sound, dimming lights, or non-working motorized parts
Replace the batteries with fresh alkaline batteries.
Walker tips over
Ensure the walker is used only on flat surfaces and that the area is free of objects that could cause tipping.
Poor stopping performance
Regularly clean the friction components on the walker.
Before use
- Child can sit up by themselves (approx. 6 months of age).
- Child cannot walk by themselves.
- Child weighs less than 12 kg (26 lbs).
- Stairs and steps are securely blocked.
- All parts are present, undamaged, and securely attached.
- Batteries are installed correctly if using the music unit.
Specs in practice
- Weight Limit
- Maximum weight capacity is 12 kg (26 lbs).
- Usage Duration
- Recommended for short periods of time, e.g., 20 minutes.
Images and diagrams
- Assembly: Follow steps 1-7 to attach the frame, seat, and toy station.
- Seat Height: Use the clips on the frame to adjust the height so the child's feet touch the floor correctly.
Model compatibility
- For indoor use only.
- Do not use accessories or replacement parts other than those approved by the manufacturer.

Manual page author
Michael Turner
Technical manual editor
Reviews PDF manuals for structure, safety notes, and practical product details so readers can find the right information quickly.