Baby / Swings & Bouncers
User Manual for Bright Starts Happy Safari Bouncer 11508-ES
Comprehensive user guide for the Bright Starts Happy Safari Bouncer (11508-ES). Includes assembly instructions, safety warnings, battery installation, usage tips, and cleaning guidelines.
Table of contents
Manual images
Click an image to enlargeImportant Safety Information
WARNING: Failure to follow these warnings can result in serious injury or death.

- Fall Hazard: Babies have suffered skull fractures falling from bouncers. Never leave the child unattended. Use the bouncer ONLY on the floor. Never use on elevated surfaces.
- Suffocation Hazard: Babies have suffocated when bouncers tipped over on soft surfaces or were used as a sleep product. Never use on a bed, sofa, cushion, or other soft surface. This product is not safe for sleep. If the baby falls asleep, move them to a firm, flat sleep surface like a crib or bassinet.
- Usage Limits: Stop using the bouncer when the baby starts trying to sit up or has reached 9 kg (20 lbs), whichever comes first.
- Safety: Always use the restraints and adjust them to fit snugly. Never lift or carry the baby in the bouncer. Never use the toy bar as a handle.
Assembly Instructions
Adult assembly is required. Ensure all parts are present before beginning.
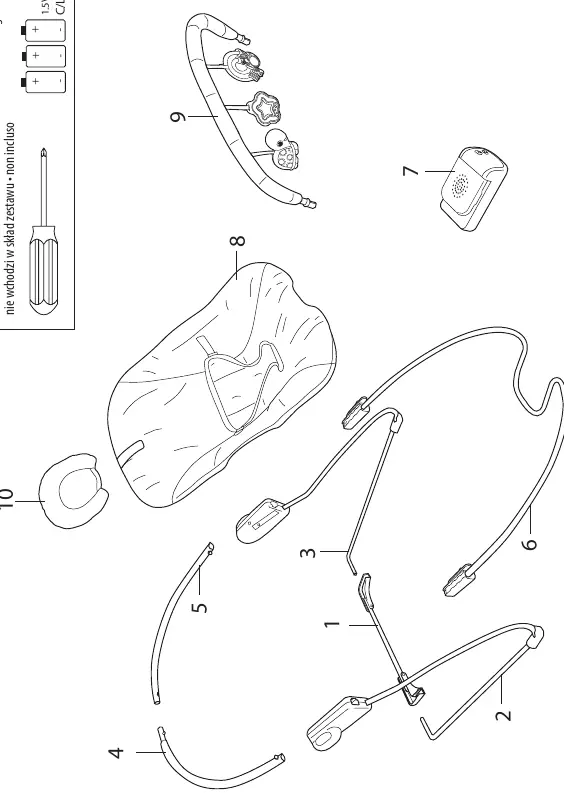
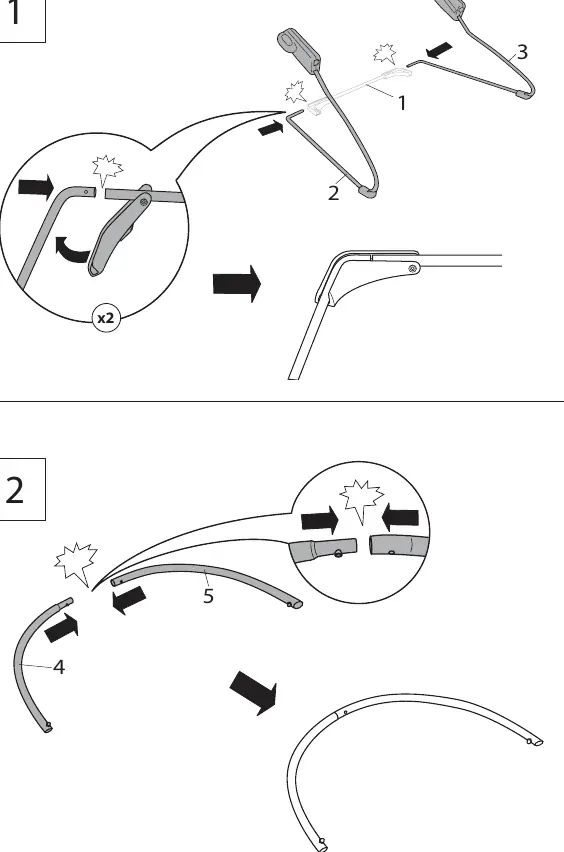
- Connect the base frame tubes (1, 2, 3) as shown in the assembly diagrams.
- Assemble the backrest tubes (4, 5) and attach them to the base frame.
- Connect the footrest wire (6) to the frame hubs.
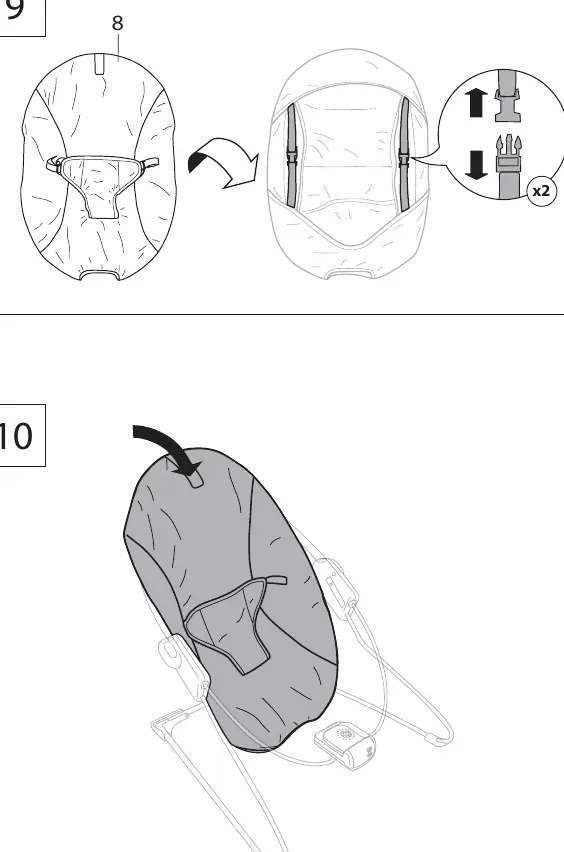
- Attach the seat pad (8) to the frame, ensuring all buckles and hook-and-loop patches are secured.
- Attach the toy bar (9) and headrest (10) to the frame.
Battery Installation
The music/vibration unit requires (3) size C/LR14 (1.5V) alkaline batteries (not included).
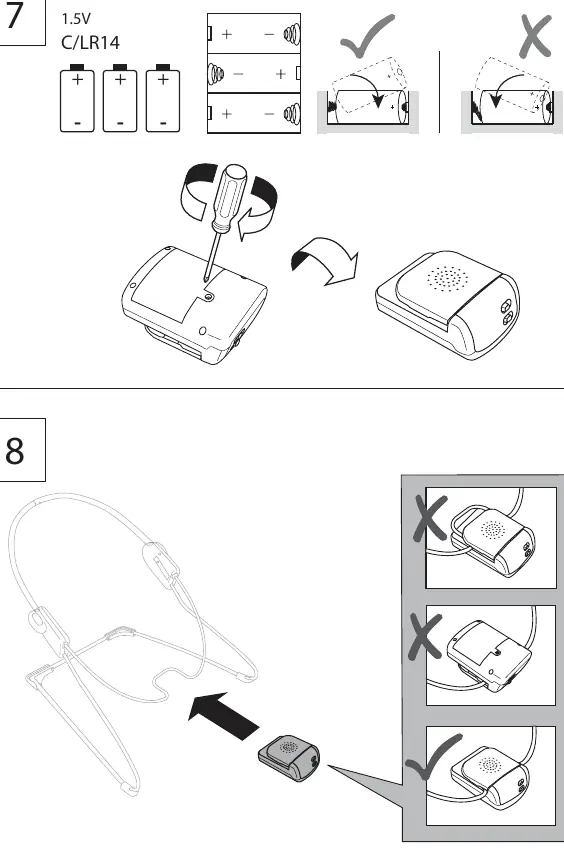
- Use a small Phillips screwdriver to open the battery compartment on the vibration unit.
- Insert batteries matching the polarity markings inside the compartment.
- Replace the cover and secure the screw.
- Replace batteries if the product operates erratically, sound is distorted, or motorized parts slow down.
Operating the Bouncer
The vibration and music unit is located at the front of the bouncer.
- Vibration: Slide the Vibration ON/OFF switch to the ON or OFF position. The vibration function automatically turns off after 30 minutes.
- Music: Slide the Music/Volume switch to the LOW or HIGH position to play music. Slide to OFF to stop the music.
Care and Cleaning
- Seat Pad: Remove from frame. Fasten all buckles and hook-and-loop patches. Machine wash with cold water, gentle cycle. Do not bleach. Tumble dry on low heat.
- Headrest: Fasten all hook-and-loop patches. Machine wash with cold water, gentle cycle. Do not bleach. Air dry flat.
- Toy Bar and Toys: Wipe clean with a damp cloth and mild soap. Air dry. Do not immerse in water.
- Frame: Wipe the metal frame with a soft, clean cloth and mild soap.
Storage and Disassembly
To disassemble for storage, use a small Phillips screwdriver to depress the release button on the inside of each connecting hub. Remove the footrest tube and base frame tubes from the hubs.
Manufacturer information
Bright Starts
Practical help
Common problems
Product operates erratically, sound is distorted, or lights fail.
Replace all three batteries with new alkaline C/LR14 batteries. Weak batteries often cause these issues.
Vibration stops working.
The vibration function has an automatic 30-minute shut-off timer. Simply slide the switch to OFF and back to ON to restart.
Baby is trying to sit up.
Stop using the bouncer immediately as it is no longer safe for the child.
Before use
- Check for damaged, missing, or loose parts before every use.
- Ensure the bouncer is placed only on the floor, never on elevated surfaces.
- Verify the seat restraint is adjusted snugly to the baby.
- Confirm the baby is under 9 kg (20 lbs) and cannot sit up independently.
- Ensure all hook-and-loop patches and buckles on the seat pad are securely fastened.
Specs in practice
- Weight Limit
- Maximum weight capacity is 9 kg (20 lbs).
Images and diagrams
- The parts list on page 14 identifies all frame components and the vibration unit.
- Assembly steps 1-4 detail the frame connection process.
- Step 7 shows the correct battery polarity orientation.
- Step 14 illustrates the correct attachment of the toy bar.
Model compatibility
- Not for use as a sleep product; if the baby falls asleep, move them to a crib.
- Do not use on beds, sofas, cushions, or other soft surfaces.

Manual page author
David Miller
Documentation analyst
Organizes user manual content into clear summaries, with attention to model details, product context, and everyday usability.