Electronics / Audio
Caliber RMD 035DAB Car Radio User Guide
Quick start guide for the Caliber RMD 035DAB car radio, covering installation, DAB+ antenna setup, wiring, and operation of radio, Bluetooth, and USB/SD features.
Table of contents
Manual images
Jump to the sectionQuick guide from the manual
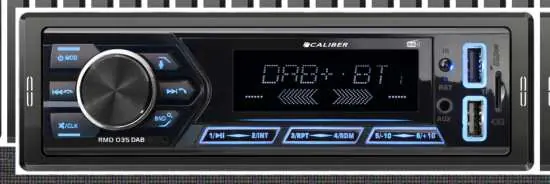
The Caliber RMD 035DAB is a car radio featuring FM/DAB+ radio, Bluetooth connectivity, and USB/SD playback. This guide provides essential steps for installation, wiring, and daily operation.
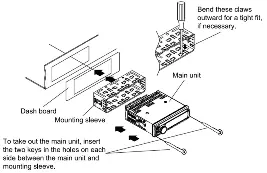
Installation
The unit is designed for a standard dashboard mounting sleeve. If necessary, bend the metal claws on the sleeve outward for a tighter fit. To remove the main unit, insert the provided keys into the holes on each side between the unit and the sleeve.
DAB+ Antenna Installation
For optimal DAB+ reception, the included screen-mount antenna must be installed correctly. Place the antenna on the windshield near the A-post. Remove the A-post cover, stick the transparent part of the antenna to the glass, and attach the black part to the metal frame. The antenna is powered through the antenna wire core (+5V), so no separate power connection is required.
Wiring Diagram
The unit uses a standard ISO connector. Key connections include: A4 (Yellow): Battery+, A5 (Blue): Antenna out, A7 (Red): ACC (ignition switch), A8 (Black): GND (battery-). Speaker outputs are provided on connector B (B1-B8).
Operation
Use the MOD button to switch between FM, USB/SD, AUX, Bluetooth, and DAB+ modes. Audio settings (Bass, Treble, Balance, Fader, Equalizer, Loudness) are accessed by pressing the VOL knob. RDS settings (AF, TA, REG, EON, PTY) are accessed by long-pressing the VOL knob.
Bluetooth
To pair, switch to Bluetooth mode, search for CALIBER_RMD035DAB on your phone, and enter password 0000. Once connected, LINKED will appear on the display.
USB/SD Playback
Insert a USB or SD card to start playback automatically. Use the number buttons (1-6) for playback controls (Play/Pause, Interval, Repeat, Random, Folder selection).
Manufacturer information
Caliber Europe
Practical help
Common problems
Radio does not find stations in AF mode
When AF (Alternative Frequency) is ON, the radio only searches for RDS-enabled stations and may skip ordinary radio stations.
DAB+ reception is poor
Ensure the DAB+ antenna is installed correctly according to the instructions; weather conditions can also affect reception.
Low volume from auxiliary device
Increase the volume on the external device (phone/MP3 player) to ensure proper signal levels.
Before use
- Ensure the vehicle ignition is off before starting wiring.
- Verify the 12VDC power supply.
- Check that speaker impedance is between 4-8 Ohm.
- Install the DAB+ antenna on the windshield near the A-post.
- Ensure the Bluetooth function is enabled on your phone.
Specs in practice
- Power Supply
- 12VDC required for operation.
- Bluetooth Version
- 5.0 for stable wireless connectivity.
- USB Charge Output
- 5.0VDC, Max 1.5A (7.5W) for charging mobile devices.
Images and diagrams
- The wiring diagram shows the ISO connector pinout for power (A) and speakers (B).
- The installation diagram illustrates how to secure the unit in the dashboard sleeve and how to use removal keys.
- The DAB+ antenna diagram shows the correct placement on the windshield and connection to the male SMA connector.
Model compatibility
- Compatible with 12V negative ground vehicle systems.
- DAB+ antenna requires an active connection with +5V phantom power (provided by the unit).
- USB input is intended for music playback and charging.

Manual page author
Emily Carter
User documentation editor
Prepares concise manual descriptions and highlights the most useful setup, operation, and maintenance information for readers.