Optics / Telescope Accessories
User Manual for Celestron Inspire 100AZ Telescope
Quick start guide and user manual for the Celestron Inspire 100AZ telescope. Includes assembly, finderscope alignment, smartphone imaging, and safety instructions.
Table of contents
Manual images
Click an image to enlargeQuick Start Guide
The Celestron Inspire 100AZ is a refractor telescope designed for both terrestrial and astronomical observation. This guide covers the essential steps to get your telescope ready for use.
- Assembly: The mount and tripod come pre-assembled. Simply extend the legs, lock the accessory tray, and attach the telescope tube.
- Alignment: Align the StarPointer Pro finderscope during the day using a distant object (at least 400m away) to ensure accurate targeting at night.
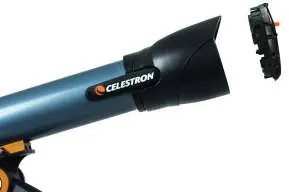
- Imaging: Use the built-in smartphone adapter located in the lens cap to capture images of the Moon and bright planets.
Assembling the Telescope
The Inspire mount and tripod are pre-assembled. To set up:
- Remove the tripod and mount from the box.
- Loosen the leg knobs to extend the legs to the desired length and tighten them.
- Stand the tripod upright and pull the legs apart until the folding accessory tray snaps into place.
- Lock the tray by aligning the tabs on the locking knob with the notches in the tray, pressing down, and turning clockwise 20 degrees.
- Secure the tray by turning the tension knob clockwise until it stops.
Attaching the Telescope Tube
- Loosen the two tube mounting bolts on the side of the dovetail saddle.
- Slide the dovetail bar on the bottom of the telescope tube into the saddle. Ensure the eyepiece end points in the same direction as the panning handle.
- Tighten the mounting bolts, starting with the larger one.
- Remove the lens cap when ready to observe.
Installing the Erect Diagonal and Eyepieces
The telescope includes a 90° erect image diagonal for comfortable viewing.
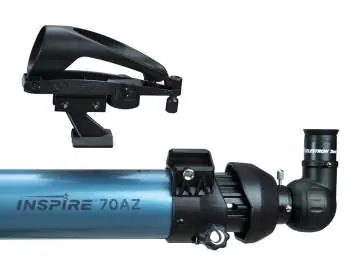
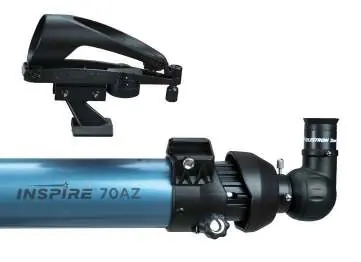
- Remove caps from the diagonal.
- Loosen the setscrews on the back of the focuser and remove the dust cap.
- Insert the diagonal into the focuser and tighten the setscrews.
- To install an eyepiece, loosen the setscrews on the diagonal, insert the 20mm eyepiece, and tighten the screws.
StarPointer Pro Finderscope
The finderscope helps aim the telescope. To install:
- Slide the bracket into the dovetail slot on top of the focuser.
- Secure by tightening the setscrew.
- Alignment: During the day, center a distant object in the 20mm eyepiece. Turn on the finderscope and use the adjustment knobs to align the red reticle with the object centered in the eyepiece.
Imaging with Your Smartphone
The lens cap features an integrated smartphone adapter.
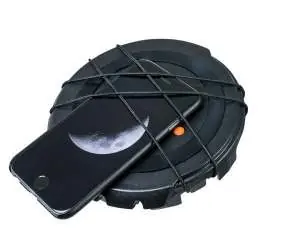
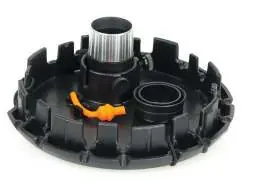
- Remove the orange plug from the camera opening in the lens cap.
- Turn the cap so the outside faces up. Lift the bungee straps and slide your smartphone between the straps and the cap, aligning the camera with the opening.
- Ensure the camera lens is centered in the opening.
- Remove the rubber eyecup from the 20mm eyepiece and attach it to the retainer inside the lens cap.
- Insert the eyepiece into the lens cap holder and secure it.
- Attach the lens cap (with phone and eyepiece) to the telescope's diagonal.
- Use your phone's camera app to focus and capture the image.
Safety Warnings
- Solar Warning: Never look directly at the Sun with the naked eye or a telescope without a proper solar filter. Permanent eye damage may occur.
- Do not use the telescope to project an image of the Sun onto any surface, as internal heat can damage the equipment.
Manufacturer information
Celestron
Practical help
Common problems
Finderscope reticle does not match the view in the eyepiece.
Perform the alignment procedure during the day using a distant, stationary object like a streetlight or tree.
Image is blurry.
Adjust the focus knobs slowly until the image is sharp. Remember to refocus when changing eyepieces.
Smartphone camera is not centered.
Reposition the smartphone using the different anchor points on the lens cap to ensure the camera lens is perfectly centered over the opening.
Before use
- Verify all parts are present using the parts list.
- Ensure the tripod is stable and the accessory tray is locked.
- Remove the main dust cover from the telescope.
- Install the 20mm eyepiece for initial setup.
- Check batteries for the StarPointer Pro (CR-2032) and Flashlight (AA).
Specs in practice
- 20mm Eyepiece
- Low power eyepiece, recommended for initial setup and finding targets.
- 10mm Eyepiece
- High power eyepiece, provides more magnification for detailed views.
- Focus Micrometer
- Numbered scale (0-10) on the focuser to help quickly return to a previously focused distance.
Images and diagrams
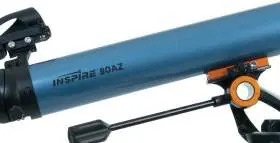
- The mount features a panning handle with an altitude clutch for vertical movement and an azimuth tension knob for horizontal movement.
- The smartphone adapter is built into the lens cap, using bungee straps to hold the phone in place.
Model compatibility
- The smartphone adapter is compatible with various smartphone designs by adjusting the bungee strap anchor points.

Manual page author
Emily Carter
User documentation editor
Prepares concise manual descriptions and highlights the most useful setup, operation, and maintenance information for readers.