Electronics / Cameras
User Manual for Celestron PowerTank 17 Power Station
Quick guide for the Celestron PowerTank 17 (Model 18777). Learn how to recharge, use the jump starter, operate the flashlight, radio, and siren, and perform basic maintenance.
Table of contents
Manual images
Click an image to enlargeQuick guide from the manual
The Celestron PowerTank 17 is a portable power station designed for jump-starting vehicles, powering 12V DC devices, and providing 5V USB power. It also features a built-in flashlight, spotlight, radio, and emergency siren. Always ensure the unit is switched OFF when not in use and charge it fully before the first use.
Recharging the PowerTank
The PowerTank can be recharged via AC or DC power sources.

- AC Recharging: Select the correct adapter plug, set the main switch to the CHA position, and connect the AC adapter to the side panel input. Charge for 15-20 hours initially, and 10-12 hours for subsequent charges.
- DC Recharging: Use the provided DC power cord to connect to a vehicle's cigarette lighter. The engine must be running to initiate a charge.
- Important: Do not exceed recommended charging times. If the yellow LED light is on during operation, the battery is low and requires immediate recharging.
Using the PowerTank
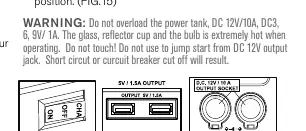
- Power Supply: Ensure your devices match the PowerTank's rating (10A for 12V, 1.5A for 5V). Switch the unit ON before connecting your device.
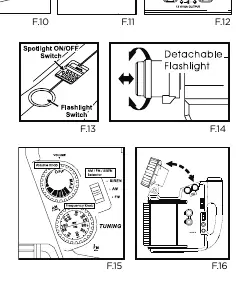
- Flashlight & Spotlight: Use the ON/OFF button to cycle through modes. The flashlight can be detached for remote operation.
- Radio & Siren: Turn the volume knob clockwise to turn on the radio. Select AM or FM. To use the siren, turn the selector to the SIREN position.
Jump starting a vehicle
The PowerTank is intended for vehicles with partially discharged batteries.
- Ensure the PowerTank is OFF or ON as needed.
- Connect the POSITIVE (+) pole of the PowerTank to the POSITIVE (+) pole of the vehicle battery.
- Connect the NEGATIVE (-) pole of the PowerTank to the NEGATIVE (-) pole of the vehicle battery.
- Leave connected for approximately 20 minutes.
- Disconnect in reverse order (Negative first, then Positive).
- Recharge the PowerTank after use.
Warning: Never allow jumper cables to touch each other or the same metal surface while connected to the PowerTank, as this may cause a short circuit or fire.
Maintenance and Troubleshooting
- Flashlight Bulb Replacement: Ensure the unit is OFF and the light has cooled down. Detach the light, unscrew the cap, and replace the bulb.
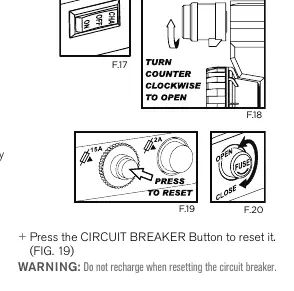
- Circuit Breaker: If output exceeds 12V, the breaker will trip. Turn the unit OFF and press the Circuit Breaker button to reset.
- Fuse: If the 5V USB output fails, the fuse may be broken. Turn the unit OFF, open the fuse cap, and replace with a new 2 Amp fuse.
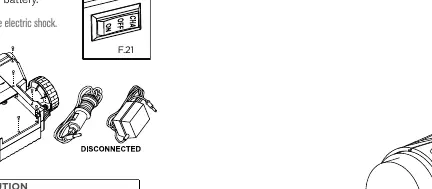
- Battery Disposal: To remove the battery, ensure the unit is OFF and disconnected from the charger. Remove the spotlight, open the casing by unscrewing the halves, and cut the wires.
Specifications
- Battery: 12V/17Ah Sealed Lead-Acid.
- Operating Temp: 32°F to 86°F (0°C to 30°C).
- DC 12V Output: 10A (protected by 15A circuit breaker).
- DC 5V USB Output: Protected by 2A fuse.
- Weight: Approx. 20 lbs (9.1 kg).
Manufacturer information
Celestron
Practical help
Common problems
No LED indicator (low or charge) when switch is ON
The circuit breaker has tripped. Reset the circuit breaker.
DC-12V output does not work
The circuit breaker has tripped. Reset the circuit breaker.
USB output does not work
The fuse is broken. Replace with a new 2 Amp fuse.
Before use
- Charge the unit for 15-20 hours before first use.
- Ensure the main switch is OFF when not in use.
- Verify the device rating matches the PowerTank output (10A for 12V, 1.5A for 5V).
- Check that the charger voltage matches the outlet.
- Ensure the PowerTank is stored in a cool, dry place.
Specs in practice
- DC 12V Output
- 10A max current, protected by a 15A circuit breaker.
- DC 5V USB Output
- Protected by a 2A fuse.
- Operating Temperature
- 32°F to 86°F (0°C to 30°C).
Images and diagrams
- F.1-F.4: Charging setup and battery indicator lights.
- F.10-F.12: Power output ports and switch locations.
- F.13-F.16: Flashlight, spotlight, and radio operation controls.
- F.17-F.20: Maintenance procedures for bulb replacement, circuit breaker, and fuse.
- F.21-F.23: Battery removal and jump-starting setup.
Model compatibility
- Use only for vehicles with partially discharged batteries.
- DC 12V negative ground system only.
- Do not use the DC 12V output jack to jump start vehicles.

Manual page author
Michael Turner
Technical manual editor
Reviews PDF manuals for structure, safety notes, and practical product details so readers can find the right information quickly.