Optics / Telescope Accessories
User Manual for Celestron StarSeeker 100mm Telescope
Comprehensive user guide for the Celestron StarSeeker 100mm telescope. Includes assembly instructions, alignment procedures, hand control operation, maintenance tips, and technical specifications.
Table of contents
Manual images
Click an image to enlargeQuick Start Guide
The Celestron StarSeeker 100mm is a computer-automated telescope. Before your first observation, ensure the tripod is level, the accessory tray is installed, and the telescope is mounted securely. Power the unit using 8 AA batteries or an optional 12V AC adapter. You must perform an alignment procedure, such as SkyAlign, to enable the GoTo functionality and tracking.
Assembly
The telescope comes partially assembled. Follow these steps to prepare for use:


- Tripod: Spread the legs until the center brace is fully extended. Attach the accessory tray to the center support brace using the locking bolt.
- Mounting: Place the fork arm base into the tripod mounting platform and secure it with the quick-release coupling screw.
- Accessories: Attach the star diagonal to the focuser barrel and secure it with the thumbscrew. Insert the eyepiece into the star diagonal.
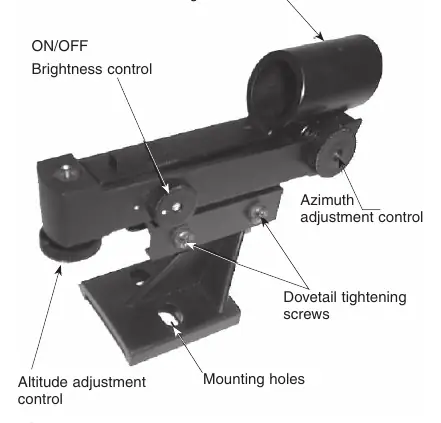
- Star Pointer: Slide the Star Pointer bracket into the dovetail mounting platform and tighten the thumbscrew. Remove the protective plastic cover from the battery before use.
Hand Control Operation
The hand control provides access to the telescope's database and alignment features.
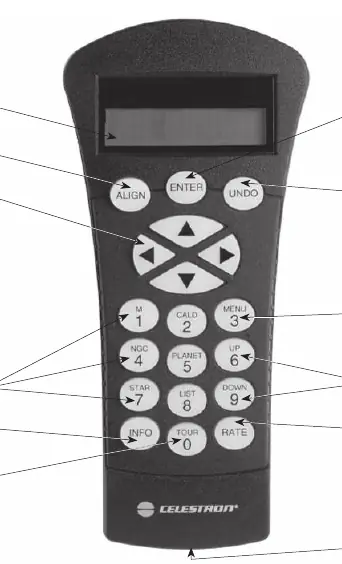
- Alignment: Choose from SkyAlign (easiest), Auto Two-Star, Two-Star, One-Star, or Solar System Align. SkyAlign requires you to point the telescope at any three bright celestial objects.
- Selecting Objects: Use the catalog keys (M, CALD, NGC, STAR) or the LIST key to browse the database of over 4,000 objects.
- Slewing: Use the direction buttons to move the telescope. The RATE key allows you to change the motor speed from precise guiding (1) to fast slewing (9).
Telescope Basics
To focus, turn the focus knobs at the eyepiece end until the image is sharp. Avoid looking through glass windows or across heat-radiating surfaces like asphalt, as this degrades image quality. Magnification is calculated by dividing the telescope's focal length (600mm) by the eyepiece's focal length.
Maintenance
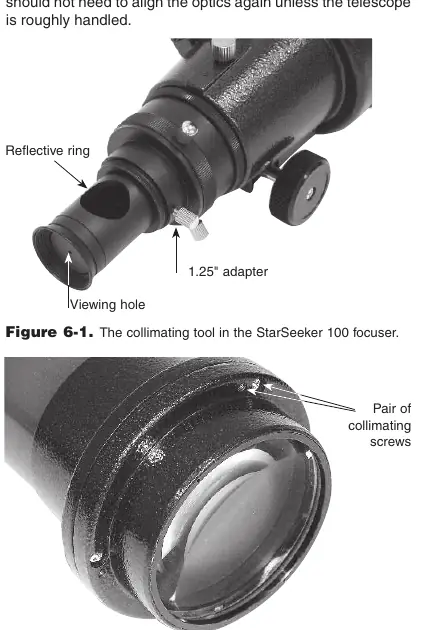
Keep the optics clean by removing dust with a camel's hair brush or pressurized air. Use an optical cleaning solution and tissue for deeper cleaning, wiping from the center outward. The telescope is factory-collimated; only adjust the collimation screws if absolutely necessary, using a 2.5mm hex key and Phillips-head screwdriver to align the reflections in the collimating tool.
Safety Warnings
- Never look directly at the sun with the telescope without a proper solar filter.
- Do not use an eyepiece solar filter or Herschel wedge, as internal heat can cause them to break.
- Never leave the telescope unsupervised around children.
Manufacturer information
Celestron
Practical help
Common problems
Telescope not tracking correctly
Ensure the telescope is properly aligned using one of the alignment procedures and that the tracking mode is set to Alt-Az.
Image is blurry
Check the focus knob. Avoid observing through windows or over heat sources like rooftops.
Star Pointer red dot not aligned
Use the azimuth and altitude adjustment knobs on the Star Pointer to center the red dot on the alignment star.
Hand control displays 'Select Model'
This occurs on the first use. Use the Up/Down keys to select your specific model and press ENTER.
Before use
- Install 8x AA alkaline batteries in the battery pack.
- Level the tripod legs.
- Attach the accessory tray.
- Remove all lens covers.
- Ensure the Star Pointer battery plastic tab is removed.
- Attach the star diagonal and eyepiece.
Specs in practice
- Focal Length
- 600mm; used to calculate magnification.
- Power Requirements
- 12V DC nominal; requires 8x AA batteries or optional AC adapter.
Images and diagrams
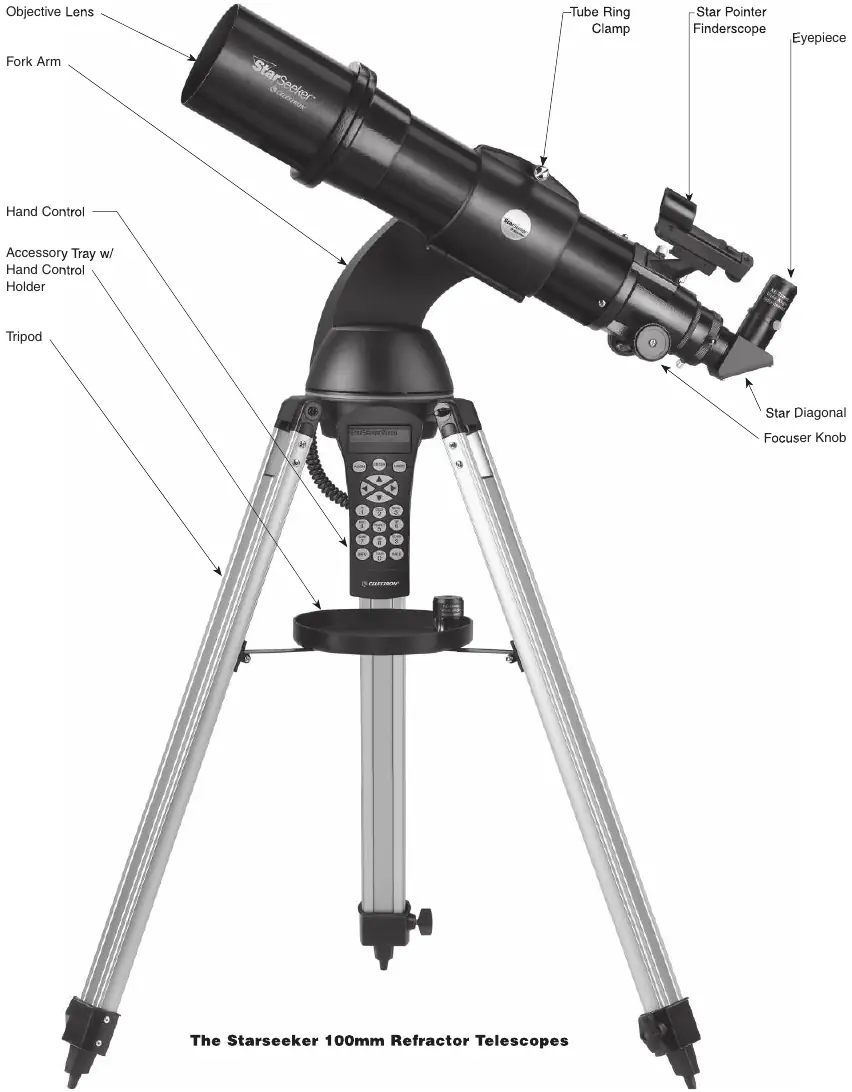
- Page 3: Parts diagram identifying the objective lens, fork arm, hand control, and focuser.
- Page 20: Collimation tool and lens cell screw locations.
Model compatibility
- Compatible with standard 1.25-inch eyepieces.
- Supports RS-232 connection for computer control (requires optional cable #93920).

Manual page author
Emily Carter
User documentation editor
Prepares concise manual descriptions and highlights the most useful setup, operation, and maintenance information for readers.