General / Accessories
Celestron StarSense Explorer DX 102AZ Telescope User Guide
Comprehensive setup and operation guide for the Celestron StarSense Explorer DX 102AZ telescope, including tripod assembly, finderscope alignment, and smartphone app integration.
Table of contents
Manual images
Jump to the sectionTelescope Assembly and Setup
The Celestron StarSense Explorer DX 102AZ is designed for ease of use, combining traditional optical performance with modern smartphone-assisted navigation. Begin by unpacking all components, including the telescope tube, tripod, mount head, accessory tray, eyepieces, finderscope, and the StarSense phone dock. Assemble the tripod by extending the legs to your desired height and securing them with the hand knobs. Attach the accessory tray to the center leg brace using the provided thumb screws.
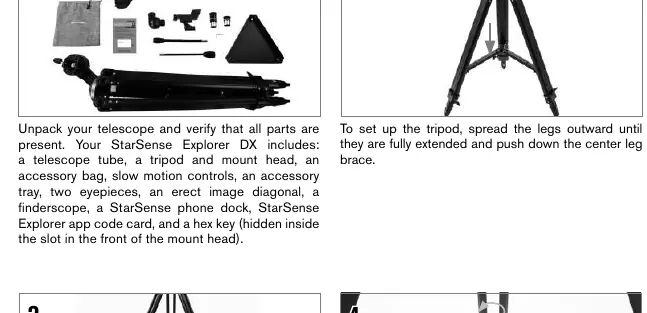
Once the tripod is stable, attach the mount head and install the slow-motion control knobs. These knobs are essential for making fine adjustments when tracking celestial objects. The telescope tube attaches to the mount via a dovetail bar; slide it into the clamp and tighten the hand knob securely. Finally, insert the erect image diagonal into the focuser and place the 25 mm eyepiece into the diagonal to complete the optical assembly.
Smartphone Integration and App Activation
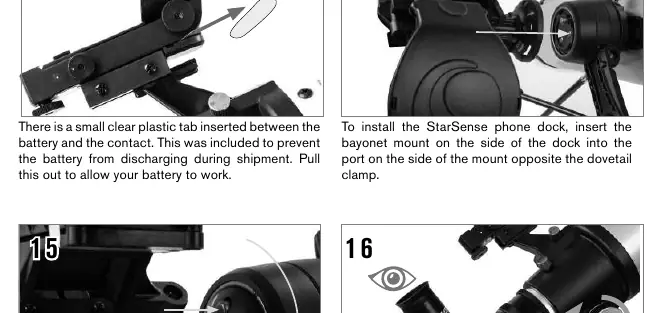
The StarSense Explorer system uses your smartphone to help you navigate the night sky. First, download the Celestron StarSense Explorer app from the Apple App Store or Google Play. Before your first session, locate the activation code on the orange postcard included in the box. Launch the app and enter this code to unlock the software features for up to five devices. To use the system, attach the StarSense phone dock to the mount, remove the protective cap from the mirror, and secure your smartphone in the spring-loaded holder.
Aligning the Finderscope
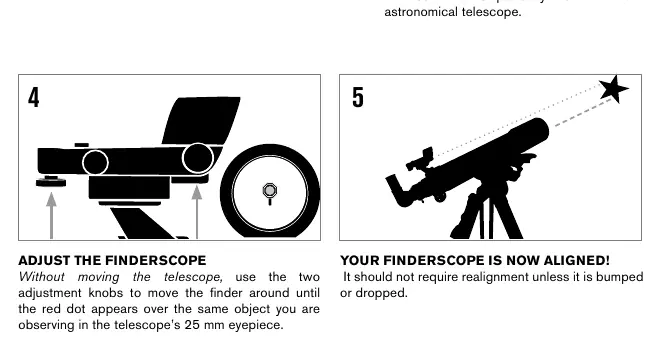
Proper alignment of the finderscope is critical for locating objects. Perform this step during the day by choosing a distant, stationary target at least a quarter-mile away. Center the target in the telescope's 25 mm eyepiece. Without moving the telescope, adjust the finderscope's knobs until the red dot is perfectly centered on the same target. Once aligned, the finderscope will allow you to quickly point the telescope at celestial objects.
Observing Safety and Maintenance
Always remember that the telescope is a precision instrument. When moving the telescope, use the slip clutches on the mount to make large adjustments by hand, and use the slow-motion knobs for precise tracking. If the image appears blurry, turn the focus knobs located below the focuser until the view is sharp. Note that astronomical telescopes often produce an inverted image, which is normal. Solar Warning: Never attempt to view the Sun through any telescope without a proper solar filter, as this can cause permanent eye damage. Keep the lens caps on when the telescope is not in use to protect the optics from dust and debris.
Manufacturer information
Celestron
Practical help
Common problems
Image is blurry
Gently turn the focus knobs on either side of the telescope until the image comes into sharp focus.
Smartphone does not fit in dock
Remove bulky phone cases, such as folio-style cases, that prevent the phone from sitting flush in the holder.
Finderscope not pointing at the same object as the telescope
Perform the alignment procedure again during the day using a distant target.
Before use
- Verify all parts are present from the box contents list.
- Ensure tripod legs are fully extended and the accessory tray is secured.
- Check that the slow-motion knobs are firmly attached to the gear shafts.
- Remove the plastic battery tab from the StarSense dock if applicable.
- Download the StarSense Explorer app and activate it with your unique code.
- Remove all lens caps from the telescope and finderscope.
- Ensure the smartphone is securely mounted in the dock.
Images and diagrams
- The tripod setup involves extending legs and securing the accessory tray.
- Slow-motion knobs attach to D-shaped gear shafts using a hex key.
- The dovetail bar slides into the mount clamp for secure attachment.
- The StarSense dock uses a bayonet mount and an orange release button.
- Finderscope alignment uses two adjustment knobs to center the red dot.
Model compatibility
- The StarSense Explorer app is available on Apple App Store and Google Play.
- The activation code unlocks the app on up to 5 devices.
- Most smartphones fit in the dock, but bulky cases may need to be removed.

Manual page author
Michael Turner
Technical manual editor
Reviews PDF manuals for structure, safety notes, and practical product details so readers can find the right information quickly.