General / Accessories
Celestron StarSense Explorer DX 130AZ Telescope Quick Setup Guide
A comprehensive quick setup guide for the Celestron StarSense Explorer DX 130AZ telescope, covering assembly, finderscope alignment, smartphone dock installation, and app activation.
Table of contents
Manual images
Jump to the sectionQuick guide from the manual
This document provides essential steps for setting up your Celestron StarSense Explorer DX 130AZ telescope. It covers the initial assembly, finderscope alignment, and the integration of the StarSense smartphone dock for use with the companion app.
Assembly and Setup
Follow these steps to prepare your telescope for use:
- Tripod Setup: Spread the tripod legs fully and push down the center leg brace. Extend the legs by loosening the hand knobs, pulling the sections out, and tightening the knobs.
- Accessory Tray: Place the tray on the center brace, align the holes, and secure it with the three thumb screws.
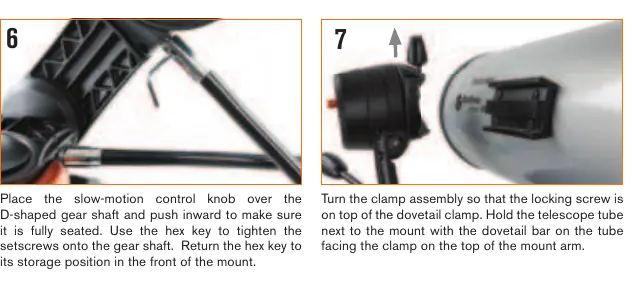
- Slow-Motion Controls: Locate the hex key hidden in the mount head. Attach the slow-motion knobs to the D-shaped gear shafts, push them in until seated, and tighten the setscrews with the hex key.
- Telescope Mounting: Rotate the clamp assembly so the locking screw is on top. Slide the dovetail bar on the telescope tube into the clamp and tighten the hand knob to secure it.
- Eyepiece and Finderscope: Remove the focuser cap, insert the 25mm eyepiece, and tighten the setscrew. Slide the finderscope bracket into the dovetail slot on the tube and secure it.
Smartphone Dock Installation
To use the StarSense app, install the phone dock:
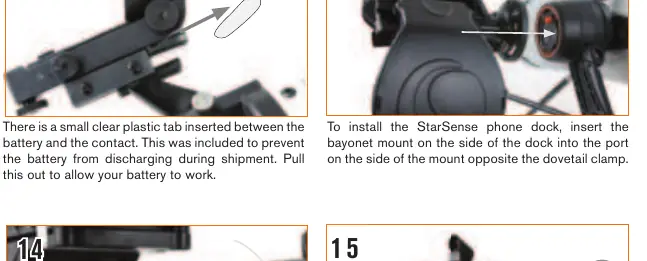
- Remove the clear plastic battery tab from the dock to activate the battery.
- Insert the dock's bayonet mount into the port on the side of the mount.
- Align the arrow on the dock with the alignment mark on the mount, press inward, and turn counterclockwise until the orange release button snaps into place.
Aligning the Finderscope
Proper alignment is crucial for locating objects:
- Choose a distant, recognizable object (at least 400 meters away) during the day.
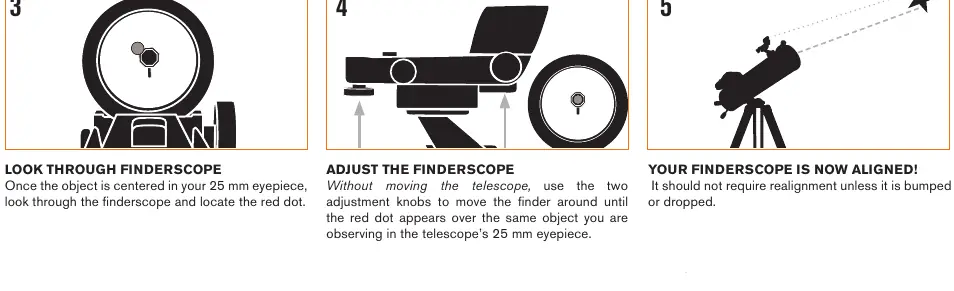
- Center the object in the 25mm eyepiece.
- Without moving the telescope, use the two adjustment knobs on the finderscope to move the red dot until it is centered on the same object.
Moving the Telescope
The mount features slip clutches. For large movements, hold a tripod leg with one hand and push the telescope tube with the other. For fine adjustments or tracking, use the slow-motion knobs.
Safety Warnings
SOLAR WARNING: Never attempt to view the Sun through any telescope without a proper solar filter. Doing so can cause permanent eye damage.
Manufacturer information
Celestron
Practical help
Common problems
Image is blurry
Turn the focus knobs located below the focuser until the image is sharp.
Finderscope is not pointing at the same object as the telescope
Perform the finderscope alignment procedure during the day using a distant object.
Smartphone dock does not power on
Ensure the clear plastic battery tab has been removed from the dock.
Before use
- Verify all parts are present (tube, tripod, mount, accessories, eyepieces, finderscope, dock).
- Ensure the tripod is stable and the accessory tray is secured.
- Check that the slow-motion knobs are fully seated and tightened.
- Remove the lens cap from the front of the telescope.
- Download the StarSense Explorer app via Wi-Fi.
- Activate the app using the code on the orange postcard.
Specs in practice
- 25mm Eyepiece
- The lower-powered eyepiece used for initial object location and alignment.
- Dovetail Clamp
- The mounting mechanism used to attach the telescope tube to the mount.
- Slip Clutches
- Internal mechanisms allowing for manual movement of the telescope without unlocking axes.
Images and diagrams
- Steps 1-4: Tripod and accessory tray assembly.
- Steps 5-6: Attaching slow-motion control knobs.
- Steps 7-8: Mounting the telescope tube to the tripod head.
- Steps 11-14: Installing and removing the StarSense smartphone dock.
- Finderscope alignment steps 1-5: Using adjustment knobs to center the red dot.
Model compatibility
- The StarSense Explorer app activation code unlocks up to 5 devices.
- Most smartphones fit in the dock with a case, but bulky cases (e.g., folio style) may need to be removed.

Manual page author
Emily Carter
User documentation editor
Prepares concise manual descriptions and highlights the most useful setup, operation, and maintenance information for readers.