General / Accessories
Celestron StarSense Explorer LT 127AZ Telescope Setup Guide
A comprehensive setup and operation guide for the Celestron StarSense Explorer LT 127AZ telescope, covering assembly, finderscope alignment, smartphone dock installation, and app activation.
Table of contents
Quick guide from the manual
This document provides essential instructions for assembling and using your Celestron StarSense Explorer LT 127AZ telescope. It covers tripod setup, telescope mounting, finderscope alignment, and smartphone integration for use with the StarSense Explorer app.
Assembly and Setup
Follow these steps to prepare your telescope:
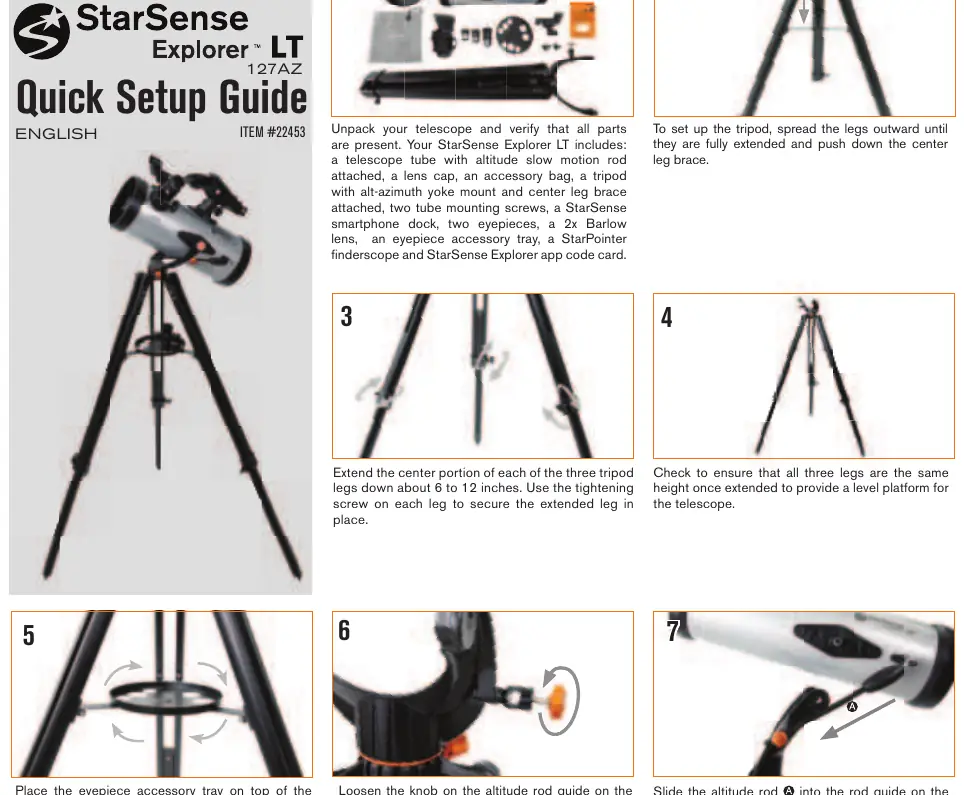
- Tripod Setup: Spread the legs fully and push down the center leg brace. Extend each leg 6-12 inches and secure with the tightening screws. Ensure all legs are at the same height.
- Accessory Tray: Place the tray on the center leg brace and thread it into the center hole until seated. Rotate counterclockwise if necessary to align holes.
- Mounting the Telescope: Loosen the altitude rod guide knob on the yoke mount. Slide the altitude rod into the guide and lower the telescope tube hubs into the cradles. Tighten the rod guide screw and secure the tube with the two mounting screws.
- Finderscope: Remove the two silver nuts from the top of the tube. Place the finderscope base over the posts and re-thread the nuts. Remove the plastic battery tab to activate the finderscope.
Using the Telescope
Moving the Telescope: Loosen the azimuth tension knob on the yoke mount to move left/right. For up/down movement, loosen the altitude rod guide knob. Use the altitude slow motion rod for fine adjustments.
Eyepieces and Barlow Lens: Always start with the 25mm low-power eyepiece. To use the 2x Barlow lens, remove the eyepiece, insert the Barlow lens into the focuser, then insert the eyepiece into the Barlow lens.
Aligning the Finderscope
Alignment is crucial for locating objects:
- Choose a recognizable target at least a quarter-mile away during the day.
- Center the target in the 25mm eyepiece.
- Look through the finderscope and use the two adjustment knobs to move the red dot until it is over the same target.
Smartphone Integration
Remove the large cap from the StarSense dock mirror. Pull the spring-loaded slider on the phone dock, place your phone flush against the bottom lip, and release the slider to secure it. Download the Celestron StarSense Explorer app and use the activation code from the orange postcard included in the box.
Safety
SOLAR WARNING: Never attempt to view the Sun through any telescope without a proper solar filter.
Manufacturer information
Celestron
Practical help
Common problems
Image is blurry
Turn the focus knobs located below the focuser until the image becomes sharp.
Altitude slow motion rod will not turn
The rod has a limited 15-degree range. Loosen the rod guide knob, turn the handle to the middle of its travel, and retighten the guide knob.
Finderscope red dot is not aligned
Use the two adjustment knobs on the finderscope to align the red dot with the object centered in the main telescope eyepiece.
Before use
- Verify all parts are present (telescope tube, tripod, mount, eyepieces, Barlow lens, finderscope, smartphone dock).
- Ensure the tripod is level and stable.
- Remove the plastic battery tab from the finderscope.
- Download the StarSense Explorer app via Wi-Fi.
- Locate the activation code on the orange postcard.
Specs in practice
- 25mm Eyepiece
- Low-power eyepiece, recommended for initial target finding.
- 2x Barlow Lens
- Doubles the magnification of the eyepiece currently in use.
- Altitude Slow Motion Rod
- Allows for fine, incremental vertical adjustments of the telescope.
Images and diagrams
- The manual includes numbered diagrams for every assembly step, from tripod extension to smartphone dock attachment.
- Diagrams for 'Moving the Telescope' show the specific knobs to loosen for azimuth and altitude adjustments.
- Finderscope alignment diagrams illustrate the process of centering a target in the main eyepiece before adjusting the finderscope.
Model compatibility
- The activation code provided with the telescope unlocks the app on up to 5 devices.
- The StarSense Explorer app is large; downloading over Wi-Fi is recommended.

Manual page author
Emily Carter
User documentation editor
Prepares concise manual descriptions and highlights the most useful setup, operation, and maintenance information for readers.