Tools / Chemical Sprayers
Instruction Manual for Chapin 22230XP Industrial Acid Staining Sprayer
Quick guide for the Chapin 22230XP Industrial Acid Staining Sprayer. Includes assembly, pre-use checks, filling, pressurizing, maintenance, and troubleshooting steps.
Quick answers from the manual
Quick answer
- The Chapin 22230XP is designed exclusively for acidic solutions. Never use with flammable, chlorine, bleach, or caustic chemicals. p. 1
Key actions
- Release pressure before troubleshooting p. 1
- Oil the pump rod p. 1
First start
- Perform a water-only test p. 1
Show 3 more answers Show less
Problems and fixes
Tank pressurizes but does not spray
Clean shut-off assembly and nozzle cap.
p. 1Maintenance and reset
- Clean shut-off assembly p. 1
Where to find it in the PDF
- Assembly and Operation p. 1
Table of contents
Manual images
Click an image to enlargeQuick guide from the manual
This document provides essential instructions for the Chapin 22230XP Industrial Acid Staining Sprayer. The sprayer is designed exclusively for acidic solutions. Always release pressure before performing any maintenance or troubleshooting.
Safety Warnings
- Chemical Compatibility: This sprayer is designed for acidic solutions only. Never use with flammable, chlorine, bleach, caustic, or other corrosive solutions.
- Personal Protection: Always wear goggles, gloves, long-sleeve shirts, long pants, and full-foot protection when spraying.
- Pressure Safety: Never leave a pressurized sprayer in the hot sun. Never use tools to remove the pump if there is pressure in the sprayer.
Assembly
Hose to Tank:
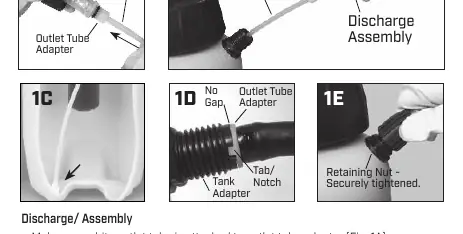
- Ensure the white outlet tube is attached to the outlet tube adapter.
- Insert the outlet tube portion of the discharge assembly into the tank adapter, lining up the tab with the notches.
- Firmly tighten the retaining nut to the tank adapter.
Nozzle:
- Attach the nozzle to the shut-off handle or extension wand.
Pre-Use Check
- Check the tightness of the hose nut to ensure it is securely attached to the tank outlet.
- Inspect the hose for deterioration, cracks, softness, or brittleness. Replace if necessary using original manufacturer parts.
- Inspect the interior and exterior of the tank for signs of deterioration. If found, discard the tank immediately.
- Perform a test with water only (10-20 pump strokes) to check for leaks.
Filling and Pressurizing
- Turn the pump handle counterclockwise to remove the pump.
- Prepare the spray solution according to the chemical manufacturer's instructions.
- Fill the tank to the proper gallon marker. Do not overfill.
- Replace the pump and tighten securely.
- To pressurize: Push the handle down, turn 1/4 turn counterclockwise to release, pump until resistance is felt, then push the handle down and turn 1/4 turn clockwise to lock.
Maintenance and Storage
- Cleaning: Follow chemical manufacturer instructions for cleaning. Rinse thoroughly with the recommended solvent.
- Storage: Store the tank upside down with the pump removed in a warm, dry location.
- Lubrication: Periodically oil the pump by dropping 10-12 drops of light oil down the pump rod through the opening in the cover.
Troubleshooting
If the tank pressurizes but does not spray:
- Clean Shut-off: Pull the handle straight up. Insert notches from the underside of the handle into the plunger grooves and turn counterclockwise. Remove the plunger and wash the diaphragm in mild dish detergent. Tighten the plunger clockwise until flush with the top of the shut-off body.
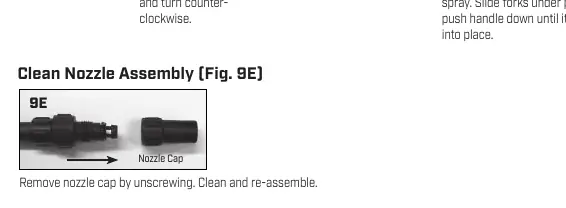
- Clean Nozzle: Remove the nozzle cap by unscrewing, clean, and re-assemble.
Practical help
Common problems
Tank pressurizes but does not spray
Clean the shut-off assembly and nozzle cap. Remove the plunger, wash the diaphragm in mild dish detergent, and reassemble.
Before use
- Check hose tightness at the tank outlet
- Inspect hose for cracks, softness, or deterioration
- Inspect tank body for signs of weakening or deterioration
- Test with water only (10-20 pump strokes) to check for leaks
- Inspect metal parts (wand, nozzle, fittings) for rust or corrosion
Show more Show less
Images and diagrams
- Fig 1A-1E: Hose to tank assembly steps
- Fig 5A-5C: Pressurizing and spraying operation
- Fig 6A-6B: Pressure release valve operation
- Fig 9A-9E: Troubleshooting shut-off and nozzle assembly
Model compatibility
- Designed for acidic solutions only
- Do not use with flammable, chlorine, bleach, or caustic chemicals

Manual page author
David Miller
Documentation analyst