Toys / Ride-on Toys
Installation Instructions for Chevrolet Cruze 1.4L Stage Kit
A comprehensive installation guide for the Chevrolet Cruze 1.4L Stage Kit. This manual covers tool requirements, safety precautions, step-by-step exhaust system removal and installation, torque specifications, and necessary ECM calibration...
Table of contents
Manual images
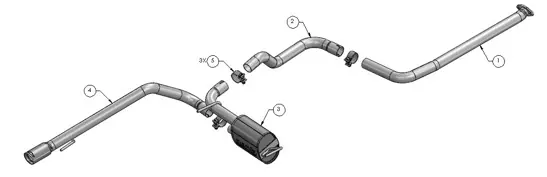
Click an image to enlargeQuick guide from the manual
This kit is designed for 2012, 2013, and 2014 Chevrolet Cruze models with automatic or manual transmissions. Installation requires mechanical expertise and specific tools. Safety Warning: Never work on a hot exhaust system; allow the vehicle to cool for at least one hour. Always wear eye protection and use proper vehicle support (hoist or jack stands).
Required tools and supplies
- 3/8" Drive Ratchet
- 3/8" Drive Extension, 6"
- 13 mm socket
- 15 mm Socket
- Reciprocating saw/hacksaw
- Pry Bar
- Wire Brush
- Spray Lubricant
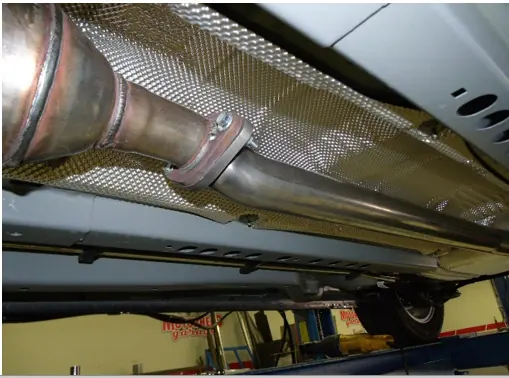
Original exhaust system removal
- Apply penetrating spray lubricant to all exhaust fasteners and rubber isolators. Allow time for the chemical to work.
- Use a 13mm socket to unbolt the flange and let the exhaust hang to provide clearance for cutting.
- With a muffler stand or an assistant supporting the front muffler, cut the pipe at the designated location. Remove the hanger from the isolator and remove the front muffler.
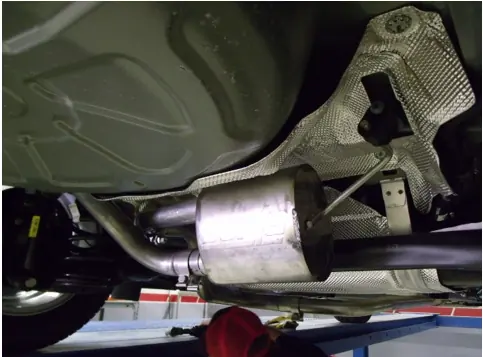
- Support the rear muffler assembly, remove the hangers from the rubber isolators, and remove the assembly. It may be necessary to remove the tip isolator bracket.
Exhaust system installation
Warning: Do not use air impact tools to tighten fasteners, as this may result in bent flanges or exhaust leaks. Torque all fasteners according to the manufacturer's values.
- Using the provided hardware and new gasket, position the front pipe and hand-tighten the hardware.
- Place a clamp over the expanded end of the intermediate pipe, position it, and install the hanger into the rubber isolator. Do not tighten the clamp yet.
- Place a clamp over the expanded end of the rear muffler assembly, position it, and install the hangers into the rubber isolators. Do not tighten the clamp.
- Place a clamp over the expanded end of the tailpipe assembly and set it into position. Do not tighten the clamp.
- Tighten the front flange to 18-22 ft-lbs. Push the exhaust up to fit properly in the tunnel. Tighten all clamps from front to back to 32-35 ft-lbs.
- Check for proper clearance under the vehicle. Adjust and re-torque as necessary.
Post-installation and calibration
Before starting the vehicle, ensure all wires, hoses, brake lines, body parts, and tires have safe clearance from the exhaust system. Start the vehicle and check for leaks. Drive the vehicle to a dealer to have the Engine Control Module (ECM) updated with the correct Stage Kit Calibration. Install the provided Emissions label in the engine compartment and the Premium Fuel Required label inside the gas cap access door. Note that smoke and fumes during the first start are normal due to the protective coating on the tubing and will disappear quickly.
Manufacturer information
Chevrolet
Practical help
Common problems
Smoke and fumes on first start
This is normal; it is a protective water-based coating on the tubing burning off. It will disappear after the exhaust reaches normal operating temperature.
Exhaust leaks
Check that clamps are properly positioned and tightened to 32-35 ft-lbs. Ensure flanges are not bent.
Warranty compliance (2012 manual transmission)
If the vehicle was built before May 22, 2012, the clutch and flywheel must be upgraded with Chevrolet Performance kit p/n 19303797.
Before use
- Verify all parts listed in the kit contents are present.
- Ensure the vehicle is cool (at least 1 hour of cooling time).
- Secure the vehicle on a hoist or jack stands.
- Obtain the vehicle's VIN and contact TCSC (1-888-337-1010) for the VCI number required for ECM reprogramming.
- Gather all required tools (ratchet, sockets, saw, pry bar, wire brush).
Specs in practice
- Front flange torque
- 18-22 ft-lbs
- Clamp torque
- 32-35 ft-lbs
Images and diagrams
- The kit includes a diagram showing the assembly sequence of the front pipe, intermediate pipe, rear muffler, and tailpipe, along with clamp locations.
Model compatibility
- Compatible with 2012, 2013, and 2014 Chevrolet Cruze models.
- Supports both automatic and manual transmissions.

Manual page author
Emily Carter
User documentation editor
Prepares concise manual descriptions and highlights the most useful setup, operation, and maintenance information for readers.