Electronics / Routers
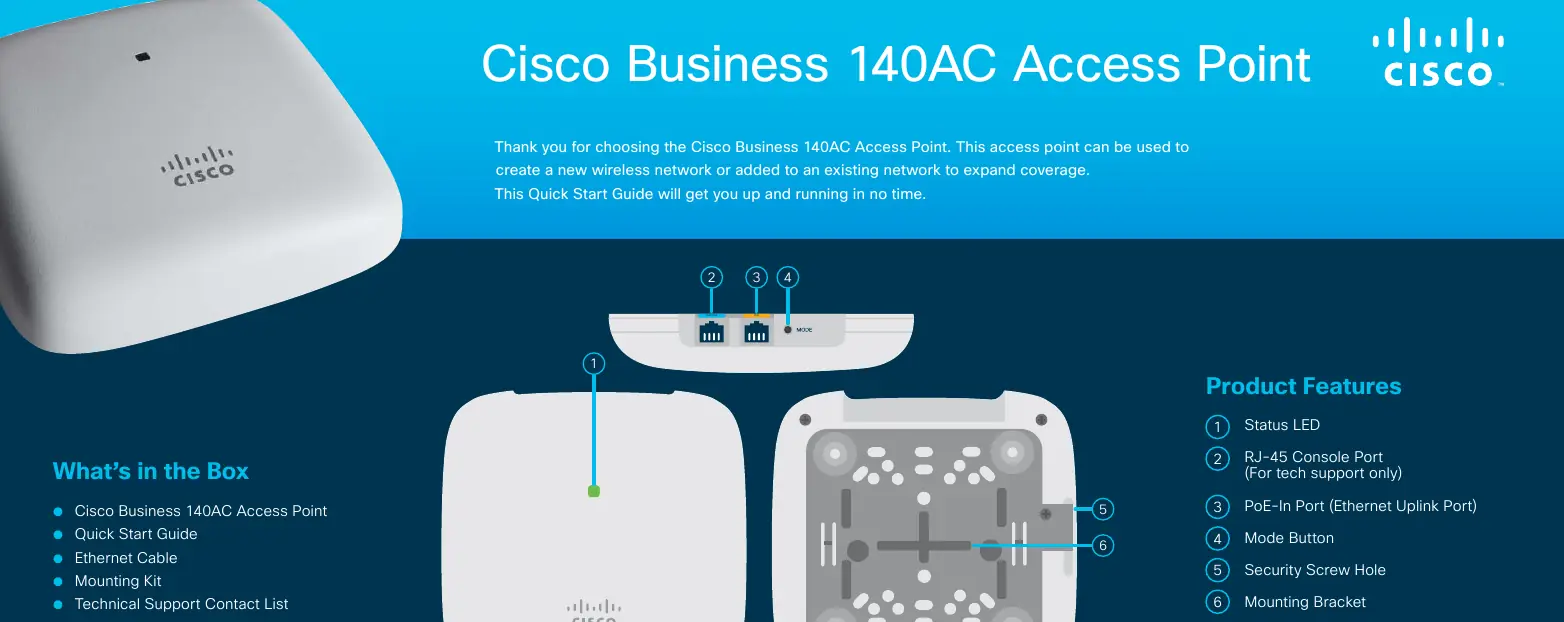
Cisco Business 140AC Access Point Quick Start Guide
Quick start guide for the Cisco Business 140AC Access Point, covering hardware setup, initial configuration via web UI or app, and network integration steps.
Table of contents
Manual images
Jump to the sectionQuick guide from the manual
This document provides essential steps to set up the Cisco Business 140AC Access Point. It covers physical connection, initial boot-up, and configuration via a web browser or the Cisco Business app. Ensure you have a PoE-enabled switch, router, or injector (802.3af) and a DHCP-enabled router before starting.
Preparing your product
Connect the access point to a PoE LAN port on your router or switch using the provided Ethernet cable. Upon power-up, the LED will cycle through green, amber, and red. This process can take up to 6 minutes. The device is ready for configuration only when the LED is consistently blinking or solid green.
Initial configuration
You can configure the device using the web interface or the Cisco Business app:
- Via Wireless (Web UI): Connect to the SSID 'CiscoBusiness-Setup' using the passphrase 'cisco123'. Launch a browser and navigate to http://ciscobusiness.cisco.
- Setup Wizard: Click 'Start' to launch the wizard, create a username and password, and follow the on-screen instructions.
- Static IP and Mesh: During setup, you may choose to configure a static IP for the Master AP or enable the 'Mesh' option if you intend to add mesh extenders.
After completing the initial settings, the device will reboot. Once finished, log in via https://ciscobusiness.cisco using your credentials to manage the network. Remember to save your configuration by clicking the red disk icon in the UI header.
Mounting
The access point can be mounted on a suspended ceiling, a hard ceiling, a wall, or in the plenum air space above a suspended ceiling. Refer to the Cisco Business Wireless Access Point Administration Guide for detailed mounting instructions.
Support
For additional documentation, including the full Administration Guide, visit cisco.com/go/cbw140ac.
Official resources from the manual
Manufacturer information
Cisco Systems, Inc.
Practical help
Common problems
LED cycles through colors for a long time
This is normal during initial boot-up or firmware updates. Wait up to 6-10 minutes until the LED is solid or blinking green.
Cannot access the web configuration page
Ensure you are connected to the 'CiscoBusiness-Setup' SSID or that your computer is on the same network as the AP. Verify the URL is http://ciscobusiness.cisco.
Before use
- Active Internet connection
- Computer with Wi-Fi capability
- PoE switch, router, or 802.3af PoE injector
- Router acting as a DHCP server
Images and diagrams
- The device features a status LED on the front and a PoE-In port, console port, and mode button on the rear/side.
- The mounting bracket is located on the underside of the unit.
Model compatibility
- Requires 802.3af PoE power source.
- Mesh functionality is disabled by default and must be enabled in the settings if needed.

Manual page author
Emily Carter
User documentation editor
Prepares concise manual descriptions and highlights the most useful setup, operation, and maintenance information for readers.