Electronics / Networking
Cisco Business 240AC Access Point Quick Start Guide
Quick start guide for the Cisco Business 240AC Access Point. Includes setup instructions, LED status indicators, network configuration via web UI or app, and mounting guidelines.
Quick answers from the manual
Quick answer
- Connect the access point to a PoE-enabled switch or injector. Wait for the LED to turn solid or blinking green (up to 6 minutes). Connect to the 'CiscoBusiness-Setup' SSID (passphrase 'cisco123') and navigate to http://ciscobusiness.cisco to run the Setup Wizard. p. 1, 2
Key actions
- Connect to PoE p. 2
- Configure via Web UI p. 2
First start
- Connect to PoE and wait for the LED to turn solid or blinking green. p. 2
Show 3 more answers Show less
Problems and fixes
LED cycling through green, amber, and red
This is normal during the boot process. Wait up to 6 minutes for new devices or 10+ minutes for existing networks.
p. 2Technical specifications
| Parameter | Value | Meaning | Pages |
|---|---|---|---|
| PoE Standard | 802.3af | Required power standard for the PoE injector or switch. | p. 1 |
| USB Port | 2.0 | USB 2.0 port for future use. | p. 1 |
Where to find it in the PDF
- Quick Start Guide p. 1, 2
Table of contents
Quick Start Guide
This guide provides the essential steps to set up and configure your Cisco Business 240AC Access Point. The device can be used to create a new wireless network or expand an existing one.
What's in the Box
- Cisco Business 240AC Access Point
- Quick Start Guide
- Ethernet Cable
- Mounting Kit
- Technical Support Contact List
- Pointer Card China RoHS
- Compliance Information (for EU SKU only)
Requirements
Before beginning, ensure you have the following:
- An active Internet connection
- A computer with Wi-Fi capability (not connected to an active wireless network)
- A PoE switch, router, or injector (802.3af PoE injector)
- A router to act as your DHCP Server
Preparing Your Product
Connection: Connect your access point via the provided ethernet cable to a PoE LAN port on your router or switch.
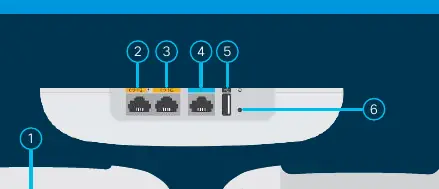
Booting: Upon connection, the device will begin its initial boot. The LED will cycle through green, amber, and red. This is normal and can take up to 6 minutes. The device is not ready until the LED is consistently blinking green or solid green.
Adding to an existing network: If adding to an existing network, the access point will automatically update its firmware and configuration. This process can take ten minutes or more. The LED will cycle through green, amber, and red. Once the LED is blinking green or solid green, the setup is complete.
Configuration
You can configure the device via the Wireless Web UI or the Cisco Business app.
Via Wireless (Web UI)
- Search for the wireless SSID "CiscoBusiness-Setup".
- Connect to this SSID with the passphrase "cisco123".
- Launch a web browser (Internet Explorer, Firefox, Chrome, or Safari).
- In the address bar, type http://ciscobusiness.cisco and press Enter.
- Click "Start" on the Cisco Business Wireless Access Point page to launch the Setup Wizard.
- Follow the instructions to create a username and password and finish initial settings.
- After configuration, the device will reboot. Once the LED is solid or blinking green, connect to the new SSID you created.
- Open a browser, go to https://ciscobusiness.cisco, and log in to manage the device.
Mounting
Cisco Business wireless access points can be mounted in several configurations, including on a suspended ceiling, on a hard ceiling or wall, or in the plenum air space above a suspended ceiling. Refer to the "Cisco Business Wireless Access Point Administration Guide" for detailed mounting instructions.
Official resources from the manual
Manufacturer information
Cisco Systems, Inc.
Practical help
Common problems
Device not ready for configuration
Ensure the LED is consistently blinking green or solid green. If it is cycling through colors, the device is still booting (up to 6 minutes for new, 10+ minutes for existing networks).
Cannot access the setup page
Ensure you are connected to the 'CiscoBusiness-Setup' SSID using the passphrase 'cisco123' and that you are using the correct URL (http://ciscobusiness.cisco).
Before use
- Active Internet connection
- Computer with Wi-Fi capability
- PoE switch, router, or injector (802.3af)
Show more Show less
Images and diagrams
- 1: Status LED
- 2: PoE-In Port (Ethernet Uplink)
- 3: Ethernet GbE Port
- 4: RJ-45 Console Port (Tech support only)
- 5: USB 2.0 Port
Model compatibility
- Requires 802.3af PoE injector or switch.
- Supports mesh extenders (can be enabled during setup).

Manual page author
Michael Turner
Technical manual editor