Tools / Air Compressors Pneumatics
User Manual for Clarke BOXER 14/150 150L Belt Driven Air Compressor
Comprehensive user guide for the Clarke BOXER 14/150 150L Belt Driven Air Compressor. Includes detailed instructions on safety, electrical connections, maintenance procedures, troubleshooting, and technical specifications.
Table of contents
Manual images
Click an image to enlargeQuick guide from the manual
This manual provides essential instructions for the safe operation and maintenance of the Clarke BOXER 14/150 150L Belt Driven Air Compressor. Users must read the manual fully before use. Key tasks include daily draining of the reservoir, regular oil level checks, and monthly air filter cleaning. Always ensure the compressor is disconnected from the power supply before performing any maintenance.
Safety precautions
Compressed air is dangerous. Never point a jet of air at people or animals. Do not operate the compressor with the guard removed. Repairs must be carried out by a qualified engineer. Keep the compressor dry and operate only in clean, well-ventilated areas. Always wear ear protection as noise levels exceed 70dB(A).
Electrical connections
Electrical installation must be performed by a qualified electrician. The compressor must be connected to the mains supply via a suitably fused, approved plug or isolator. It is recommended to use an earth leakage protection device (RCD). Ensure the power cable is sufficient to carry the starting and running load of the motor.
Before use
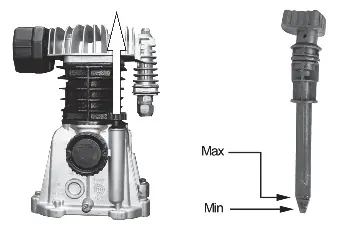
Before connecting to the power supply, ensure the compressor is on level ground and the supply voltage matches the data label. Push down the OFF button. Remove the protective plastic moulding from the top of the cylinder head. Check the oil level using the dipstick; it must be between the min and max marks. Use only SAE30 compressor oil.
Operation
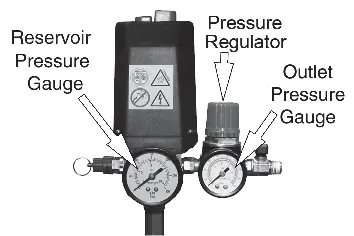
To start, plug in the compressor and push the ON button. The unit will run until the reservoir is pressurized and then shut down automatically. To attach air tools, connect the hose to the outlet valve and turn the valve handle to the ON position. Always set the pressure regulator to the recommended setting for the tool being used. To stop, push the OFF button, turn off the outlet valve, and depressurize the hose by operating the tool.
Maintenance
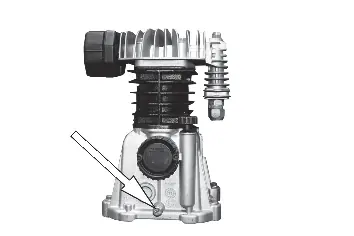
Drain the reservoir (Daily): Open the drain valve on the bottom of the reservoir after each day's use to remove condensate.
Check oil (Daily): Ensure the oil level is between the min and max marks on the dipstick.
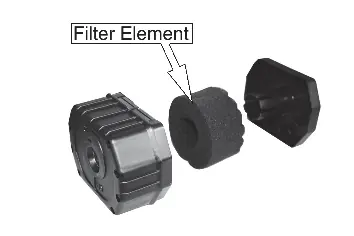
Clean the air filter (Monthly): Remove the securing bolt, pull the filter from the compressor, and clean the element with a soft brush or warm soapy water. Ensure it is completely dry before refitting.
Replacing the oil: Replace oil after the first 100 hours of use, then every 500 hours or every 6 months.
Check the non-return valve (Every 6 months): If reservoir pressure drops unexpectedly, inspect the non-return valve, gasket, and spring.
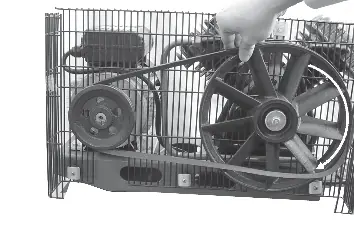
Replacing the drive belt: Remove the safety cage, take out the worn belt, and guide the new belt onto the wheels by rotating the large wheel by hand.
Troubleshooting
If the compressor stops and does not start, check electrical connections or the overload cutout switch. If it does not reach set pressure, the head gasket or valve may be damaged. If air leaks from the non-return valve, clean the valve seat and gasket. If the unit is very noisy, it may require an overhaul.
Technical specifications
Model: BOXER 14/150Part Number: 2245250Max Pressure: 10 BarVoltage: 400V AC @ 50Hz 3 PhaseAir Displacement: 14 CFMReceiver Capacity: 150 LDimensions: 1300 x 400 x 790 mmWeight: 75 kg
Manufacturer information
Clarke International
Practical help
Common problems
Compressor stopped and does not start
Check electrical connections, clean and tighten if necessary. Check if the overload cutout switch has tripped (wait 5 minutes). If motor windings are burnt, contact a dealer.
Compressor does not reach set pressure and overheats
Compressor head gasket may be blown or valve broken; return the machine to your nearest service agent.
Air leaking from non-return valve when not running
Drain receiver completely, remove valve end plug, carefully clean the valve seat and gasket, then reassemble.
Air pressure from regulator will not adjust
The diaphragm within the regulator body is likely broken; replace the regulator.
Before use
- Push down the OFF button.
- Remove the protective plastic moulding from the top of the cylinder head.
- Ensure the compressor is on level ground.
- Verify that the supply voltage matches the voltage shown on the data label.
- Check the oil level using the dipstick (must be between min and max marks).
Specs in practice
- Max Pressure
- 10 Bar (do not exceed).
- Air Displacement
- 14 CFM.
- Receiver Capacity
- 150 Liters.
Images and diagrams
- Exploded diagram shows internal components for maintenance and repair.
- Filter cleaning steps show how to remove and clean the element.
- Drive belt replacement steps show how to guide the belt onto the wheels.
Model compatibility
- Requires 3-phase power supply.
- Use only SAE30 compressor oil (Part No. 3050801).

Manual page author
Michael Turner
Technical manual editor
Reviews PDF manuals for structure, safety notes, and practical product details so readers can find the right information quickly.