Tools / Power Tools
User Manual for Clarke CONTRACTOR 1500W SDS Demolition Hammer CON1500DD
Quick guide for the Clarke CONTRACTOR 1500W SDS Demolition Hammer (CON1500DD). Includes setup, oil maintenance, bit installation, safety instructions, and troubleshooting tips.
Table of contents
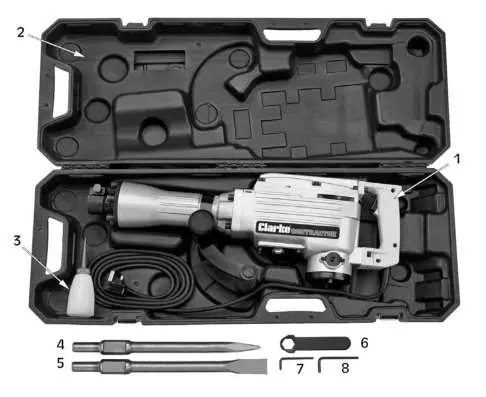
Manual images
Click an image to enlargeQuick guide from the manual
The Clarke CON1500DD is a 1500W SDS demolition hammer designed for breaking breeze blocks, brick, hard earth, and concrete. Before use, ensure the oil level is correct and the work area is safe. Always wear appropriate PPE, including dust masks, safety footwear, and hearing protection.
Specifications
- Voltage: 230V AC, 50Hz
- Power: 1500W
- Impact Energy: 45 Joules
- Impact Rating: 1900 blows/min
- Chuck: SDS HEX 30mm
- Weight: 17.35 kg
- Duty Cycle: S1 Continuous
Electrical connections
This is a Class II product and does not require an earth connection. Ensure your mains voltage matches the rating plate. If replacing the plug, follow the wiring code: Blue to Neutral (N/Black), Brown to Live (L/Red). We strongly recommend using a Residual Current Device (RCD).
Before use
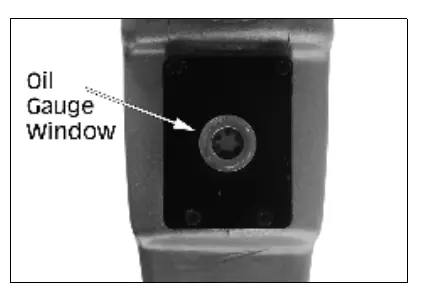

Oil gauge and top up
The machine has an oil chamber filled at the factory. Check the oil level before use; it should be approximately 3mm above the oil gauge window. If low, place the machine on a flat surface, remove the oil gauge window cover with a wrench, and top up with the supplied oil (no more than 25ml at a time). Do not overfill.
Positioning the auxiliary handle
The front handle can be adjusted to the left, right, or center. Loosen the adjustment knob by twisting clockwise, rotate the handle to the desired position, and secure it by twisting the knob anticlockwise.
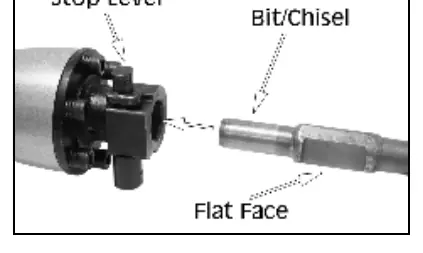
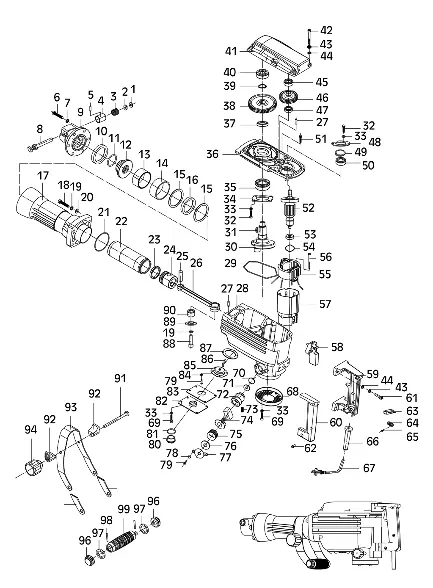
Inserting a hammer bit
The chuck clamps SDS 30mm Hex bits without a key. Clean and grease the chisel shank. Pull out and rotate the stop lever 180 degrees clockwise. Insert the chisel with the flat face facing the stop lever. Rotate the stop lever 180 degrees anticlockwise to lock it. Pull the chisel to ensure it is secure.
Using the hammer
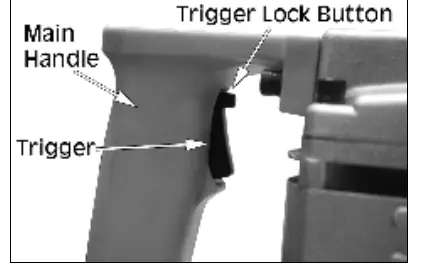
Before starting, check for hidden cables or pipes. Select and install the chisel, adjust the handle, and ensure the work area is hazard-free. Position the tool against the surface and pull the trigger. For continuous use, press the trigger lock button after pulling the trigger. To stop, release the trigger and wait for the chisel to stop before placing the tool down.
Maintenance and servicing
After use, remove the bit and tap the chuck to remove dust. Keep the handle clean and free of oil. Regularly clean the tool with a soft brush or cloth; do not use harsh chemicals. Use compressed air (max 3 bar) to clean ventilation holes at the end of work. Worn parts must be replaced by qualified personnel.
Manufacturer information
Clarke International
Practical help
Common problems
Hammer not starting
Check power supply, fuse, and ensure the trigger is not locked in an 'off' state or obstructed.
Bit jamming
Reduce pressure on the hammer bit when it is about to break through the material.
Low impact performance
Check the oil level; it should be 3mm above the oil gauge window. Top up if necessary.
Before use
- Check oil level (3mm above window).
- Ensure mains voltage is 230V.
- Check for hidden electrical cables, gas, or water pipes in the work area.
- Ensure auxiliary handle is securely tightened.
- Clean and grease the chisel shank before insertion.
- Wear appropriate PPE (dust mask, safety shoes, hearing protection).
Specs in practice
- Impact Energy (45 Joules)
- The force of each individual blow delivered by the hammer.
- Impact Rating (1900 blows/min)
- The frequency of strikes per minute.
- Duty Cycle (S1 Continuous)
- The tool is rated for continuous operation.
Images and diagrams
- Oil Gauge: Located on the side of the machine; check level before use.
- Stop Lever: Used to lock/unlock the chisel bit in the chuck.
- Trigger Lock: Allows continuous operation without holding the trigger.
Model compatibility
- Uses SDS HEX 30mm hammer bits and chisels.
- Class II product (double insulated, no earth required).

Manual page author
Michael Turner
Technical manual editor
Reviews PDF manuals for structure, safety notes, and practical product details so readers can find the right information quickly.