Tools / Air Compressors Pneumatics
Operating Instructions for Clarke Devil 1200Q Quartz Halogen Heater
Quick guide for the Clarke Devil 1200Q quartz halogen heater. Includes installation steps, safety warnings, operation modes, maintenance, and troubleshooting.
Table of contents
Manual images
Click an image to enlargeImportant Information
The Clarke Devil 1200Q is a quartz halogen heater designed for indoor use in well-insulated areas. It is not intended to be used as a primary heat source. The unit features two heat settings and can be wall-mounted or used with a compatible tripod.
Safety Rules
- Indoor Use Only: Do not use in areas with high condensation or near water (baths, showers, swimming pools).
- Clearance: Maintain at least 2 metres of clearance from walls, curtains, furniture, or combustible materials.
- Positioning: Do not place the heater immediately below an electrical outlet. Ensure it is placed on a horizontal, stable surface.
- Operation: Do not use the heater if it has been dropped or shows signs of damage. Do not cover the heater or obstruct the air inlet/outlet.
- Supervision: Keep children under 3 years old away unless supervised. Children aged 8 and above may use the appliance if given proper instruction.
- Electrical Safety: Always disconnect from the power supply before moving or performing maintenance. Do not modify the plug.
Assembly
Wall Mounting
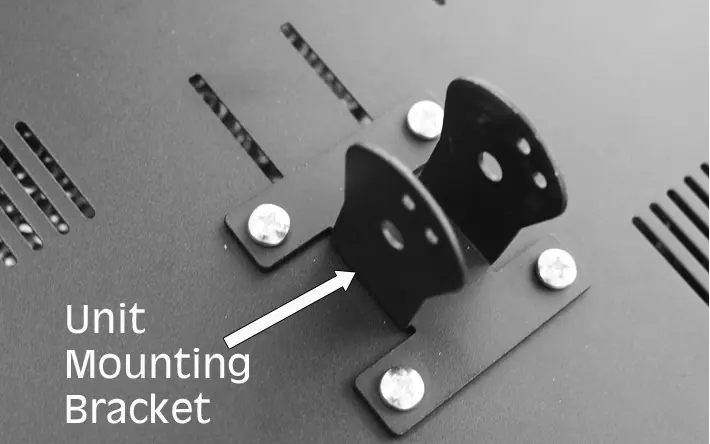
- Remove the four screws on the rear of the unit to take out the unit mounting bracket.
- Attach the unit mounting bracket to the rear of the unit using the four screws. Ensure the orientation allows for downward adjustment.
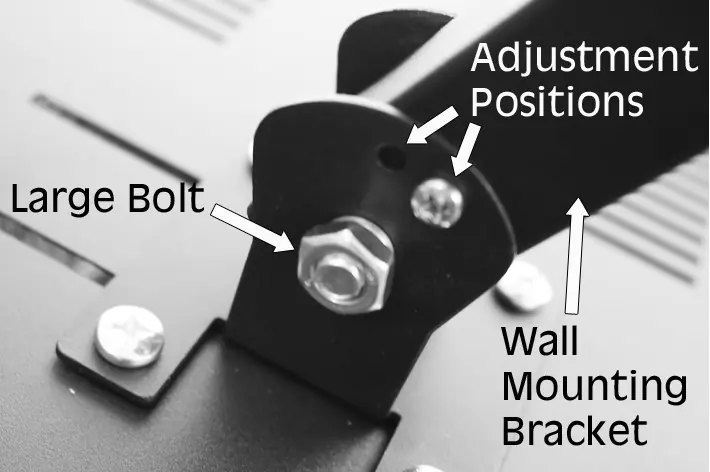
- Mount the wall bracket to a suitable wall using the three mounting holes. Ensure the location is at least 0.3m from the ceiling, 1.8m from the floor, and 1m from any sidewall.
- Slide the wall mounting bracket between the unit mounting bracket arms and secure with the large bolt. Adjust the angle and secure with the small screw.
Tripod Mounting
- Complete steps 1-3 of the wall mounting assembly.
- Extend the tripod legs until the locking pin engages in the lower locking hole.
- Attach the tripod mounting bracket to the unit mounting bracket using the supplied large bolt.
- Place the bracket onto the tripod and tighten the locking screw.
Operation
The heater is controlled via a primary ON/OFF rocker switch located on the unit:
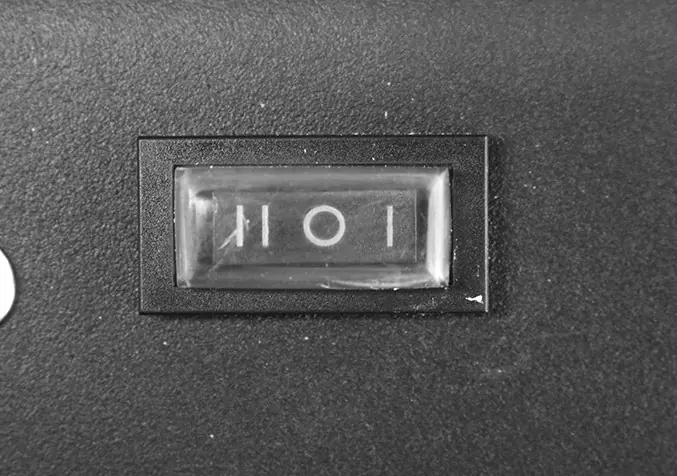
- O: Off
- I: Low Heat (600W)
- II: High Heat (1200W)
Cleaning & Maintenance
Always allow the heater to cool for at least 15 minutes and disconnect from the power supply before maintenance.
- Replacing Tubes: Remove the front cover and guard. Push the tube gently to one end to clear the spring-loaded holder, then remove. Fit the new tube in reverse order. Never handle tubes with bare hands; use a soft clean cloth or glove.
- Periodic Cleaning: Wipe the exterior with a damp cloth. Ensure the heating tube is clear of dust (use compressed air if possible, wearing a dust mask and safety glasses).
Troubleshooting
- Heater does not operate: Check if the plug is loose, the fuse is blown, or if there is no power at the socket.
- Heater tube is glowing hot: Ensure the input voltage is correct and the air supply is not blocked.
Manufacturer information
Clarke International
Practical help
Common problems
Heater does not operate when switched on
Check the plug connection, inspect the fuse, or verify the power outlet is functional.
Heater tube is glowing hot
Verify the input voltage matches the label and ensure the air supply is not obstructed.
Before use
- Ensure the heater is used in a well-insulated area.
- Check that the heater and power cable are free from damage.
- Verify the mounting surface is stable and suitable.
- Ensure the grille is not blocked or covered.
- Confirm the heater is not placed near flammable materials.
Specs in practice
- Rated Input Wattage: 1.2kW
- The maximum power consumption of the heater.
- Supply Voltage: 230V/50Hz
- Standard UK mains power requirement.
- Ingress Protection Class: IP20
- Protected against solid objects over 12mm; not waterproof.
- Duty Cycle: S1 - Continuous
- Designed for continuous operation.
Images and diagrams
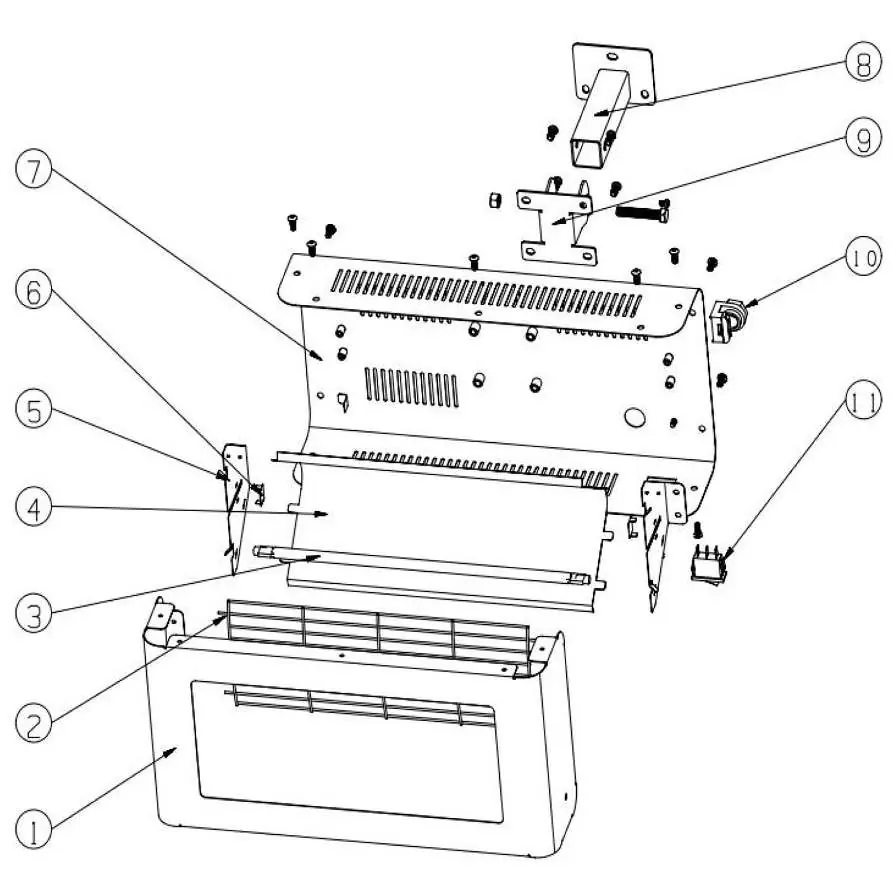
- Parts Diagram: Illustrates the assembly of the main case, heating tube, reflector, and mounting brackets.
- Wiring Diagram: Shows the correct wiring for a BS1363/A approved plug.
Model compatibility
- Compatible with Clarke Tripod (product number 6920335).
- Not designed to be the primary heat source.

Manual page author
Emily Carter
User documentation editor
Prepares concise manual descriptions and highlights the most useful setup, operation, and maintenance information for readers.