Sports / Bicycle Components
User Manual for CUBE SPD and Flat Pedals
Quick guide for CUBE SPD and Flat pedals. Learn how to install, adjust spring tension, replace cleats, and perform safety checks for your bicycle pedals.
Table of contents
Manual images
Click an image to enlargeQuick guide from the manual
This manual covers the installation, adjustment, and safe use of CUBE SPD and Flat pedals. Before riding, ensure all fastening sections are secure, check for abnormal noises, and verify that cleats engage and release correctly. Always use appropriate footwear and protective gear. If you are unsure about installation or adjustment, contact your local bicycle dealer.
Installation
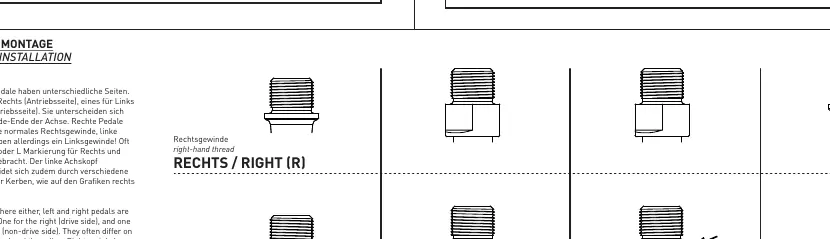
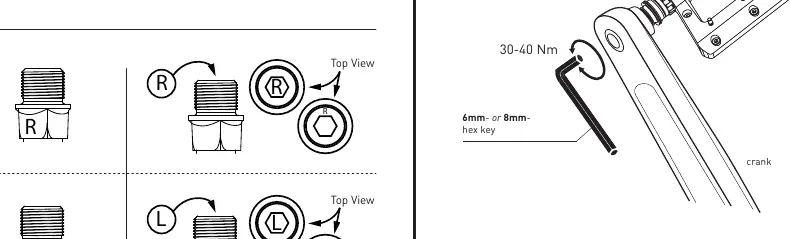
Pedals have specific sides: one for the right (drive side) and one for the left (non-drive side). They differ in axle head and threading. Important: Right pedals have right-hand threads, while left pedals have left-hand threads. Often, the left axle head is marked with special scores or an 'L' marking.
- Use a 6mm or 8mm hex key for installation.
- Recommended torque for installation is 30-40 Nm.
SPD Pedals: Adjustment and Usage
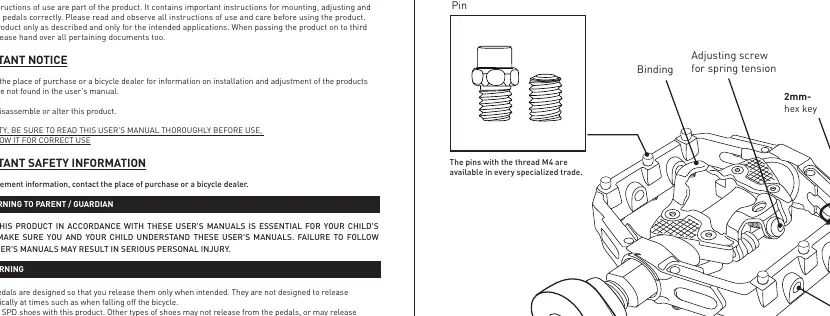
Adjusting Spring Tension
The spring tension can be adjusted using the adjustment screw located at the rear of the binding. Turning the screw clockwise increases tension, while counter-clockwise decreases it. There are three clicks per turn, with four positions in total.
Engaging and Releasing Cleats
- Engaging: Press the cleats into the pedals with a forward and downward motion.
- Releasing: These cleats release when the heel is moved outward. Practice this motion while stationary, holding the brakes, and with one foot on the ground before riding.
- Safety: Use only SPD shoes and CUBE/RFR cleats. If you are riding in difficult conditions or at low speeds, adjust to a lighter spring tension.
Flat Pedals: Pin Adjustment
Flat pedals may come with pins and spacers of different thicknesses. If the gripping force between the shoes and pedals is insufficient, remove the spacers or switch to longer pins to increase grip. Note that longer pins can cause injury if they come into direct contact with skin; wear appropriate protective clothing.
Regular Inspections and Maintenance
Before every ride, perform the following checks:
- Ensure all fastening sections are securely tightened.
- Check for any abnormal noises.
- Inspect cleats for wear (SPD pedals).
- Check for bearing clearance.
- Clean bindings of dirt and debris to ensure proper engagement and release.
If pedals do not behave normally or if rotating parts feel stiff, contact your bicycle dealer for adjustment. Products are not guaranteed against natural wear and deterioration from normal use.
Practical help
Common problems
Cleats do not release easily
Adjust spring tension to a lower setting and practice the outward heel motion while stationary.
Insufficient grip on Flat pedals
Remove spacers or switch to longer pins to increase the gripping force.
Pedal feels loose or makes noise
Check if fastening sections are secure and inspect bearing clearance. Contact a dealer if issues persist.
Before use
- Verify that fastening sections are securely tightened.
- Check for abnormal noises.
- Ensure cleats engage and release normally (SPD).
- Check for bearing clearance.
- Clean bindings of dirt and debris.
Specs in practice
- 6mm/8mm hex key
- Tool used for pedal installation.
Images and diagrams
- Left/Right thread identification: Left pedal has a left-hand thread, Right pedal has a right-hand thread.
- Spring tension adjustment: Located at the rear of the binding; 3 clicks per turn.
Model compatibility
- Use only SPD shoes with SPD pedals.
- Use only CUBE/RFR cleats.
- Pins with M4 thread standard are available in specialized trade.

Manual page author
Emily Carter
User documentation editor
Prepares concise manual descriptions and highlights the most useful setup, operation, and maintenance information for readers.