HVAC / Water Heaters
Giant MTB Clipless Pedals
A quick guide to installing, adjusting, and maintaining Giant MTB clipless pedals, including cleat installation, tension adjustment, and safety tips.
Table of contents
Manual images
Click an image to enlargeQuick guide from the manual
This manual provides instructions for the installation, adjustment, and maintenance of Giant MTB clipless pedals. Key procedures include proper threading for crank arm installation, cleat attachment to cycling shoes, and adjusting binding tension for secure engagement. Users are advised to practice engaging and disengaging on a stationary bike before riding in traffic.
Parts supplied
- Cleat
- Cleat bolt
- Cleat washer
Assembly to crank arms
Giant MTB clipless pedals feature 9/16 inch x 20T threaded spindles. Follow these steps for installation:
- Lubricate the spindle thread prior to assembly.
- Use a 15mm wrench or 6mm Allen key.
- The right pedal (marked R) is assembled in a clockwise direction.
- The left pedal (marked L) is assembled in a counter-clockwise direction.
- Tighten securely to a recommended torque of 34Nm.
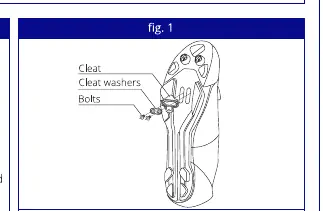
Cleat installation
The supplied cleats are compatible with standard SPD cycling shoes and provide 4 degrees of lateral float to relieve knee stress. Use a 4mm Allen key for installation:
- Attach the cleats to the bolt receiver holes in the shoes using the supplied bolts and washers.
- Align the lateral center line of the cleat under the center of the ball of the foot.
- Adjust vertically via the slots in the shoe sole.
- Tighten the bolts firmly to a recommended torque of 5-16Nm.
Pedal binding tension adjustment
To adjust the tension of the rear binding, use a 3mm Allen key in the spring cavity:
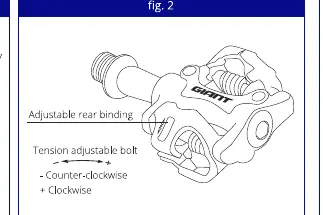
- Increase tension: Turn the adjustment bolt in a clockwise direction (+) for more secure engagement.
- Decrease tension: Turn the adjustment bolt in a counter-clockwise direction (-) for easier disengagement.
Important: Binding tension must be equal on both pedals to ensure uniform engagement and disengagement.
Pedal use
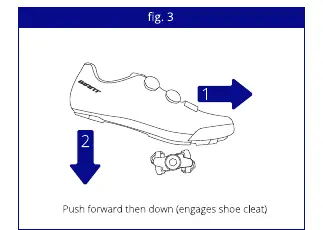
- Engage: Push the cleated shoe forward and down into the pedal until the rear binding engages.
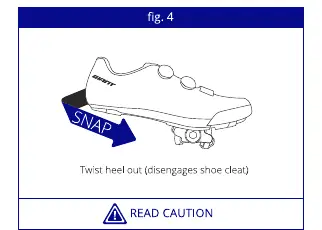
- Disengage: Twist the heel outward (away from the bicycle).
Caution and safety
- Practice engaging and disengaging on a stationary bike with one foot on the ground until the action becomes natural.
- Do not overtighten the tension adjustment bolts, as this may damage the thread.
- Replace cleats if they are worn or damaged.
- Minimize walking in cycling shoes to prevent premature cleat wear.
- Use only cleats from Giant or other compatible brands.
Maintenance
- Keep pedals and cleats clean.
- Apply oil or light grease to the binding springs occasionally.
- Service pedals every 6 months.
- Replace bearings if the pedal emits noise or feels rough during rotation.
- Replace pedals if they show signs of fractures or damage.
Practical help
Common problems
Pedal emits noise or feels rough
Service the pedals or replace the bearings.
Difficulty engaging or disengaging
Adjust the binding tension using the 3mm Allen key.
Cleat wear
Replace cleats if they are worn or damaged; minimize walking in cycling shoes.
Before use
- Ensure pedals are installed with correct threading (Right: clockwise, Left: counter-clockwise).
- Tighten crank arm bolts to 34Nm.
- Ensure cleats are tightened to 5-16Nm.
- Practice engaging and disengaging on a stationary bike.
- Check that binding tension is equal on both pedals.
Specs in practice
- 4-degree float
- Lateral movement allowed by the cleat to relieve knee stress.
Images and diagrams
- Fig 1: Shows the assembly of the cleat, washer, and bolt onto the shoe.
- Fig 2: Shows the location of the tension adjustment bolt and the direction for increasing/decreasing tension.
- Fig 3: Illustrates the motion for engaging the shoe into the pedal.
- Fig 4: Illustrates the motion for disengaging the shoe by twisting the heel outward.
Model compatibility
- Compatible with standard SPD cycling shoes.
- Use only cleats from Giant or other compatible brands.

Manual page author
Michael Turner
Technical manual editor
Reviews PDF manuals for structure, safety notes, and practical product details so readers can find the right information quickly.