Sports / Bicycle Components
Magene P715 Power Meter Pedal User Guide
Quick start guide for the Magene P715 power meter pedals, covering installation, activation, calibration, charging, and maintenance.
Table of contents
Quick guide from the manual
The Magene P715 power meter pedals require activation via the Magene Utility app before first use. Proper installation is critical to avoid damage to the power meter module and to ensure accurate data. Always use a torque wrench for installation and perform zero-point calibration after the initial setup.
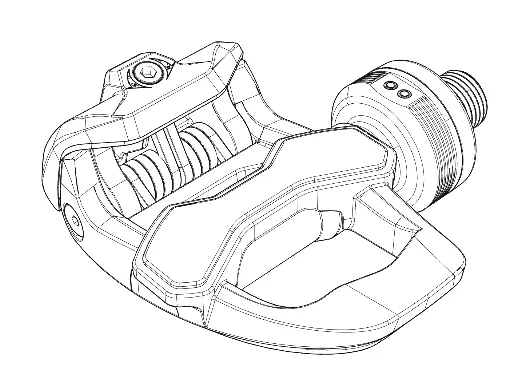
Pedals installation
- Clean the crankshaft threaded hole and apply a small amount of lubricating grease.
- Install the left pedal counterclockwise and the right pedal clockwise.
- Use one or two crank washers to ensure at least 1mm of clearance between the power meter module and the crank arm.
- Tighten to a recommended torque of 30-40 N·m using an 8mm hex head torque wrench.
- Warning: Do not tighten the pedal by holding the power meter module itself, as this may cause damage.
Activate the device
Download the Magene Utility app from your app store. Charge the pedals and follow the in-app instructions to activate the product before your first ride.
Pedals locking tension adjustment
If the factory tension is not suitable, use a 3mm hex wrench to adjust it. Turning clockwise increases tension, while counterclockwise decreases it.
Connect power meter equipment
The pedals use ANT+ and Bluetooth protocols. To connect to a bike computer, navigate to Settings > Sensors > Add Sensor > Power Meter on your device. A flashing blue LED indicates searching, while a solid blue light indicates a successful connection.
Zero point calibration
After installation, perform a zero-point calibration to ensure power accuracy. Ride the bike vigorously a few times to release stress, then use the Magene Utility app or your connected bike computer to perform the calibration.
Charge the power meter
When the red LED flashes every 10 seconds, the battery is low. Use the provided magnetic charging cable. A green LED will flash during charging and stay on for 5 seconds when fully charged. Warning: Only use a 5V USB adapter.
Precautions and daily inspections
- Do not use high-pressure water spray for cleaning.
- Do not immerse the module in water.
- Ensure at least 2mm of distance between your shoes and the power meter module.
- Check for secure fastening, abnormal noises, and battery levels before every ride.
Practical help
Common problems
Power meter module damaged during installation
Ensure at least 1mm clearance between the module and crank arm using washers; do not hold the module while tightening.
Inaccurate power data
Perform zero-point calibration after installation and ensure the pedals are correctly tightened to 30-40 N·m.
Device not connecting
Ensure the device is activated via the Magene Utility app and check if the battery is charged (red LED flashing).
Before use
- Charge and activate the device using the Magene Utility app.
- Ensure pedals are installed with correct torque (30-40 N·m).
- Verify 1mm clearance between module and crank arm.
- Verify 2mm clearance between shoe and module.
- Perform zero-point calibration.
- Check that the battery level is sufficient.
Specs in practice
- Power accuracy
- ± 1% deviation for precise performance tracking.
- Waterproof rating IPX7
- Protected against temporary immersion in water; do not use high-pressure spray.
- Battery life
- Up to 120 hours of operation on a single charge.
Images and diagrams
- The manual includes a diagram showing the use of an 8mm hex wrench for pedal installation.
- A diagram illustrates the 3mm hex wrench adjustment point for pedal locking tension.
Model compatibility
- Compatible with KEO-style cleats.
- Supports ANT+ and Bluetooth dual-protocol devices.

Manual page author
Emily Carter
User documentation editor
Prepares concise manual descriptions and highlights the most useful setup, operation, and maintenance information for readers.