Furniture / Chairs & Seating
Assembly Instructions for Curtis 194S9728LGY-1 Reclining Chair
Quick assembly and care guide for the Curtis 194S9728LGY-1 Reclining Chair. Includes component list, step-by-step assembly instructions, and maintenance tips for microfiber and corduroy fabric.
Table of contents
Manual images
Click an image to enlargeQuick Assembly Guide
Before beginning assembly, ensure you have all components listed. Important: Do not use power tools for assembly. Using power tools increases the risk of over-tightening, which can lead to splitting or cracking the wood frame.
Component List
Verify that the following parts are included in the package:
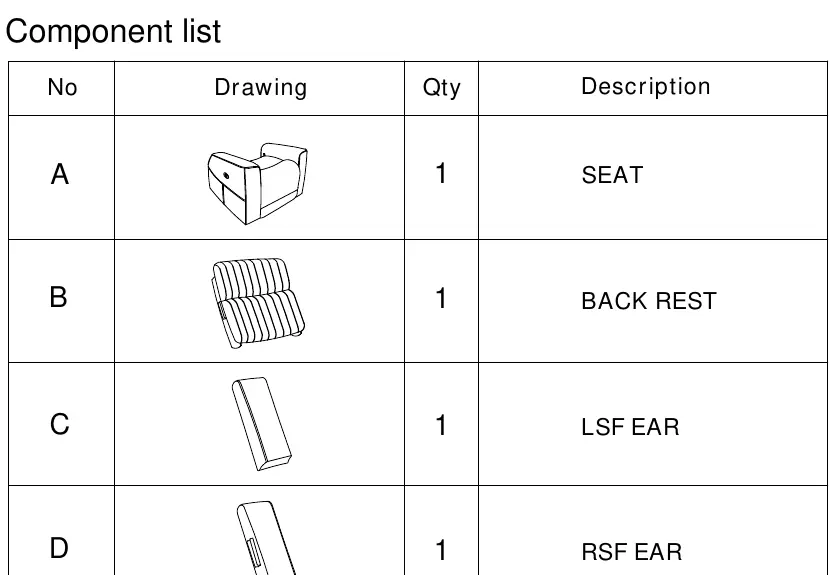
- A: Seat
- B: Back Rest
- C: LSF Ear (Left Side Facing)
- D: RSF Ear (Right Side Facing)
Assembly Steps
Follow these steps to assemble your reclining chair:
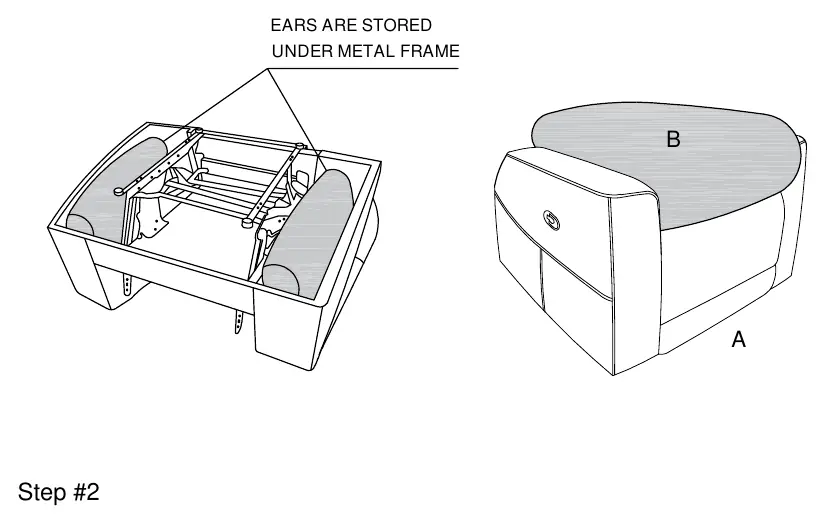
Step 1
Locate the ears (C and D) which are stored under the metal frame of the seat (A).
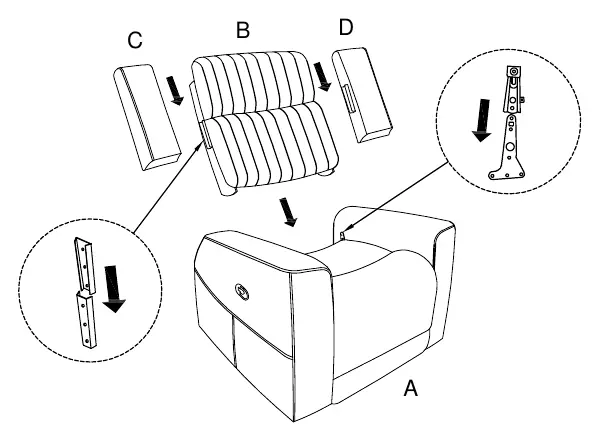
Step 2
Attach the backrest (B) and the ears (C and D) to the seat (A). Ensure all connections are properly aligned and secured.
Step 3
Once assembled, the chair is ready for use. To recline the chair, pull the release mechanism located on the side.
Care and Maintenance
To maintain the appearance of your textured microfiber and corduroy furniture, follow these guidelines:
- Avoid Sun and Heat: Do not expose the furniture directly to sunlight or heating and air conditioning outlets, as this will cause fading and damage to the fabric.
- Cleaning: Vacuum or wipe the surface with a soft cloth to remove dust.
- Hardware Maintenance: Hardware may loosen over time. Periodically check all connections and re-tighten if necessary.
- Floor Protection: If using the chair on wooden floors, hard surfaces, or carpets, it is recommended to install protective pads under all legs and supports to prevent scratches, damages, and discoloration.
Practical help
Common problems
Hardware feels loose
Periodically check all connections and re-tighten them if necessary.
Fabric fading or damage
Avoid placing the chair in direct sunlight or near heating and air conditioning outlets.
Scratches on floor
Install protective pads under all legs and supports if using on wooden or hard floors.
Before use
- Do not use power tools for assembly.
- Locate the ears stored under the metal frame of the seat.
- Ensure all components (Seat, Back Rest, LSF Ear, RSF Ear) are present.
- Install protective pads on legs if placing on hard surfaces or wooden floors.
Images and diagrams
- Step 1 illustrates the location of the ears stored under the seat frame.
- Step 2 shows the attachment points for the backrest and ears to the seat base.
- Step 3 demonstrates the operation of the reclining mechanism.
Model compatibility
- Recommended to use protective pads on wooden floors, hard surfaces, or carpets to prevent scratches and discoloration.

Manual page author
David Miller
Documentation analyst
Organizes user manual content into clear summaries, with attention to model details, product context, and everyday usability.