Industrial / Electrical
Danfoss Optyma Plus Control Unit (084B8080) Quick Start Guide
Quick start and configuration guide for the Danfoss Optyma Plus control unit, covering setup, refrigerant selection, and activation procedures.
Table of contents
Overview of the Optyma Plus Control Unit
The Danfoss Optyma Plus control unit (code 084B8080) is designed for efficient management of condensing units. This guide provides the essential steps for initial configuration, including deactivating the unit for maintenance, selecting the appropriate refrigerant, and setting the condensing unit type. Proper configuration ensures the system operates within safe and optimal parameters.
Navigation and Interface
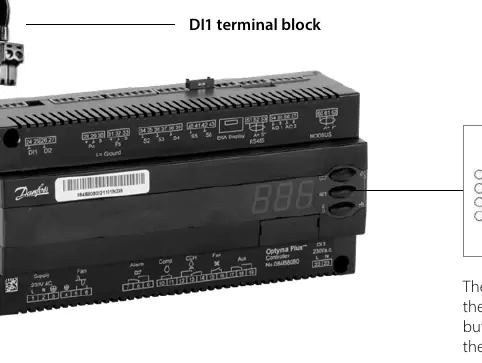
The controller features a simple three-button interface consisting of an upper, central, and lower button. The upper and lower buttons are used to navigate through the menu and adjust parameter values. The central button is used to access specific parameters and confirm selected values. Users should familiarize themselves with this interface before attempting any configuration changes.
Initial Setup and Deactivation
Before performing any configuration, it is often necessary to deactivate the control unit. This is achieved by cutting off the power supply and removing the DI1 terminal block, which acts as an external hard-wired stop/start link. Once the unit is powered back on, users can enter the settings mode by holding the upper button for five seconds until the code r05 appears. To deactivate the unit, navigate to parameter r12 and set the value to 0.
Refrigerant Selection and Unit Configuration
Selecting the correct refrigerant is critical for system performance. Navigate to parameter o30 and enter the value corresponding to your specific refrigerant type, such as R134a, R404A, or R513A. After selecting the refrigerant, configure the condensing unit type using parameter c33. This parameter allows for the adjustment of the Pump Down cut-out value, which should be set based on the specific application and compressor type. For Optyma Plus INVERTER models, additional settings such as the evaporating pressure (parameter r23) must be configured based on the desired evaporation temperature.
Activation
Once all parameters are correctly set, the control unit must be reactivated. This involves ensuring the DI1 terminal block is securely connected, powering the unit on, and returning to the settings mode. Navigate back to parameter r12 and set the value to 1 to activate the unit. Once confirmed, the condensing unit is ready for operation.
Manufacturer information
Danfoss A/S
Practical help
Common problems
Compressor will not start
Ensure the DI1 terminal block is properly connected and the control unit is activated (parameter r12 set to 1).
Before use
- Ensure the power supply is switched off before removing the DI1 terminal block.
- Verify the refrigerant type matches the system requirements.
- Confirm the condensing unit type is correctly set in parameter c33.
- For INVERTER models, verify the evaporating pressure setting (r23).
Images and diagrams
- The DI1 terminal block serves as the external hard-wired stop/start link.
- The three-button interface allows for menu navigation and parameter confirmation.
Model compatibility
- Specific settings for Pump Down cut-out values depend on the refrigerant and compressor type.
- INVERTER models require additional configuration via parameter r23.

Manual page author
David Miller
Documentation analyst
Organizes user manual content into clear summaries, with attention to model details, product context, and everyday usability.