Tools / Power Tools
DeWALT 12V Ratchet User Manual (DCF503, DCF503E, DCF504)
Quick guide for DeWALT 12V Ratchet models DCF503, DCF503E, and DCF504. Includes setup, operation, safety, and maintenance instructions.
Table of contents
Quick guide from the manual
This manual provides essential information for operating the DeWALT 12V Ratchet series (DCF503, DCF503E, DCF504). These tools are designed for light-duty fastening applications. Note that these are not torque wrenches; use a calibrated torque measurement device if specific torque settings are required.
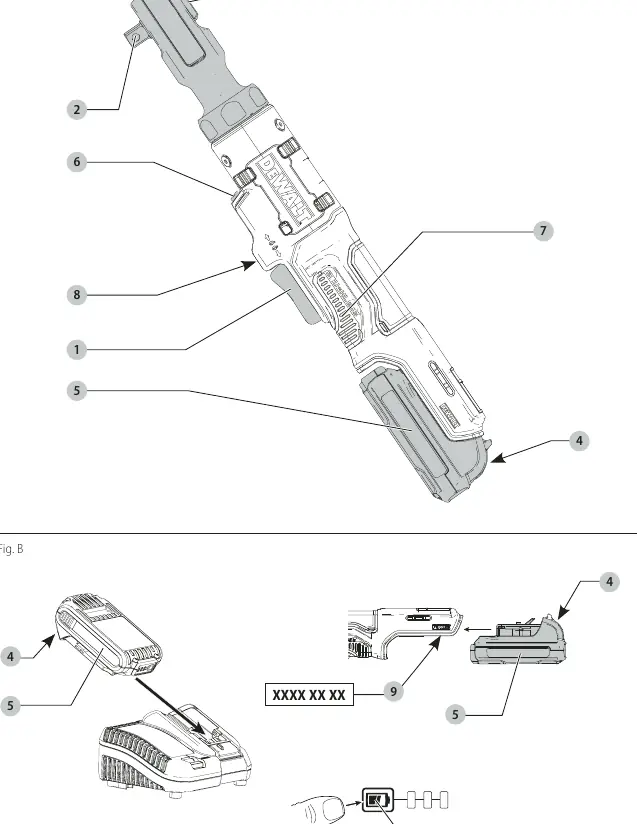
Tool Description
The tool features a trigger switch for variable speed, a forward/reverse dial, a worklight, and a lock-off button. The DCF503E model includes an extended neck for reaching into tight spaces.
Operation
Battery Installation: Align the battery pack with the rails inside the tool handle and slide it in until it is firmly seated.
Operation: Pull the variable speed trigger to start the tool. The speed increases as the trigger is depressed further. Use the forward/reverse dial to select the rotation direction. The worklight activates when the trigger is pressed and stays on for up to 20 seconds after release.
Locking: Slide the lock-off button to the locked position to prevent the trigger from being pulled.
Maintenance
The tool requires minimal maintenance. Keep the tool clean and free of dust. The tool does not require additional lubrication. Blow dirt and dust out of the main housing with dry air regularly.
Safety
Always wear eye and ear protection. Do not operate in explosive atmospheres. Keep children and bystanders away. Ensure the workpiece is secured on a stable platform. Be aware that accessories can become hot during operation.
Manufacturer information
DEWALT
Practical help
Common problems
Ratchet stalls
The tool is overloaded or used improperly. Release the variable speed trigger immediately. Do not cycle the trigger on and off to restart a stalled ratchet, as this can damage the tool.
Battery not charging
Ensure the battery is fully seated in the charger. If the charger does not light up, the battery or charger may be faulty; take them to an authorized service center.
Before use
- Ensure the battery pack is fully charged
- Inspect the anvil for damage
- Select the correct rotation direction
- Ensure the workpiece is secured on a stable platform
- Wear appropriate personal protective equipment
Specs in practice
- No load speed
- 0-250 RPM
Images and diagrams
- Fig A: Tool components including trigger, anvil, forward/reverse dial, battery, worklight, and lock-off button.
- Fig B: Battery installation and fuel gauge operation.
- Fig C: Proper hand position for controlling the tool.
- Fig D: Anvil installation and removal.
- Fig E: Forward/Reverse dial operation.
Model compatibility
- Compatible with 12V batteries: DCB122, DCB124, DCB124G, DCB125, DCB126G, DCB127.

Manual page author
David Miller
Documentation analyst
Organizes user manual content into clear summaries, with attention to model details, product context, and everyday usability.