Tools / Measuring Tools
User Manual for Draper Tools 13818-501G Metal, Voltage & Stud Detector
Quick guide for the Draper Tools 13818-501G detector. Learn how to operate, calibrate, replace the battery, and safely detect metal, live wires, and wall studs.
Table of contents
Manual images
Click an image to enlargeQuick guide from the manual
The Draper Tools 13818-501G is a multi-function detector designed to locate metal, live electrical wiring, and wall studs. Before use, ensure a 9V PP3 battery is installed. Always test the device on a known voltage source before attempting to detect unknown sources. Note that this device is intended as a guide only and does not guarantee the absence of hazards; always exercise caution when working on walls.
Product Overview
The device features several controls and indicators:
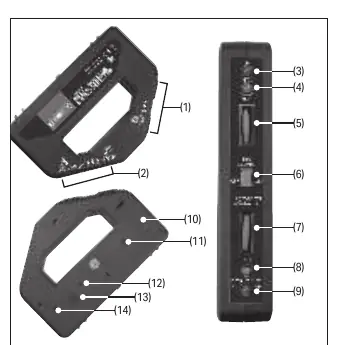
- Stud detection face (1) and Voltage/metal detection face (2).
- Stud indicators (3, 4) and Voltage/metal indicator (9).
- Sensitivity dials (5, 7) for adjusting detection levels.
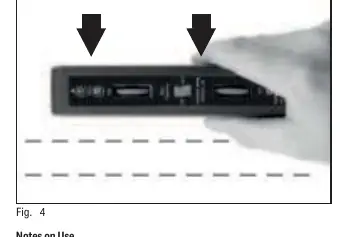
- Selector switch (6) to toggle between modes.
- Power indicator (8).
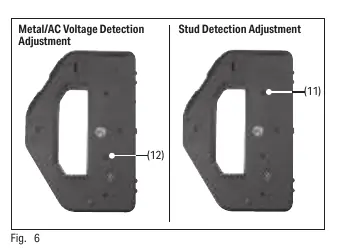
- Adjustment trimmers (11, 12) located inside the battery compartment for calibration.
Operation and Use
AC Voltage and Metal Detection:
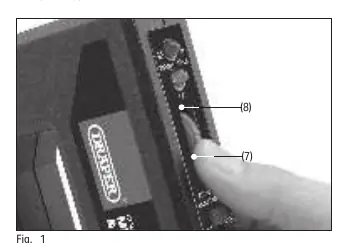
- Rotate the voltage/metal sensitivity dial (7) fully downwards.
- Move the selector switch (6) to the AC Voltage/Metal Detector position.
- Rotate the sensitivity dial (7) upwards until the indicator illuminates and the tone sounds, then reverse the dial gently until they switch off.
- Hold the device flush against the wall and move it sideways.
Wood Frame Detection:
- Hold the device flush against the wall.
- Rotate the stud sensitivity dial (5) fully downwards.
- Move the selector switch (6) to the Stud Detector position.
- Turn the sensitivity dial until the red stud indicator (3) illuminates and the tone sounds.
- Gently reverse the dial until the green indicator illuminates and the tone stops.
- Move the unit horizontally across the wall. The red indicator and tone will activate when the edge of a stud is detected.
Maximizing Accuracy
To pinpoint the exact location of objects:
- Configure the device as normal and sweep the surface to find the approximate location.
- Adjust the sensitivity dial slightly downwards and sweep again.
- Repeat until the indicator is no longer activated.
- Adjust the dial slightly upwards and perform one final sweep to identify the exact location.
Unit Adjustment
The device is calibrated at the factory. Only adjust if the device does not function as expected. Use the small screwdriver (15) found on the back of the battery cover to rotate the trimmers (11 or 12). Adjustments are highly sensitive; only make small rotations. Warranty claims may be rejected if the device is poorly adjusted by the user.
Maintenance and Disposal
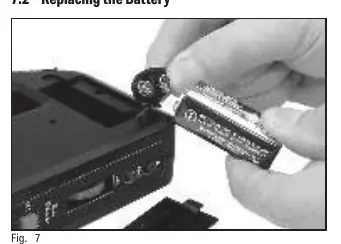
Clean the product regularly with a dry cloth; do not use aggressive chemicals. Remove the battery before storing for extended periods. To replace the battery, unclip the cover (10) on the back of the unit, replace the 9V PP3 battery, and reattach the cover. Dispose of the product and battery according to local regulations; do not incinerate or dispose of with domestic waste.
Health and Safety
This device is a guide only. Lack of response does not guarantee the absence of metal, currents, or wall studs. Do not immerse in water. Avoid touching the wall while testing, as contact may cancel detection or generate static electricity causing false readings. The device may be triggered by very low currents in damp walls, indicating a potential hazard that requires investigation by qualified personnel.
Manufacturer information
Draper Tools Limited
Practical help
Common problems
Device indicates voltage in a wall where none exists
Check for damp walls or poor insulation; investigate as a potential hazard.
Device not detecting studs
Ensure the device is held flush with the wall and recalibrate if necessary.
False readings during testing
Avoid touching the wall while testing, as static electricity or body contact can interfere with detection.
Before use
- Install a 9V PP3 battery.
- Test the device on a known voltage source before use.
- Ensure the device is not positioned near metal objects when switching on.
- Check the device for physical damage or battery leakage.
- Ensure the selector switch is in the correct position for the intended task.
Specs in practice
- Wood detecting depth
- 10mm
- Metal detecting depth
- 25mm
- Live wiring detecting depth
- 35mm
- Ambient condition
- -20°C to 60°C below 80% RH
Images and diagrams
- Controls include sensitivity dials for stud and voltage/metal detection.
- Adjustment trimmers are located inside the battery compartment for calibration.
- The device uses a 9V PP3 battery.
Model compatibility
- Cannot detect shielded current conductors (e.g., in metal conduit).
- Metallic fibers in fireproofing or foil-backed plasterboard may cause incorrect readings.
- Multiple adjacent studs may cause the device to function incorrectly.

Manual page author
David Miller
Documentation analyst
Organizes user manual content into clear summaries, with attention to model details, product context, and everyday usability.