Electronics / Monitors
User Manual for Elo 90 Series Open Frame Touchscreen
Quick guide for the Elo 90 Series Open Frame Touchscreen. Includes installation, mounting, OSD settings, troubleshooting, and technical specifications.
Table of contents
Manual images
Click an image to enlargeQuick Guide
The Elo 90 Series Open Frame Touchscreen is designed for high-traffic environments. This manual provides instructions for installation, mounting, and operation. Before powering on, ensure you have the necessary cables and have reviewed the mounting requirements for your specific model.
Installation
Unpack the display and verify the following items are included: Japanese language regulatory information pamphlet, Quick Install Guide, HDMI cable, EEI label, VGA cable, USB cable, mounting brackets, and OSD remote.

Connections:
- Connect the video cable (HDMI, DisplayPort, or VGA) between the monitor and your video source. Tighten screws for VGA connections.
- Connect the USB touch cable to your PC's USB port. For specific models (EXX9XL-XCXX), a Serial (COM) cable may be used instead.
- Connect the 12VDC power supply to the monitor's input power jack.
- The monitor ships in an ON state.
Drivers: For Windows 7, 8.1, and 10, no additional drivers are required (uses Windows HID drivers). For Windows XP, visit the Elo website to download the touch driver.
Mounting
The 90 Series supports multiple mounting options:
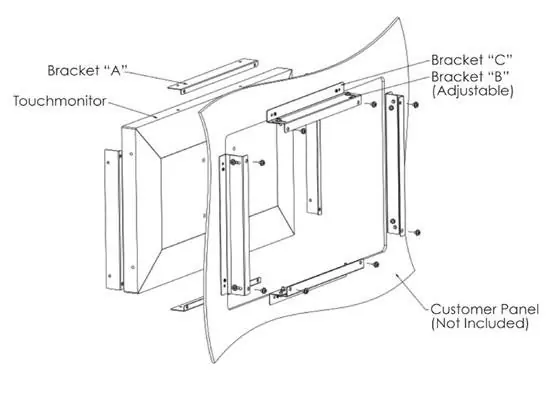
- Flush Mount: Uses brackets A, B, and C. Attach bracket A to the display, bracket C to the customer panel, and bracket B to connect them. Adjust depth as needed.
- Side Bracket Mount: Uses side-mounted brackets.
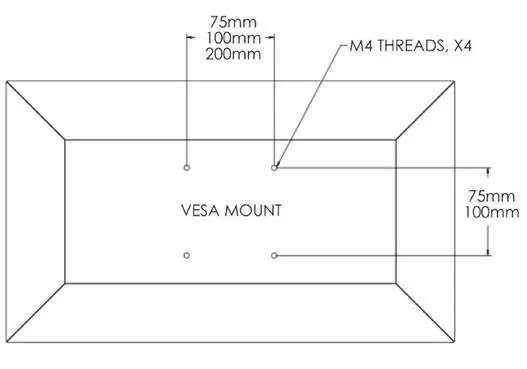
- Rear VESA Mount: A four-hole pattern (M4 screws) is provided on the rear. Supported patterns include 75x75mm, 100x100mm, and 200x100mm, depending on the specific model.
Operation
Power: Use the OSD controller to turn the display on or off. The power status LED indicates the state: OFF (OFF), SLEEP (PULSING), ON (ON).

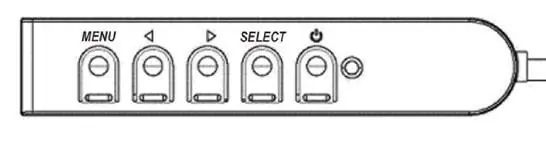
OSD Controls: The wired OSD controller has five buttons: Menu, Left Arrow, Right Arrow, Select, and Power. Use these to adjust brightness, contrast, H/V position, aspect ratio, and other display parameters.
Touch Technology: The display is factory-calibrated. If needed, use the Elo driver control panel to re-calibrate. For multiple monitors, use the EloConfig desktop shortcut.
Troubleshooting
If you encounter issues, try these steps:
- Display is dim: Increase brightness and contrast via OSD. Check for Protection Mode (95/96 series).
- Display is blank: Check power connections, ensure the signal source is on, and verify the monitor is not in SLEEP mode.
- Out of Range message: Adjust computer resolution/timing to match the monitor's specifications.
- Touch not working: Ensure latest drivers are installed and perform calibration.
Safety & Maintenance
To maintain optimal performance: disconnect power before cleaning, use a clean cloth with mild detergent for the cabinet, and use glass cleaner on a cloth for the screen (never apply directly). Do not block ventilation slots. The unit is not designed for outdoor use.
Practical help
Common problems
Display is dim
Use the OSD to increase brightness and contrast. For 95/96 series, check if Thermal Protection Mode is active (indicated by an exclamation mark in the OSD menu).
Display is blank
Check that the power adapter is connected and functioning. Ensure the signal source is on and cables are secure. If the LED is pulsing, the monitor is in SLEEP mode; move the mouse or touch the screen to wake it.
Out of Range message
Adjust your computer's resolution or timing mode to be within the allowable ranges specified for your touchscreen display.
Touch functionality does not work
Verify that the latest Elo drivers are installed on your PC and perform the calibration routine provided with the drivers.
Before use
- Verify all items are present: cables, mounting brackets, and OSD remote.
- Ensure the power supply is 12VDC.
- Check the VESA mounting pattern compatibility (75x75, 100x100, or 200x100mm).
- Install drivers for Windows XP if necessary (Windows 7/8.1/10 are Plug & Play).
- Ensure the installation environment meets temperature and humidity specifications.
Specs in practice
- VESA MIS-E,C
- The standard mounting pattern code for the rear of the monitor.
- Thermal Protection Mode
- A safety feature for 95/96 series that reduces brightness if the internal temperature exceeds limits.
Images and diagrams
- Connector Panel: Shows ports for 12V DC, DisplayPort, HDMI, VGA, OSD Remote, USB for Touch, and optional COM(Serial) for Touch.
- Flush Mount: Illustrates the assembly of brackets A, B, and C to mount the display flush with a panel.
- VESA Mount: Shows the 4-hole M4 screw pattern on the back of the monitor.
Model compatibility
- Windows 7, 8.1, 10: Plug & Play (uses Windows HID drivers).
- Windows XP: Requires manual driver installation.
- 95/96 Series: Includes thermal protection mode.
- COM (Serial) port: Only applicable for EXX9XL-XCXX models.

Manual page author
Emily Carter
User documentation editor
Prepares concise manual descriptions and highlights the most useful setup, operation, and maintenance information for readers.