Lighting / Fixtures
User Manual for Energizer 10343-CO-10 Solar Pathway Lights
Quick guide for Energizer 10343-CO-10 Solar Pathway Lights. Learn how to assemble, install, replace batteries, and troubleshoot your solar lights for optimal performance.
Table of contents
Quick guide from the manual
To ensure your Energizer Solar Pathway Lights function correctly, they must be installed in an area that receives direct sunlight. Before installation, remove the battery tab from the solar top housing. If the ground is hard, moisten it with water to avoid breaking the stake. Do not use a hammer to install the lights.
Assembly
Follow these steps to assemble your lights:
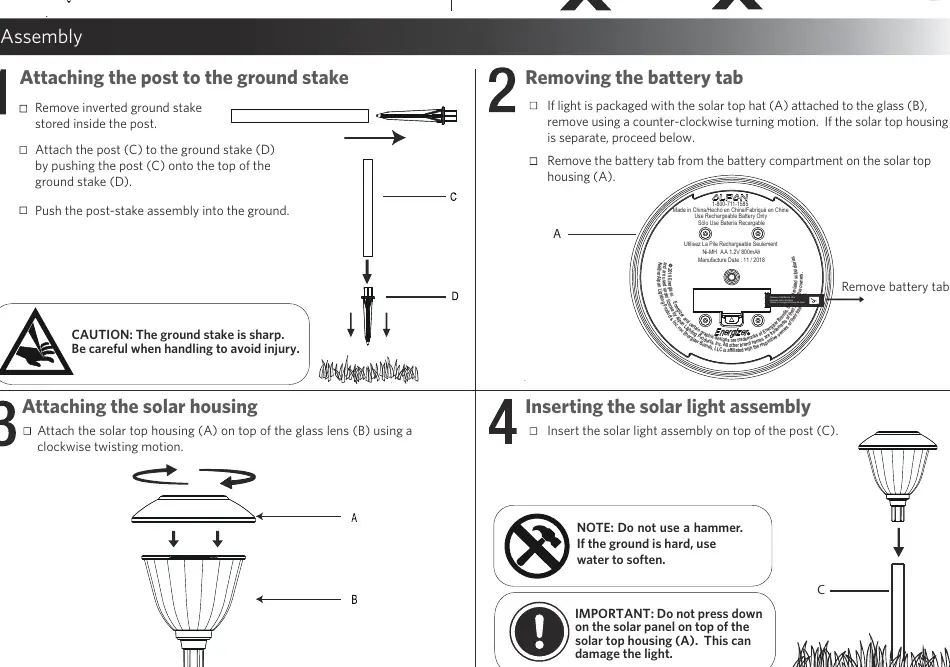
- Prepare the stake: Remove the inverted ground stake stored inside the post.
- Connect post and stake: Attach the post (C) to the ground stake (D) by pushing them together.
- Remove battery tab: If the solar top housing (A) is attached to the glass lens (B), remove it using a counter-clockwise motion. Remove the battery tab from the battery compartment.
- Attach housing: Attach the solar top housing (A) on top of the glass lens (B) using a clockwise twisting motion.
- Final assembly: Insert the completed solar light assembly on top of the post (C).
Maintenance and Battery Replacement
To replace the battery:
- Remove the solar light assembly from the post by gently pulling upwards.
- Remove the solar top housing (A) from the glass lens (B) by twisting counter-clockwise.
- Remove the battery cover on the bottom of the solar top housing and replace the battery.
- Re-assemble the unit.
Important: Use only AA 800mAh Nickel Metal Hydride (Ni-MH) rechargeable batteries. Do not use alkaline, standard (carbon-zinc), or Ni-Cd batteries.
Care and Cleaning
Clean the solar panel with a damp cloth. Do not use any chemicals or abrasives. Keep the solar panel free of snow and debris to allow the battery to charge properly.
Troubleshooting
If the lights stop working or operate for a short duration:
- Ensure the units are in a location with sufficient sunlight and not blocked by trees or buildings.
- Place the unit in direct sunlight for three sunny days to ensure the battery is adequately charged.
- Ensure the solar top housing is not under any direct light source when testing, as the lights are designed to turn on only when it is dark.
- If the battery is old or weak, replace it with a new AA 800mAh Ni-MH battery.
Manufacturer information
Energizer
Practical help
Common problems
Light stops working after a period of time
Check if the unit is getting sufficient sunlight. Place in direct sunlight for three days to charge. Ensure the solar panel is not under direct light sources at night.
Lights only operate for a short duration
Move the unit to a sunnier location. If the battery is old, replace it with a new AA 800mAh Ni-MH battery.
Before use
- Remove the battery tab from the solar top housing.
- Ensure the ground is soft; moisten with water if hard.
- Place the unit in an area with direct sunlight.
- Do not use a hammer for installation.
Specs in practice
- Battery Type
- AA 800mAh Nickel Metal Hydride (Ni-MH) rechargeable battery.
- Operating Time
- Varies by specific location, daily weather conditions, and season.
Images and diagrams
- Assembly steps show the connection sequence of the ground stake, post, glass lens, and solar top housing.
- Battery replacement diagram illustrates removing the top housing and battery cover.
Model compatibility
- Use only Ni-MH rechargeable batteries.
- Do not use alkaline, standard (carbon-zinc), or Ni-Cd batteries.

Manual page author
Michael Turner
Technical manual editor
Reviews PDF manuals for structure, safety notes, and practical product details so readers can find the right information quickly.