Home / Door Hardware
Installation Guide for Everbilt Soft Close Frameless Inset 110-Degree Hinge
A comprehensive installation guide for the Everbilt Soft Close Frameless Inset 110-Degree Hinge (Model 9235951). Includes step-by-step instructions for drilling, mounting, and adjusting the hinge for optimal door alignment.
Table of contents
Manual images
Click an image to enlargeQuick guide from the manual
This document provides installation instructions for the Everbilt Soft Close Frameless Inset 110-Degree Hinge. The hinge is designed for inset applications on frameless furniture. Key requirements include a 35mm boring bit for the hinge cup and ensuring the door hole is at least 1/2 inch deep. The hinge allows for a maximum opening angle of 110 degrees.
Planning installation
Before beginning, ensure you have all necessary tools and parts. Verify the number of hinges required based on your door size and weight using the provided guidelines.
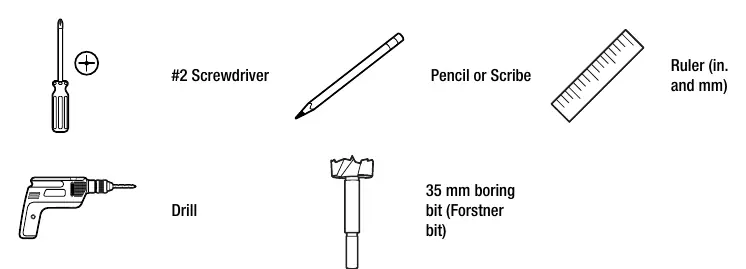
Tools required
- #2 Screwdriver
- Pencil or Scribe
- Ruler (in. and mm)
- Drill
- 35 mm boring bit (Forstner bit)
Package contents
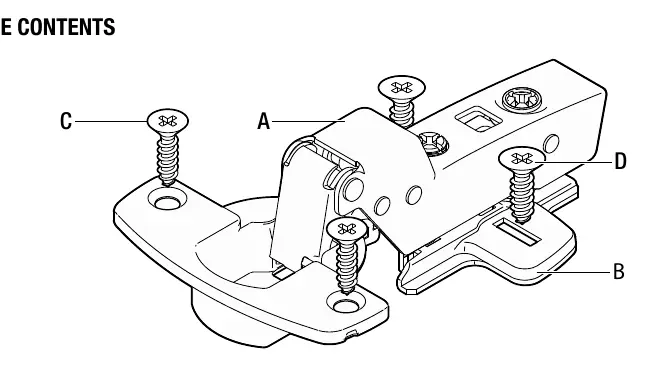
- Hinge (2)
- Frameless Mounting Plate (2)
- #5 x 5/8 in. Wood Screw (4)
- #9 x 5/8 in. Wood Screw (4)
Installation steps
- Pre-drilling: Use a pencil and ruler to mark the installation location. Use a 35mm boring bit to drill the door hole 7/8 inch from the edge. Ensure the hole is at least 1/2 inch deep. Do not drill through the door face.
- Installing hinges to the door: Insert each hinge cup into the pre-drilled hole and secure it using two 5/8 inch wood screws.
- Installing mounting plates: Align the mounting plates to the marked position on the cabinet and fasten them with two screws.
- Installing the door: Open the hinges to the fully-extended position. Connect the hinge arm to the mounting plates and press the hinge arm down until it snaps into place.
Adjusting the door
Once installed, you can fine-tune the door position using the adjustment screws on the hinge arm:
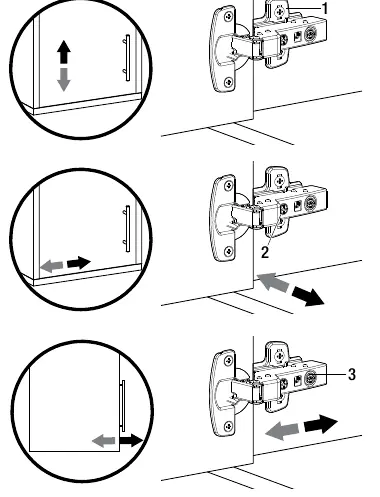
- Height Adjustment: Loosen the top mounting screw (1) to adjust the door up or down.
- Overlay Adjustment: Turn the adjustment screw (2) to adjust the door overlay.
- Depth Adjustment: Turn the eccentric screw (3) to adjust the distance of the door from the cabinet.
Practical help
Common problems
Door is misaligned or not closing flush
Use the three adjustment screws on the hinge arm to modify height, overlay, and depth until the door sits correctly.
Hinge cup does not fit in the door
Ensure the hole is exactly 35mm in diameter and at least 1/2 inch deep.
Before use
- Verify all parts (hinges, mounting plates, screws) are present.
- Gather required tools: #2 screwdriver, pencil, ruler, drill, and 35mm Forstner bit.
- Check door size and weight to determine the correct number of hinges needed.
- Ensure the cabinet is frameless and the door is an inset application.
Specs in practice
- 35 mm boring bit
- The required drill bit size for creating the hinge cup hole in the door.
- 1/2 inch deep
- The minimum depth required for the hinge cup hole to ensure proper fit.
- 7/8 inch from edge
- The distance from the door edge to the center of the hinge cup hole.
Images and diagrams
- The hinge orientation diagram shows the correct positioning for inset applications on frameless cabinets.
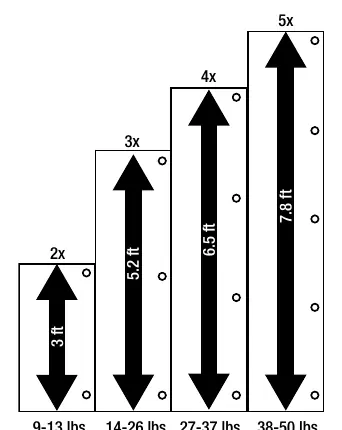
- The hinge count diagram helps determine how many hinges are needed based on door height and weight (e.g., 2 hinges for 3ft doors, up to 5 hinges for 7.8ft doors).
Model compatibility
- Designed specifically for frameless furniture with inset doors.
- Maximum opening angle is 110 degrees.

Manual page author
Michael Turner
Technical manual editor
Reviews PDF manuals for structure, safety notes, and practical product details so readers can find the right information quickly.