Software / Apps Services
Falcon 1080P Heavy Duty Bracket Camera IR Light Disabling Guide
Official instructions on how to safely disable the infrared (IR) lights on your Falcon 1080P heavy-duty bracket camera.
Table of contents
Understanding the IR Light Disabling Process
The Falcon 1080P heavy-duty bracket camera is equipped with infrared (IR) lights designed to improve visibility in low-light conditions. In certain environments, users may wish to disable these lights. This procedure involves opening the camera housing and disconnecting the power supply to the IR board. Please be aware that performing this modification will void both the standard one-year manufacturer warranty and any extended warranties. Proceed only if you possess the necessary tools and technical knowledge to handle delicate electronic components.
Safety and Warranty Warnings
Before attempting this procedure, it is critical to understand that you are assuming all risks associated with the modification. Any internal damage caused to the unit during this process will result in the loss of warranty coverage, and you will be responsible for the cost of a replacement unit. If you are unsure about any step, please contact technical support at 512-251-8472 for further guidance before proceeding.
Step-by-Step Disabling Instructions
To begin, ensure you have a clean, well-lit workspace and the appropriate screwdrivers. Follow these steps precisely to avoid damaging the internal circuitry:
- Start with the heavy-duty square bracket camera unit.
- Remove the four screws located on the back of the camera housing.
- Carefully remove the front glass cover to expose the internal components.
- Locate the two screws on the left and right sides of the printed circuit board (PCB) and remove them.
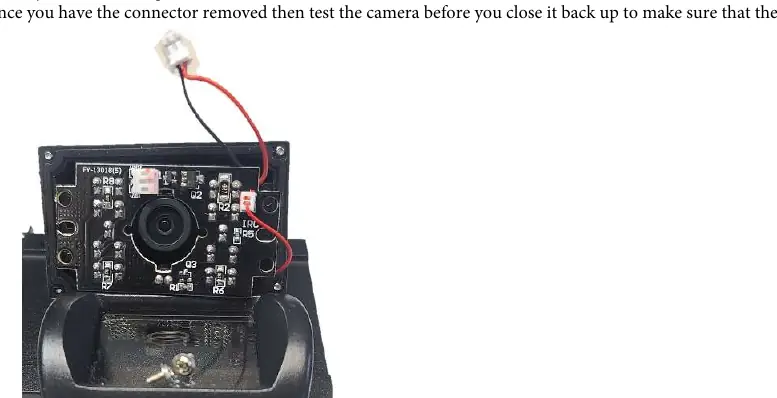
- Gently turn the PCB around to reveal the two white connectors on the back.
- Identify the larger white connector that has red and black wires attached to it.
- Very carefully disconnect this larger white connector from the connector attached to the board.
Once the connector has been removed, it is recommended to test the camera functionality before reassembling the housing. Ensure the IR lights are successfully disabled while the camera is powered on. If the camera operates as expected, proceed to reassemble the unit by reversing the disassembly steps, ensuring all screws are tightened securely to maintain the weather-resistant seal of the camera.
Manufacturer information
Falcon Electronics
Practical help
Common problems
IR lights remain on after modification
Ensure the larger white connector with red and black wires is fully disconnected from the board.
Camera does not power on after reassembly
Check that no internal wires were pinched or disconnected during the reassembly process.
Before use
- Verify you have the correct tools for small screws
- Ensure you are working in a clean, static-free environment
- Review the entire procedure before starting
- Confirm you are willing to accept the risk of voiding the warranty
Images and diagrams
- The process involves accessing the internal PCB by removing the rear screws and front glass.
- The IR lights are controlled by a specific white connector with red and black wires.
- Disconnecting this specific wire harness disables the IR functionality.
Model compatibility
- This procedure is specific to the Falcon 1080P heavy-duty bracket camera model.

Manual page author
Emily Carter
User documentation editor
Prepares concise manual descriptions and highlights the most useful setup, operation, and maintenance information for readers.