Furniture / Home Furnishing
Falcon Thermoset Toilet Seat Installation Guide
Quick installation and maintenance guide for the Falcon Thermoset Toilet Seat with adjustable stainless steel hinges. Includes step-by-step fitting instructions, adjustment procedures for optimal seat projection, and care guidelines.
Table of contents
Quick guide from the manual
This guide provides instructions for installing and adjusting the Falcon Thermoset Toilet Seat with adjustable stainless steel hinges. Ensure all components are present before beginning the installation process.
Parts included
- Swivel Hinge Anchors
- Main Seat Washers
- Fixing Hole Inserts
- Dome Washers
- Washers
- Nuts
- Fixing Key
Fitting the seat to the pan
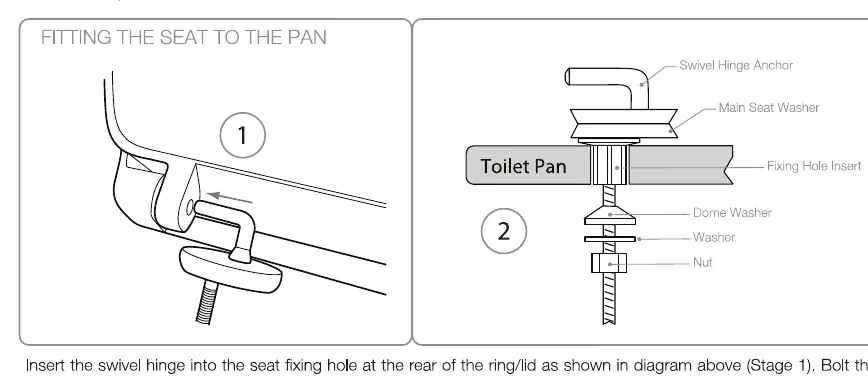
- Insert the swivel hinge into the seat fixing hole located at the rear of the ring/lid.
- Position the seat on the toilet pan.
- Secure the seat using the provided fixings as shown in the assembly diagram.
- Tighten the nut fully using the supplied fixing key once the seat is in the desired position.
Adjustment
The seat position can be adjusted to align with the toilet pan:
- Rotation: Rotate the hinge body disc to adjust the angle.
- Sliding: Slide the fixing bolt backwards or forwards to adjust the projection.
- Projection settings: For minimum seat projection, fit the hinge anchors as shown in Fig 1. For maximum seat projection, fit the hinge anchors as shown in Fig 2.
Aftercare instructions
To maintain the condition of your toilet seat:
- Clean surfaces using a soft damp cloth and a mild soap solution.
- Do not use abrasive cleaning agents.
- Do not scrub or scour the surface.
- Do not stand on the lid or the ring of the toilet seat.
Customer services
For further assistance, contact: Brassmill Lane Trading Estate, Bath BA1 3JF, tel: 01225 303900.
Manufacturer information
Falcon Electronics
Practical help
Common problems
Seat does not align correctly with the pan
Rotate the hinge body disc or slide the fixing bolt backwards/forwards to adjust the position.
Seat projection is too short or too long
Adjust the orientation of the hinge anchors according to the minimum or maximum projection diagrams provided.
Before use
- Verify all parts from the fixing kit are present (2x of each component except the Fixing Key).
- Ensure the toilet pan is clean and dry before installation.
- Identify the desired seat projection to determine hinge anchor orientation.
Specs in practice
- Adjustable Hinge
- Allows for both rotational and sliding adjustments to ensure the seat fits various toilet pan sizes.
Images and diagrams
- Stage 1: Inserting the swivel hinge into the seat fixing hole.
- Stage 2: Exploded view of the bolt, washer, and nut assembly through the toilet pan.
- Fig 1: Hinge anchor orientation for minimum seat projection.
- Fig 2: Hinge anchor orientation for maximum seat projection.
Model compatibility
- Designed for use with standard toilet pans compatible with adjustable stainless steel hinge systems.

Manual page author
David Miller
Documentation analyst
Organizes user manual content into clear summaries, with attention to model details, product context, and everyday usability.