Sports / Fitness
Fiamma Carry-Bike PRO / PRO N Bicycle Carrier Installation and Usage Instructions
A comprehensive guide for the installation and safe operation of the Fiamma Carry-Bike PRO and PRO N motorhome bicycle carriers, including mounting steps, weight distribution guidelines, and safety warnings.
Table of contents
Quick guide from the manual
This document provides installation and usage instructions for the Fiamma Carry-Bike PRO and PRO N models. It is essential to ensure the vehicle wall is strong enough to support the carrier before installation. The installation should be performed by qualified personnel in compliance with local regulations.
Installation
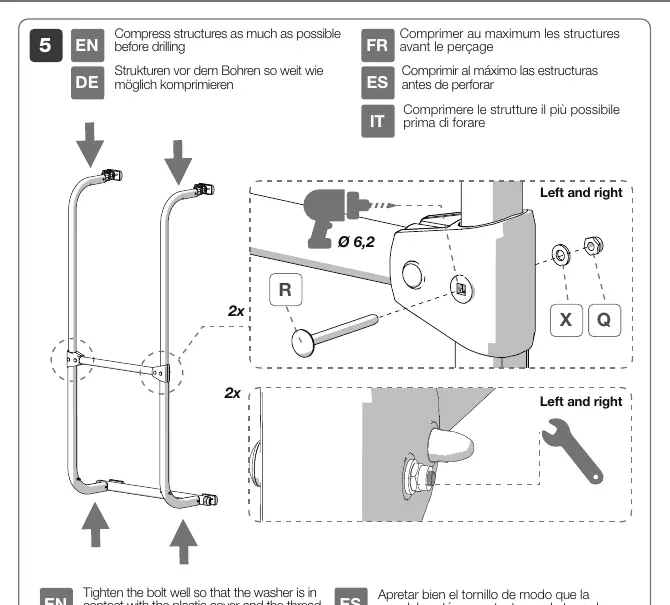
The installation process involves several steps:
- Check the vehicle wall for the strongest points to fix the brackets.
- Measure and mark the required spacing (60 cm horizontal, 80-150 cm vertical).
- Drill holes (6.5 mm) and mount the brackets using the provided hardware (F, T, E, U, H, G).
- For Carry-Bike Pro N, ensure the upper bar is correctly oriented.
- Cut the tubes (A) to the desired vertical spacing.
- Compress the structures before final drilling (6.2 mm) and tightening.
- Tighten bolts so the washer is in contact with the plastic cover and the thread protrudes from the nut.
- Do not fully tighten the fork to the tube; leave a 2 mm space.
- Fit the pre-cut upper cover to the fixing claw.
Usage and Safety
Follow these guidelines for safe operation:
- Weight Distribution: Distribute weight uniformly. Place the heaviest bikes closest to the vehicle wall.
- Maximum Load: Do not exceed the maximum load capacity (60 kg total).
- Driving: Always be aware of the carrier's presence, especially when reversing. Use additional rear-view mirrors if rear visibility is limited.
- Maintenance: Periodically check all attachments, especially after the first few kilometers and before/after long trips. Ensure belts are not loose and brackets have not shifted.
- Preparation: Remove batteries from e-bikes before transport. Rotate bicycle handlebars to prevent damage to the vehicle wall.
Troubleshooting
If you encounter issues, contact your local dealer and provide the alphanumeric code found on the product nameplate. Visit the official Fiamma website at fiamma.com for spare parts drawings and further support.
Official resources from the manual
Manufacturer information
Fiamma SpA
Practical help
Common problems
Damaged or deformed parts upon delivery
Do not install; contact your dealer immediately.
Unstable mounting
Ensure the vehicle wall is sufficiently solid. If not, reinforce the wall before proceeding.
Bikes damaging vehicle wall
Rotate the bicycle handlebars and ensure the heaviest bikes are placed closest to the vehicle wall.
Before use
- Verify compatibility with your vehicle.
- Check that all parts are undamaged.
- Ensure the vehicle wall is strong enough for anchoring.
- Remove batteries from e-bikes.
- Check that all belts are tight and brackets are secure.
- Verify that the tow hook remains accessible if using a trailer.
Specs in practice
- Drill Bit Size (Brackets)
- 6.5 mm for initial bracket mounting.
- Drill Bit Size (Structure)
- 6.2 mm for structure drilling.
Images and diagrams
- Page 2: Exploded view of components for Pro and Pro N models.
- Page 5: Drilling template and bracket mounting positions.
- Page 12: Correct loading sequence for 4 standard bikes or 2 e-bikes.
Model compatibility
- Designed specifically for motorhomes.
- Carry-Bike Pro N requires specific upper bar orientation.
- Always check axle load limits after installation.

Manual page author
Emily Carter
User documentation editor
Prepares concise manual descriptions and highlights the most useful setup, operation, and maintenance information for readers.