Garden / Lawn Care
User Manual for Fieldmann FZV 2102-E Electric Scarifier
Quick guide for the Fieldmann FZV 2102-E Electric Scarifier. Includes assembly, operation, maintenance, safety instructions, and technical specifications.
Quick answers from the manual
Quick answer
- The Fieldmann FZV 2102-E is an electric scarifier for private lawn aeration. To operate, hold the safety button and pull the starting lever. Always disconnect from power before maintenance. p. 1, 11
Key actions
- Assemble the handle and grass catcher before first use. p. 8, 9
- Adjust working depth using the control knob. p. 11
First start
- Unpack, assemble handle and basket, check all bolts, and inspect work area. p. 3, 8, 9
Show 4 more answers Show less
Problems and fixes
Motor stops due to overload
Release lever, remove obstacles, wait for reset, and reduce working depth.
p. 12Maintenance and reset
- The motor safety mechanism resets automatically after releasing the starting lever and waiting several minutes. p. 12
Technical specifications
| Parameter | Value | Meaning | Pages |
|---|---|---|---|
| Rated power | 1300 W | Motor power | p. 13 |
| Working width | 32 cm | Scarification width | p. 13 |
Where to find it in the PDF
- Safety Instructions p. 3, 4, 5
- Assembly p. 8, 9
- Maintenance p. 12
Table of contents
Manual images
Click an image to enlargeQuick guide from the manual
The Fieldmann FZV 2102-E is an electric scarifier designed for aerating lawns in private gardens. Before use, ensure the machine is fully assembled and safety mechanisms are functional. Always disconnect the power plug before performing any maintenance or blade replacement. Do not operate in rain or wet conditions.
Description of the machine
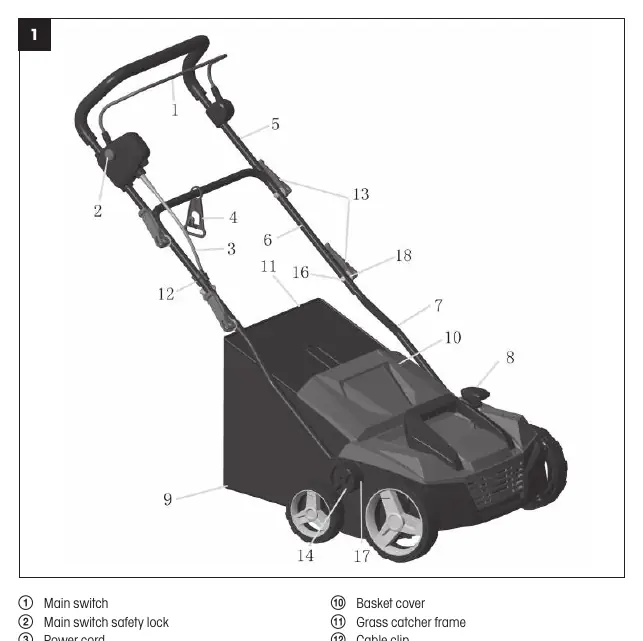
The machine consists of a main switch, safety lock, power cord, handle assembly, working depth adjustment control, and a collection basket. Refer to the diagram on page 7 for specific part identification.
Assembly
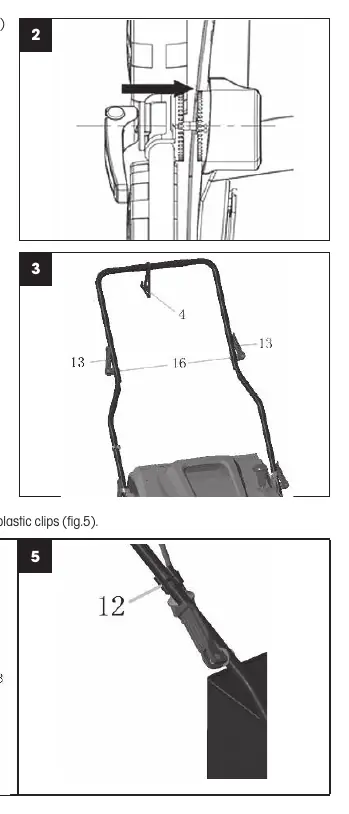
Handle Assembly: Attach the bottom handle parts using the provided screws and adjust height. Secure the middle handle section with the fast-coupling lever. Attach the top handle section and secure the power cord using the provided plastic clips.
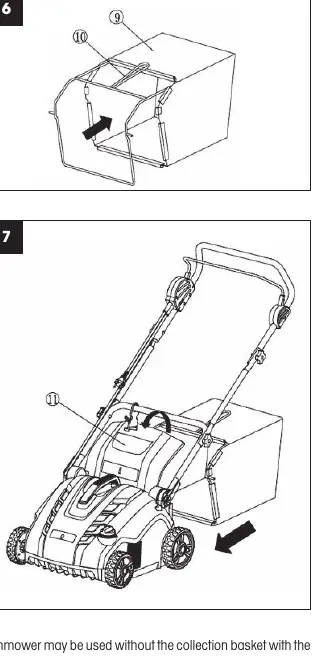
Basket Assembly: Insert the steel frame into the textile collection basket and secure all fasteners. Attach the assembled basket to the rear of the scarifier by lifting the protective cover and hooking it onto the fastening points.
Replacing blades
Danger: Always disconnect from the power grid before replacing blades. Wear work gloves.
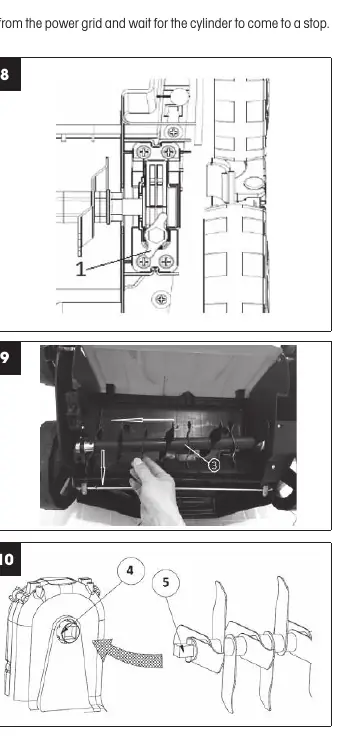
- Unscrew the bolt on the underside of the chassis.
- Lift the cylinder at an angle and remove it.
- Slide the new cylinder onto the drive shaft, ensuring the pin fits into the drive shaft part.
- Tighten the screw to secure the cylinder.
Setting up
The recommended working depth is no more than 3 mm. Use the working depth adjustment control to set the depth. Excessive depth can damage the motor and the lawn.
Operation
Starting: Press and hold the safety button, then pull the starting lever towards the handle. Release the safety button once the motor is running.
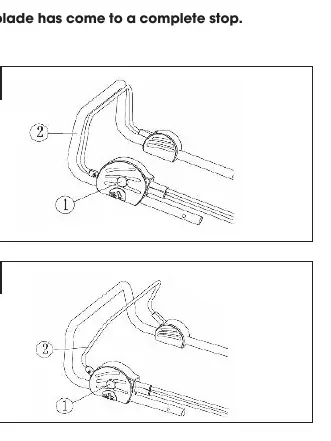
Stopping: Release the starting lever.
Maintenance
Clean the scarifier after every use. Remove grass and debris from the wheels, cylinder, and cover. Do not use running water or high-pressure cleaners. Use work gloves during cleaning.
Scarification / Aeration
Start working closest to the power source and move away from it. Work at a right angle to the power source to keep the cable on the treated side. If the motor slows down or the noise changes, stop immediately and reduce the working depth.
Technical specifications
- Rated power: 1300 W
- Working width: 32 cm
- Working depth: +10 to -12 mm
- Collection basket capacity: 40 l
- Weight: 11.0 kg
- Protection class: IPX4
- Cylinder speed: 3600 rpm
Disposal
Dispose of packaging and the machine at designated municipal waste or recycling centers. The product complies with EU directives.
Manufacturer information
Fieldmann
Practical help
Common problems
Motor stops or slows down during operation
Release the starting lever, remove obstacles, wait for the safety mechanism to reset, and reduce the working depth.
Poor scarification results
Check for blade or spring wear and adjust the working depth.
Before use
- Check that all safety mechanisms (lever, brake, cover) are undamaged.
- Ensure all nuts and bolts are tight.
- Inspect the work area for foreign objects like stones or branches.
- Wear solid footwear and long pants.
- Ensure the power cord is in good condition.
Show more Show less
Specs in practice
- Working width
- 32 cm path width per pass.
- Working depth
- Adjustable from +10 mm to -12 mm.
- Protection class
- IPX4 (protected against splashing water).
Images and diagrams
- Fig 1: Overview of machine components.
- Fig 2-5: Step-by-step handle assembly.
- Fig 6-7: Grass catcher assembly and mounting.
- Fig 8-10: Blade cylinder removal and installation.
- Fig 11-12: Starting and stopping procedure.
Model compatibility
- Designed for private gardens only.
- Not for public facilities, parks, or sports fields.
- Do not use for trimming shrubs or leveling uneven terrain.

Manual page author
Emily Carter
User documentation editor