Tools / Saws
User Manual for Fieldmann FZP 2110-E Electric Chain Saw
Quick guide for the Fieldmann FZP 2110-E electric chain saw. Includes assembly, chain tensioning, operation, maintenance, and safety instructions.
Quick answers from the manual
Quick answer
- The Fieldmann FZP 2110-E is an 1800W electric chain saw. To operate, ensure the oil tank is filled, the chain is correctly tensioned (3-4 mm lift), and the chain brake is disengaged. Always hold with both hands and use an outdoor-rated extension cord. p. 9, 10, 11
Key actions
- Install guide bar and chain p. 10
- Fill oil tank p. 11
- Check chain brake p. 12
First start
- Fill the oil tank with chain oil, install the guide bar and chain, tension the chain, and ensure the brake is disengaged before starting. p. 10, 11
Show 4 more answers Show less
Problems and fixes
Chain jams in material
Stop the saw and use a wedge to release the chain.
p. 13Maintenance and reset
- Regularly clean the body, remove sawdust from the guide bar groove, and sharpen the chain when blunt. p. 15, 16
Technical specifications
| Parameter | Value | Meaning | Pages |
|---|---|---|---|
| Power input | 1800 W | Motor power | p. 19 |
| Guide bar length | 35 cm | Length of the cutting bar | p. 19 |
| Oil tank capacity | 110 ml | Capacity for chain oil | p. 19 |
Where to find it in the PDF
- Safety Instructions p. 4, 5, 6, 7
- Installation and Operation p. 9, 10, 11, 12
- Maintenance and Specs p. 15, 16, 17, 18
Table of contents
Manual images
Click an image to enlargeQuick Guide
This manual provides essential instructions for the safe and efficient operation of the Fieldmann FZP 2110-E electric chain saw. Before first use, ensure the oil tank is filled with appropriate chain oil and the chain is correctly tensioned. Always wear protective gear, including eye and hearing protection, and gloves.
Description of the Chain Saw
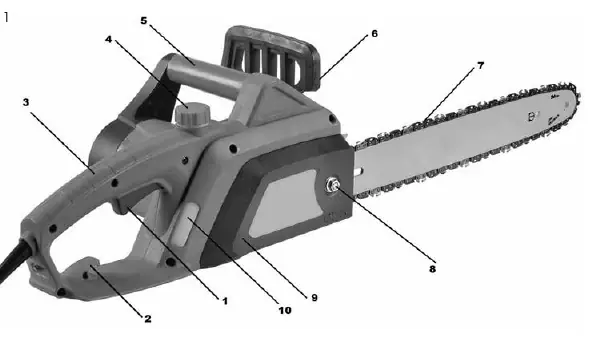
The chain saw features a start/stop trigger, rear and front handles, a safety chain brake, a guide bar with chain, and an oil tank window. Familiarize yourself with these components before operation.
Installing the Guide Bar and Chain
Warning: Disconnect the power cord before installation. Wear protective gloves.
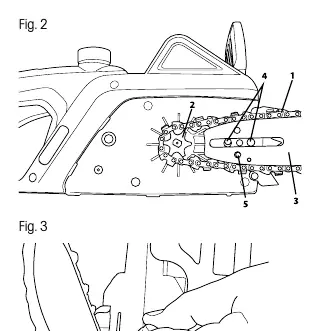
- Remove the sprocket cover by unscrewing the guide bar fastening nut.
- Place the chain onto the drive sprocket and guide bar. Ensure the adjustment pin fits into the hole in the guide bar.
- Seat the chain into the guiding groove.
- Replace the cover and lightly tighten the nut.
- Tension the chain using the tensioning screw until it can be lifted 3-4 mm from the guide bar.
- Fully tighten the fastening nut.
Filling the Chain Saw Oil Tank
The oil tank is empty upon delivery. Use only oil specified for total-loss lubrication. Do not use recycled or processed oil, as this may damage the oil pump. Ensure the area around the cap is clean before filling.
Operating the Chain Saw
Always use an extension cord suitable for outdoor use (minimum 1.5 mm²). Secure the power cord using the safety hook on the rear handle. To start, press the trigger safety lock button, then the start/stop trigger. To stop, release the trigger.
Chain Brake
The saw is equipped with an automatic chain brake that engages in the event of kickback. You can also engage it manually by pushing the brake lever forward. Check the brake function before every use by running the saw at full speed and pushing the lever forward; the chain must stop immediately.
Adjusting the Chain Tension
The chain may lengthen during operation due to heat. Periodically check the tension. Loosen the fastening nut, turn the tensioning screw to achieve the correct tension (3-4 mm lift), and re-tighten the nut.
Cutting
Only use the saw for cutting wood. Do not use it as a lever. When cutting trees, plan the fall direction and ensure an escape route. When cutting logs, maintain a stable stance and always stand above the log when working on a slope.
Cleaning and Maintenance
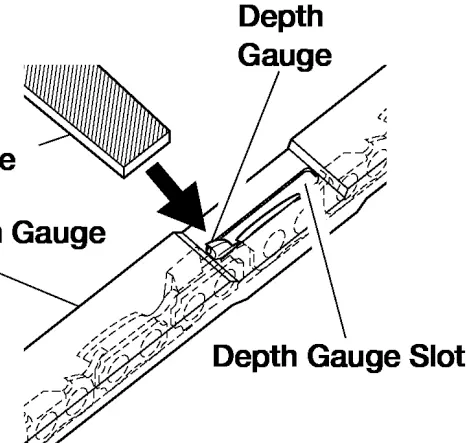
Keep the body clean using a soap solution. Regularly remove sawdust from the guide bar groove. If the chain becomes blunt, sharpen it using a round file at a 30° angle or have it serviced. Replace the chain if teeth are excessively worn or if it snaps.
Technical Specifications
- Power input: 1800 W
- Voltage/frequency: 230 V - 240 V / 50 Hz
- Guide bar length: 35 cm
- Chain pitch: 3/8"
- Oil tank capacity: 110 ml
- Weight: 5.0 kg
Manufacturer information
Fieldmann
Practical help
Common problems
Chain jams in the cut
Stop the saw and knock a wooden or plastic wedge into the cut to release the chain.
Chain is loose
Loosen the fastening nut and turn the tensioning screw until the chain can be lifted 3-4 mm from the bar.
No oil stain on the ground (lubrication check)
Clean the oil outlet, tensioning hole, and oil lines, or contact an authorized service center.
Before use
- Check oil level in the tank.
- Check chain tension (3-4 mm lift).
- Verify chain brake functionality.
- Ensure the power cord is secured in the safety hook.
- Wear protective glasses, gloves, and hearing protection.
Show more Show less
Specs in practice
- Oil tank capacity
- 110 ml, requires oil for total-loss lubrication.
Images and diagrams
- Fig 1: Parts identification diagram.
- Fig 2 & 3: Guide bar and chain installation steps.
- Sharpening diagram: Shows the 30° filing angle.
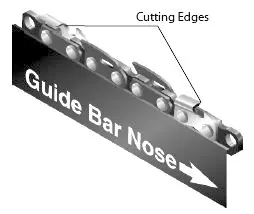
- Chain direction: Shows the correct orientation of teeth on the guide bar nose.
Model compatibility
- Use only extension cords designed for outdoor use (min 1.5 mm²).
- Use only oil specified for total-loss lubrication.
- Do not use oil that has already been used or processed.

Manual page author
Michael Turner
Technical manual editor