Garden / Lawn Care
User Manual for Fieldmann FZV 2004-E Electric Scarifier
Quick guide for the Fieldmann FZV 2004-E Electric Scarifier. Includes assembly instructions, blade replacement, depth adjustment, operation, and maintenance tips.
Quick answers from the manual
Quick answer
- The Fieldmann FZV 2004-E is an electric scarifier with a 1500W motor and 32cm working width. It is designed for aerating private lawns and features adjustable working depths. p. 1, 7, 12
Key actions
- Assemble the handle by connecting the bottom, middle, and top parts using the provided screws. p. 9, 10
- Start the machine by pressing the safety button and pulling the starting lever. p. 12
First start
- Inspect the area for debris, check all bolts, connect to power, and set the working depth. p. 6, 12
Problems and fixes
Motor stops/overloaded
Release the starting lever, remove obstacles, wait for the safety mechanism to reset, and reduce working depth.
p. 13Maintenance and reset
- Clean the scarifier after every use; remove grass and debris from wheels and cylinder. p. 13
Technical specifications
| Parameter | Value | Meaning | Pages |
|---|---|---|---|
| Rated power | 1,500 W | Power consumption of the motor. | p. 14 |
| Working width | 32 cm | Width of the scarification path. | p. 14 |
Where to find it in the PDF
- Safety Instructions p. 4, 5, 6
- Assembly p. 7, 8
- Technical Specifications p. 12
Table of contents
Manual images
Click an image to enlargeQuick guide from the manual
The Fieldmann FZV 2004-E is an electric scarifier designed for aerating lawns in private gardens. Before use, ensure the area is clear of foreign objects like stones or branches. Always wear solid footwear and long pants. Do not operate in the rain or wet conditions. If the motor stops due to overload, release the starting lever, remove obstacles, and wait for the safety mechanism to reset.
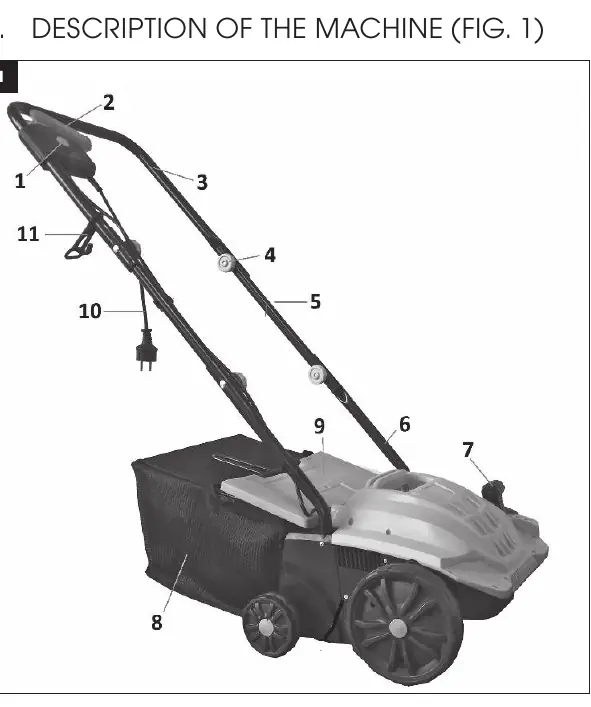
Description of the machine
The machine consists of a handle assembly (top, middle, and bottom parts), a main switch with a safety lock, a grass catcher, and a working depth adjustment lever. The power cord retainer clip is located on the handle.
Assembly
Assembling the handle
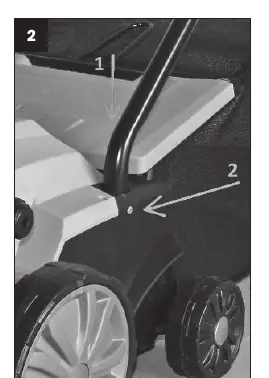
- Insert the bottom part of the handle into the body of the scarifier and fasten with the provided screws. Ensure the indents in the top part of the bottom handle point inwards.
- Connect the middle part of the handle to the bottom part using the provided screws.
- Slide the power cord retainer clip onto the right side of the top handle.
- Attach the top part of the handle to the middle part using the provided screws.
- Secure the power cord to the handle using the plastic holders.
Assembling the grass catcher
The grass catcher is supplied assembled. Lift the grass catcher cover, place the grass catcher on the scarifier, and ensure the hooks slide into the holes in the body. Release the cover.
Operation
Setting the working depth
Use the working depth adjustment lever to set the desired depth. Pull it upwards to adjust. Position 1 is for transport. The recommended working depth is no more than 3 mm.
Starting and stopping
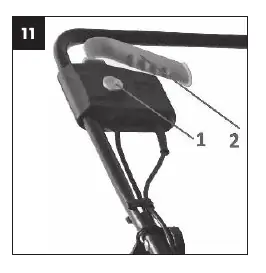
To start, press and hold the safety button, then pull the starting lever to the handle. Release the safety button. To turn off, release the starting lever.
Maintenance and Blade Replacement
Clean the scarifier after every use. Remove grass and debris from the wheels, cylinder, and cover. Do not use running water or high-pressure cleaners.
Replacing blades
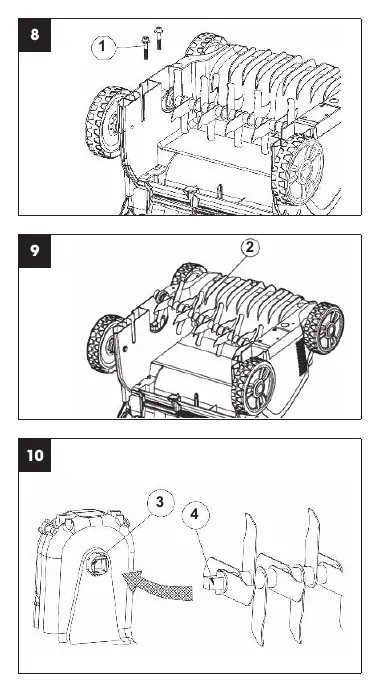
- Disconnect the machine from the power grid and wear work gloves.
- Unscrew the bolts on the underside of the chassis.
- Lift the cylinder at an angle and pull it out.
- Slide the new cylinder onto the drive shaft, ensuring the pin fits into the respective part of the drive shaft.
Technical Specifications
- Voltage/Frequency: 230-240 V / 50 Hz
- Rated power: 1,500 W
- Working width: 32 cm
- Working depth: -12, -8, -4, 4 mm
- Collection basket capacity: 40 l
- Weight: 8.5 kg
- Protection class: IPX4
Manufacturer information
Fieldmann
Practical help
Common problems
Motor stops during operation
The safety mechanism has triggered due to overload or caught blades. Release the starting lever, remove obstacles, wait several minutes for reset, and resume.
Poor scarification results
Check for blade wear. Adjust the working depth using the adjustment lever.
Before use
- Inspect the work area for foreign objects (stones, branches, rope).
- Check that all nuts and bolts are tight.
- Verify that safety mechanisms (start lever, rear lid) are not damaged.
- Ensure you are wearing solid footwear and long pants.
- Check the power cord for damage.
Specs in practice
- Working depth
- Adjustable settings (-12, -8, -4, 4 mm) to control how deep the blades penetrate the soil.
- Working width
- 32 cm, the effective area covered by the scarifier in one pass.
- Protection class IPX4
- Protected against splashing water from any direction.
Images and diagrams
- Fig 1: Overview of components including the switch, handle parts, and depth lever.
- Fig 2-6: Step-by-step guide for assembling the handle and attaching the power cord.
- Fig 8-10: Procedure for removing and replacing the scarification cylinder.
- Fig 11: Correct method for starting the machine using the safety button and lever.
Model compatibility
- Use only approved extension cords meeting DIN VDE 0620 requirements.
- Recommended to use a residual current device (RCD) with a maximum current rating of 30 mA.

Manual page author
David Miller
Documentation analyst
Organizes user manual content into clear summaries, with attention to model details, product context, and everyday usability.