Tools / Polishing Tools
User Manual for FLEX XFE 15 18.0-EC and XCE 8 18.0-EC Orbital Polishers
Quick guide for the FLEX XFE 15 18.0-EC and XCE 8 18.0-EC cordless orbital polishers. Includes setup, battery charging, operation, maintenance, and safety instructions.
Table of contents
Manual images
Click an image to enlargeQuick Guide
This manual provides essential operating and safety instructions for the FLEX XFE 15 18.0-EC and XCE 8 18.0-EC cordless orbital polishers. Always read the full safety section before use. Ensure you use only original FLEX batteries (AP 18.0/2.5-US or AP 18.0/5.0-US) and the specified charger (CA 12.0/18.0-US).
Intended Use
These hand-operated orbital polishers are designed for industrial applications and various polishing tasks, including paintwork on vehicles, furniture, and metal surfaces. They are intended for use with polishing sponges, lambswool, and wool pads that are rated for at least 500 r.p.m.
Overview
The tool features a grip hood with air outlets, a speed preselection dial, a locking button for continuous operation, and a main switch. The battery slot is located at the rear. The Velcro pad is used for attaching polishing tools.

Operating Instructions
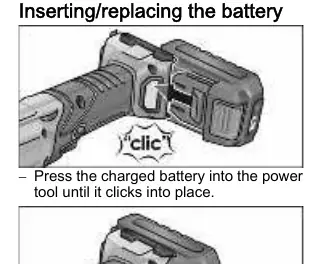
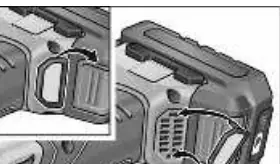
Battery Installation: Press the charged battery into the slot until it clicks into place. To remove, press the release button and pull the battery out.
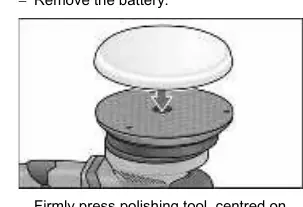
Attaching Polishing Tools: Remove the battery first. Firmly press the polishing tool, centered, onto the Velcro pad. Run the polisher for 30 seconds without load to check for imbalances or vibrations before applying it to the surface.
Speed Control: Use the dial to preselect the desired speed. Gently press the switch to accelerate the tool to the set speed. The tool features an automatic speed reduction if it overheats or is overloaded.
Operation: Switch the machine on before placing it on the surface. Move the polisher with light pressure in circular, overlapping movements.
Charger
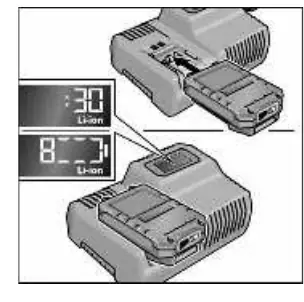
The CA 12.0/18.0 charger is designed for FLEX batteries. Insert the battery until it clicks. The display shows the remaining charging time and state of charge. The backlighting turns orange when charged below 80% and green when 80% or higher is reached. If the display flashes, check for faults or temperature issues (charging range 0°C to 55°C).
Maintenance and Care
Cleaning: Regularly clean the tool and ventilation slots. Blow out the housing interior and motor with dry compressed air. Clean plastic parts with a soft, damp cloth; never use solvents.
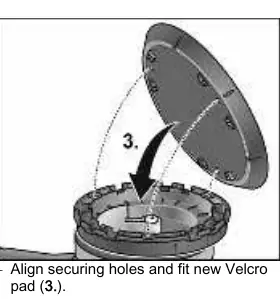
Velcro Pad Replacement: Remove the battery and polishing tool. Place the machine on its back. Use a wrench to remove the screws, replace the worn Velcro pad, and tighten the new pad with the specified torque (2.5-3.0 Nm).
Safety
Always wear eye protection. Keep bystanders at a safe distance. Do not use damaged accessories. Ensure the tool is switched off before changing batteries or accessories. Do not operate near flammable materials. Store the tool and batteries within the specified temperature ranges (0°C to 40°C for use; -25°C to +85°C for storage).
Manufacturer information
FLEX
Practical help
Common problems
Battery not charging or display flashing
Check if the battery is too hot or too cold (must be 0°C-55°C). If the display flashes rapidly red, the battery or charger may be faulty.
Excessive vibrations
Ensure the polishing tool is centered correctly on the Velcro pad. Check if the pad is worn or damaged.
Tool stops or slows down during operation
The tool has likely triggered overload or overheating protection. Allow it to cool down before continuing.
Before use
- Check for missing or damaged parts.
- Ensure the battery is fully charged.
- Verify the polishing tool is undamaged.
- Ensure the switch is in the off position before inserting the battery.
- Check that the Velcro pad is securely attached.
Images and diagrams
- The overview diagram identifies the grip hood, speed dial, switch, locking button, and battery slot.
- The charger diagram illustrates the insertion slot, ventilation, and status display.
Model compatibility
- Use only FLEX batteries AP 18.0/2.5-US and AP 18.0/5.0-US.
- Use only FLEX charger CA 12.0/18.0-US.

Manual page author
David Miller
Documentation analyst
Organizes user manual content into clear summaries, with attention to model details, product context, and everyday usability.