Electronics / Speakers & Soundbars
User Manual for Focal Theva N°1, N°2, N°3 Loudspeakers
Quick guide for Focal Theva N°1, N°2, and N°3 loudspeakers. Includes setup, base installation, wiring, positioning, and technical specifications.
Table of contents
Manual images
Click an image to enlargeQuick guide from the manual
This document provides essential setup and usage instructions for the Focal Theva N°1, N°2, and N°3 loudspeakers. Proper installation and positioning are critical for achieving the best sound quality.
Handling and Assembly
Handling: Theva N°2 and N°3 loudspeakers are heavy (almost 20kg). We strongly advise having two people lift them during unpacking and installation. Be careful of sharp corners.
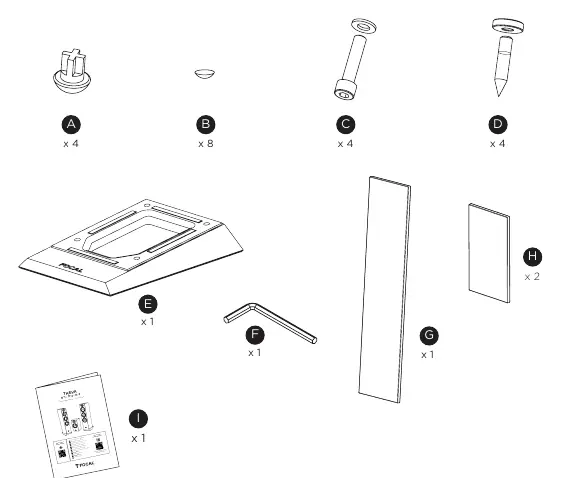


Fixing the base (N°2, N°3): Align the base with the fixing holes, insert the 4 supplied screws, and tighten them using the provided Allen key. Ensure the base is oriented correctly (upper part at the front). Attach rubber feet for hard floors or spikes for carpeted floors to ensure stability.
Fixing silicone feet (N°1): If placing the N°1 bookshelf speakers on a shelf or furniture, stick the included silicone feet to the bottom before installation.
Grilles: The speakers come with magnetic grilles. We recommend removing them during listening sessions for optimal performance.
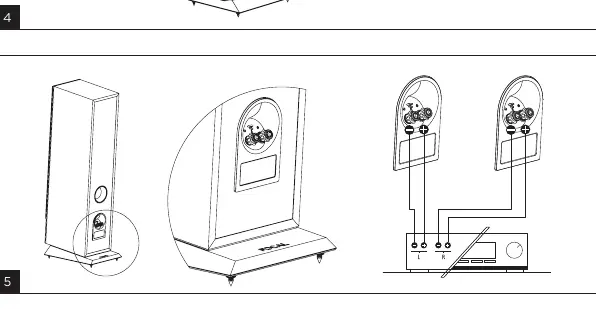
Connections
Theva connectors accept stripped cables (up to 4mm diameter), fork terminals, or banana connectors. It is imperative to respect the polarity: connect the '+' terminal on the amplifier to the '+' terminal on the speaker, and '-' to '-'. Incorrect polarity will severely compromise the stereo image and bass performance.
Positioning and Optimisation
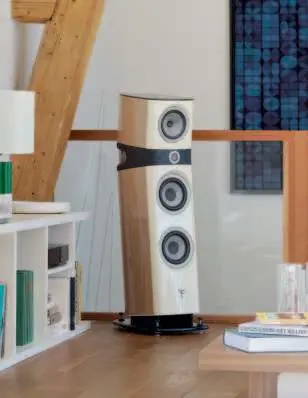
Positioning: Position the speakers symmetrically, facing the listening area, ideally forming an equilateral triangle. The tweeters should be at the same height as the listener's ears. Avoid placing speakers too close to corners or walls to prevent unwanted resonance and artificial bass boost.
Optimisation: If the bass is insufficient, move the speakers closer to a wall. If the sound is harsh, add sound-absorbing materials (carpets, curtains) to the room. If the sound is flat, introduce sound-reflecting materials (furniture) to balance the acoustics.
Break-in Period
The speaker drivers require a break-in period to adapt to the temperature and humidity of your environment. This may last a few weeks. To speed this up, operate the speakers for approximately 20 consecutive hours.
Maintenance
Clean the speakers only with a dry cloth. If they become dirty, use a damp cloth. Never use solvents, detergents, alcohol-based products, or scourers.
Manufacturer information
Focal
Practical help
Common problems
Stereo perception is imprecise and poorly centred
Try moving the loudspeakers closer together and/or angling them to face the listening point.
Sound is harsh or aggressive
The room is likely too reverberant. Use sound-absorbing materials like carpets, upholstered furniture, or curtains.
Sound is flat or strangled
There are too many sound-absorbing materials in the room. Introduce sound-reflecting furniture to balance the acoustics.
Before use
- Unpack carefully; N°2 and N°3 require 2 people to lift.
- For N°2/N°3: Attach the base using the 4 screws and Allen key provided.
- For N°1: Stick the silicone feet on the bottom if placing on a shelf.
- Check polarity: Connect '+' to '+' and '-' to '-' on the amplifier.
- Ensure speakers are at the same height and horizontal plane.
- Remove magnetic grilles for best listening performance.
Specs in practice
- Nominal impedance
- The standard electrical resistance (8 Ohms), important for amplifier compatibility.
- Recommended amp power
- The range of amplifier power suitable for driving these speakers safely and effectively.
Images and diagrams
- Figure A/B: Base assembly instructions for floorstanding models.
- Figure E: Wiring connection diagram showing polarity.
- Figure F/G/I: Positioning guidelines for optimal soundstage and bass response.
Model compatibility
- Compatible with stripped cables (up to 4mm), fork terminals, or banana connectors.
- N°2 and N°3 are floorstanding; N°1 is a bookshelf model.

Manual page author
Michael Turner
Technical manual editor
Reviews PDF manuals for structure, safety notes, and practical product details so readers can find the right information quickly.