Automotive / Roof Racks
Installation Guide for Front Runner Load Bar Kit for Suzuki Jimny (2018-Current)
Step-by-step installation guide for the Front Runner Load Bar Kit on a Suzuki Jimny (2018-Current). Includes component lists, assembly instructions, torque settings, and safety warnings.
Quick answers from the manual
Quick answer
- This document provides installation instructions for the Front Runner Load Bar Kit (KRSJ007) on a Suzuki Jimny (2018-Current). It covers component assembly, mounting to the vehicle, and torque specifications. p. 1, 2, 3, 4
Key actions
- Assemble the legs to the slats using M8 Schnorr Washers and M8 Nyloc Nuts. p. 3
First start
- Position the bars 1100mm apart (center to center) on the vehicle gutters and tighten all fasteners. p. 4
Technical specifications
| Parameter | Value | Meaning | Pages |
|---|---|---|---|
| M6 Torque | 8-10Nm | Tightening torque for M6 fasteners | p. 4 |
| M8 Torque | 15-20Nm | Tightening torque for M8 fasteners | p. 4 |
Where to find it in the PDF
- Components and Tools p. 2
- Assembly p. 3
- Installation p. 4
Table of contents
Manual images
Click an image to enlargeImportant Information
This document provides the installation procedure for the Front Runner Load Bar Kit designed for the Suzuki Jimny (2018-Current). Before beginning, ensure you have all components and the required tools. Always refer to your vehicle manufacturer's stated roof load rating, as it may be lower than the rack's capacity. Improper installation can lead to accidents or void your warranty.
Components Included
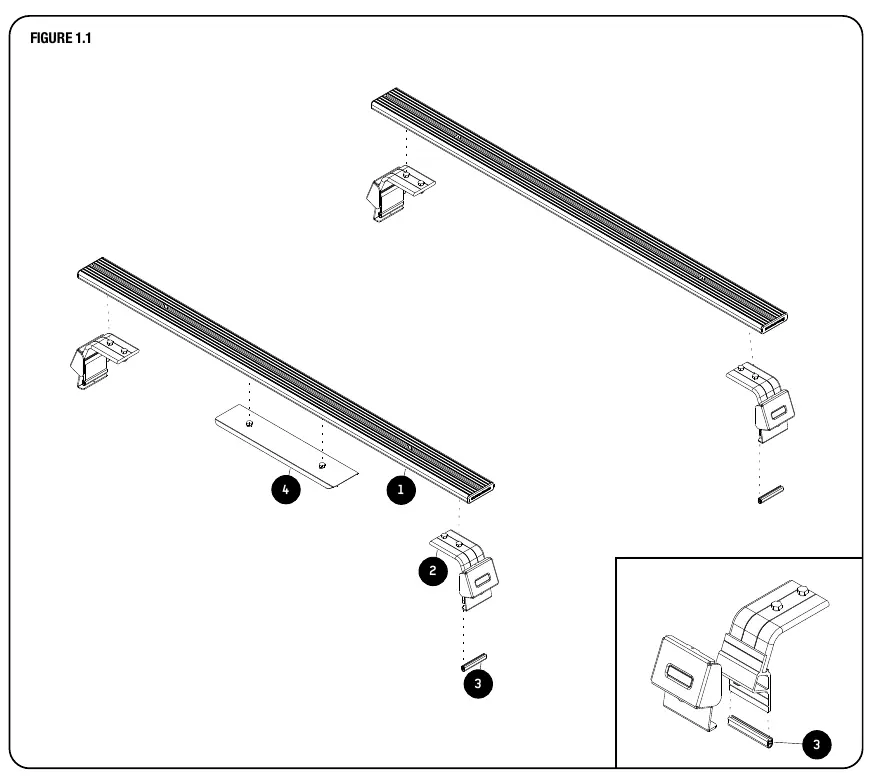
- 1 x Load Bar 1345mm (L)
- 4 x Load Bar Leg
- 2 x Pinch Weld (Pack of 6)
- 1 x Wind Deflector 10mm
Tools Required
- 3mm Allen key
- 5mm Allen key
- 13mm wrench
Assembly Instructions
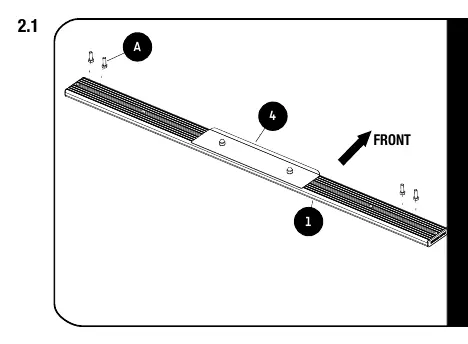
Step 2.1: Preparing the Load Bars
Flip the Load Bar so that the bottom of the Wind Deflector faces up. Place the remaining Load Bar next to it. Insert 2 x M8x25 Hex Bolts into each side of the machined slots in the slats. Repeat this for both Load Bars.
Step 2.2: Leg Assembly
Assemble the legs according to the specific fitment guide for LASSUNI (referenced in the manual).
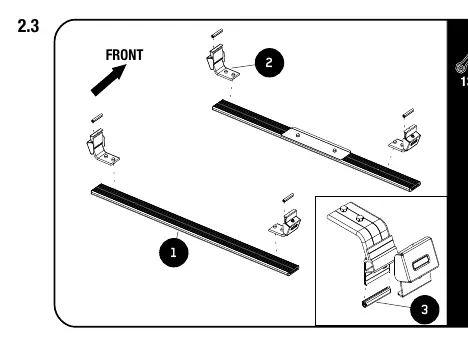
Step 2.3: Mounting Legs to Slats
Loosely mount the 2 x legs to the slats using the M8 Schnorr Washers and M8 Nyloc Nuts included in the leg sets. Assemble the legs with the Pinch Weld.
Installation on Vehicle
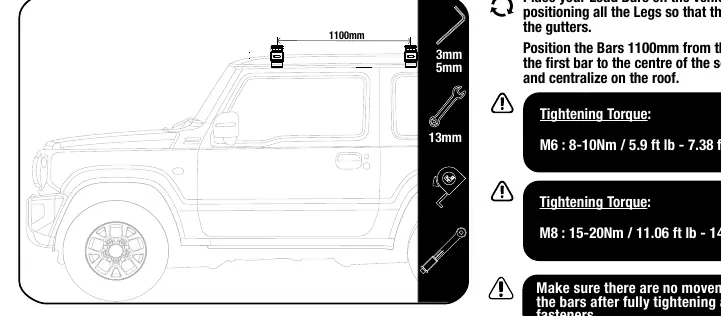
Step 3.2: Positioning
Place your Load Bars on the vehicle, ensuring all legs rest securely on the gutters. Position the bars 1100mm from the center of the first bar to the center of the second bar and centralize them on the roof.
Step 3.3: Final Tightening
Center the rack and tighten all fasteners fully. Finish by placing M8 Nut Caps over the M8 Nyloc Nuts. Ensure there is no movement on the bars after tightening.
Torque Specifications
- M6 Fasteners: 8-10Nm (5.9 - 7.38 ft lb)
- M8 Fasteners: 15-20Nm (11.06 - 14.75 ft lb)
Practical help
Common problems
Movement of bars after installation
Ensure all fasteners are fully tightened to the specified torque settings (M6: 8-10Nm, M8: 15-20Nm).
Unsure about load capacity
Refer to your vehicle manufacturer's stated roof load rating, as it may be lower than the rack's capacity.
Before use
- Verify all components are present (Load Bar, Legs, Pinch Weld, Wind Deflector).
- Ensure you have the required tools (3mm, 5mm, 13mm).
- Read the specific fitment guides for WDLB001 and LASSUNI if referenced.
- Check vehicle roof for cleanliness before installation.
Images and diagrams
- Figure 1.1 shows the exploded view of the load bar assembly.
- Steps 2.1-2.3 detail the assembly of the legs to the slats.
- Step 3.2 illustrates the positioning of the bars on the vehicle gutters.
Model compatibility
- Designed specifically for Suzuki Jimny (2018-Current).
- Requires reference to WDLB001 and LASSUNI fitment guides for specific components.

Manual page author
David Miller
Documentation analyst
Organizes user manual content into clear summaries, with attention to model details, product context, and everyday usability.